# Welcome to Gan.AI

Gan.AI is reshaping the way the world creates videos. In a world where attention spans are shrinking and content demands are exploding. Gan.AI brings a refreshing, futuristic, and incredibly practical

**Realistic AI Avatars That Feel Human**

One of Gan.AI’s most magical features is its AI avatars. These are lifelike digital presenters that talk, move, and express emotion just like real humans. You can choose from stock avatars or create a custom avatar that looks and sounds like you. Just type a script, and the avatar delivers it flawlessly — no retakes, no lighting setup, no complicated shoots. It’s perfect for product demos, explainer videos, onboarding content, and outreach messages where human presence matters.

***

**Personalization at Massive Scale**

Imagine sending 10,000 leads a personalized video where the presenter says their name, mentions their company, shows their product, or speaks in their language. Gan.AI makes this possible with one of its biggest superpowers: video personalization. You create one template, add variables like “@name” or “@company,” upload a spreadsheet or integrate your CRM, and Gan.AI generates thousands of customized videos automatically.

This is a game-changer for sales and marketing teams looking to boost engagement, conversions, and customer connection.

***

**Cinematic Ads and Creative Automation**

Gan.AI doesn’t just make talking-head videos — it also helps you create cinematic, high-impact ads from just your product images. With built-in templates, music, transitions, and animations, even non-designers can create professional ads in minutes. What used to take days in Premiere Pro or After Effects now takes a few clicks.

***

**Multilingual Voice Generation**

Brands can instantly translate and localize content for global audiences without hiring voice actors or worrying about pronunciation. The lip-sync is smooth, the emotion is realistic, and the results feel authentic.

***

**Designed for Businesses of All Sizes**

Whether you’re an individual creator experimenting with AI or a large enterprise running global campaigns, Gan.AI scales effortlessly.

***

**Key benefits include:**

1. Fast video creation
2. Custom revisions
3. Instant localization
4. Lower production costs
5. CRM and automation integrations
6. Custom landing pages
7. Easy sharing and downloads

***

**Why Gan.AI Matters**

Gan.AI isn’t just another AI tool—it’s the beginning of a new era in video creation. It empowers anyone to tell stories, explain ideas, market products, and build human connection without the usual barriers of time, cost, or technical skill.

It brings creativity back to the people while taking care of the heavy lifting. Whether you're creating one video or one million, Gan.AI makes it possible, simple, and fun.

<table data-view="cards"><thead><tr><th></th><th></th><th></th><th data-hidden data-card-cover data-type="files"></th><th data-hidden data-card-target data-type="content-ref"></th></tr></thead><tbody><tr><td></td><td><a href="/pages/cmEO2nKxoef8460Gu2GZ">Our Products</a></td><td>AI Avatar &#x26; Cinematic Ads</td><td><a href="/files/FgqjUBVz7tAXlEfNtuDd">/files/FgqjUBVz7tAXlEfNtuDd</a></td><td><a href="/pages/k8DNAzgwzuJI3TW1MslV">/pages/k8DNAzgwzuJI3TW1MslV</a></td></tr><tr><td></td><td><a href="/pages/a0VL8B6kdwPfjsfw2Gaz">Automatic Backgrounds</a> </td><td>Automatic Backgrounds in Gan.AI</td><td><a href="/files/8QIsmCEHKv31LTNVPf4e">/files/8QIsmCEHKv31LTNVPf4e</a></td><td><a href="/pages/t5Ysj2g6YqMxNDaRFWmZ">/pages/t5Ysj2g6YqMxNDaRFWmZ</a></td></tr><tr><td></td><td><a href="/pages/EDkbD24r6zC2LDnNViqk">Chrome Extension</a></td><td>Instant video recorder with personalization</td><td><a href="/files/nr2V1SLnMZmBLv7cND9m">/files/nr2V1SLnMZmBLv7cND9m</a></td><td><a href="/pages/ZJ728qnfqku2F2Yc2QyS">/pages/ZJ728qnfqku2F2Yc2QyS</a></td></tr><tr><td></td><td><a href="/pages/IfQOZPQgIrxkU2WP8CHE">Personalization</a></td><td>Custom landing pages, subtitles &#x26; backgrounds</td><td><a href="/files/lHERxQpRYAr7bEpoDb9i">/files/lHERxQpRYAr7bEpoDb9i</a></td><td><a href="/pages/6H4z7e7xDiIzkXsEPOsa">/pages/6H4z7e7xDiIzkXsEPOsa</a></td></tr><tr><td><p></p><p><a href="/pages/vOfUhGJjCyCCCG8uar45">AI Personalization</a></p></td><td>AI lip sync, voice cloning &#x26; visual personalization</td><td></td><td><a href="/files/sWiEUuMGH6jT4Fay7V3G">/files/sWiEUuMGH6jT4Fay7V3G</a></td><td><a href="/pages/MAHnWiKO8dXYY1EOWHFg">/pages/MAHnWiKO8dXYY1EOWHFg</a></td></tr><tr><td><p></p><p><a href="/pages/UIIIy9E6TmmvBsHvMfzC">Custom Branding</a></p></td><td>AI-generated templates &#x26; custom landing pages</td><td></td><td><a href="/files/VmY8rQvqF2CTGWNeFr7q">/files/VmY8rQvqF2CTGWNeFr7q</a></td><td><a href="/pages/2A3YYUd44pJg8QRYm7Zi">/pages/2A3YYUd44pJg8QRYm7Zi</a></td></tr><tr><td><p></p><p><a href="/pages/aEpq6dS76Exf5bUHldI7">Video Generation</a></p></td><td>Generate multiple copies with just one click</td><td></td><td><a href="/files/hESvhu66wWbksHrsE7PI">/files/hESvhu66wWbksHrsE7PI</a></td><td><a href="/pages/0lIncPW4xOJA43D1hTaw">/pages/0lIncPW4xOJA43D1hTaw</a></td></tr><tr><td><p></p><p><a href="/pages/QIYb9r8X20LRYzU6ocYF">Integrations</a></p></td><td>Connect with platforms &#x26; automate your outreach </td><td></td><td><a href="/files/5GxMI8Yptr7zM0Mu0Ldm">/files/5GxMI8Yptr7zM0Mu0Ldm</a></td><td><a href="/pages/ZQ8cn32AVARDjVvsvlqd">/pages/ZQ8cn32AVARDjVvsvlqd</a></td></tr><tr><td><p></p><p><a href="/pages/mpoWRboN4YVx9NRGEpbm">Other</a></p></td><td>Support, pricing, FAQs, &#x26; more</td><td></td><td><a href="/files/BF4mGPtu1NKlVtRI0XFl">/files/BF4mGPtu1NKlVtRI0XFl</a></td><td></td></tr></tbody></table>


# Creating your Gan.AI account&#x20;

Get started with Gan.AI quickly using fast login options and a simple signup process. Create custom AI videos, use avatars and voice tools, and analyze video performance—all from one easy platform.

### Bring your ideas to life with GAN.AI—follow these easy steps to start creating an Account

#### 1. Go to the Gan.AI Studio login page

* Visit 👉[ https://studio.gan.ai/login](https://studio.gan.ai/login)
* When you reach the login page for GAN.AI, you'll see two quick sign-in options: “**Continue with Google**” and “**Continue with Microsoft.**” You can simply click either button to log in using your Google or Microsoft account—making registration fast and secure, with no need to create a separate password. This lets you start creating AI videos in seconds.

<p align="center"> <img src="/files/Ms92qzEolyF8L0ZBD3Js" alt=""></p>

#### **2. Sign in using Google:**

* Click on the button labeled “**Continue with Google**” to start logging in with your Google account.<br>
* A list of your Google accounts will appear; select the one you want to use, or enter your Google login details if asked.<br>
* When prompted, allow Gan.AI to access basic info from your Google account, like your name and email address.<br>
* Once permission is granted, you’ll be automatically signed in to your Gan.AI workspace, ready to create videos.<br>
* Gan.AI uses your Google information only to keep your account safe and confirm your identity.

#### **3: Sign in Using Microsoft:**

1. Click “**Continue with Microsoft**” to start the login process using your Microsoft account. This option makes signing in quick by linking Gan.AI to your existing Microsoft credentials.<br>
2. Enter your Microsoft account details—either your work or personal email and password. This verifies your identity securely using Microsoft’s trusted authentication system.<br>
3. Approve the permissions requested by Gan.AI. This allows Gan.AI to access your basic profile information, such as your name and email, to set up your account.<br>
4. After approval, you will be automatically redirected to your Gan.AI Studio dashboard, where you can begin creating AI videos and managing your projects.<br>
5. Your Microsoft login details remain private — Gan.AI never stores your password.

#### **4: Sign up using the Signup page:**

1. URL - [https://studio.gan.ai/signup](<https://studio.gan.ai/signup&#xA;>)

<p align="center"><img src="/files/Snr2tWpl0WehrmGzTbQP" alt=""></p>

2. Enter your Email, your Name, and your Password, and click Sign up.
3. Once done, you will get an email from Gan.AI to verify your account.

#### **5:  You’re All Set!**

&#x20;      You can now start exploring:

* **Create Your First Personalized Video** - Start by recording a single video or uploading a clip. With Gan.AI, you can tag names, locations, or other details that require personalization. The platform uses AI to create hundreds or thousands of unique videos automatically—each tailored for a specific person—saving you time while boosting relevance and engagement.<br>

* **Access AI Avatars, Templates, and Voice Tools** - Gan.AI offers a library of realistic AI avatars and easy-to-use templates. You can choose a stock avatar or create your own by uploading a photo. Advanced voice tools let you clone your own voice or use lifelike text-to-speech, ensuring your message sounds natural and authentic. Lip-sync and visual editing features also add a professional touch with no coding needed.

* **Track Video Analytics** - Once your videos are sent out, Gan.AI tracks key analytics like views, clicks, completion rates, and audience responses. You get instant insights into which personalized content works best, helping you optimize future campaigns and measure success in real time.

<figure><img src="/files/lUfe5yFkvgrqKqXvViJN" alt=""><figcaption></figcaption></figure>

“With your Gan.AI account set up, you’re now ready to unlock the full power of AI-driven video creation. Whether you want to generate hyper-personalized messages, craft stunning avatar-based content, or streamline your marketing with automated video workflows, Gan.AI gives you everything you need in one intuitive platform. Explore the tools, experiment with features, and start creating videos that connect, convert, and scale effortlessly.


# Dashboard overview

Gan.AI Video Dashboard – Manage Projects, Create AI Videos, Record Screens, Use Avatars & Streamline Your Workflow

Once you’ve logged in to Gan.AI, you’ll land on the **Dashboard** — your command center for creating, managing, and tracking AI-generated videos.

The dashboard provides a quick snapshot of all your tools, projects, personalized video campaigns, and credits, helping you take control of every step in your video creation workflow.

<p align="center"><strong>Home</strong></p>

<figure><img src="/files/O9yhcPTFWTONZgVtkJqH" alt=""><figcaption></figcaption></figure>

1. **Left Navigation Panel**

The left navigation panel provides quick access to the platform’s core features and account controls:

• Home

&#x20;Redirects users to the main dashboard, where all creation options are available.

• My Videos

&#x20;Displays all previously generated and saved videos for easy access, review, and management.

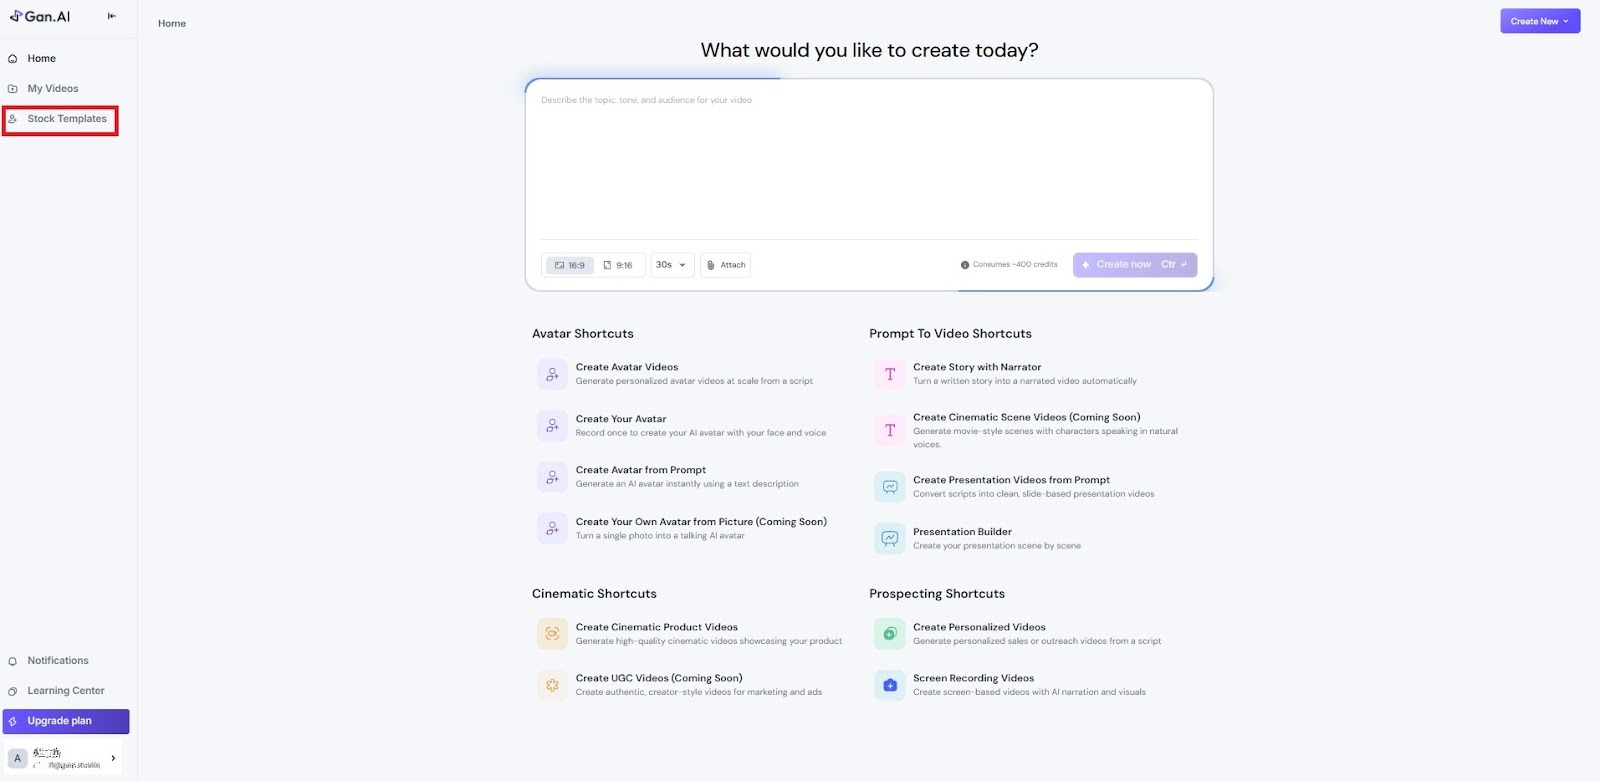
• Stock Templates

&#x20;Allows users to browse and leverage pre-designed video templates for faster creation.

• Notifications

&#x20;Shows important system alerts, updates, and platform announcements.

• Learning Center

&#x20;Provides tutorials, guides, and educational resources to help users maximize platform usage.

• Upgrade Plan

&#x20;Enables users to upgrade their subscription for additional features and credits.

• User Profile

&#x20;Displays the logged-in account with options for profile and account management.

<figure><img src="/files/KFY2QLQT6vOMRKDZom99" alt=""><figcaption></figcaption></figure>

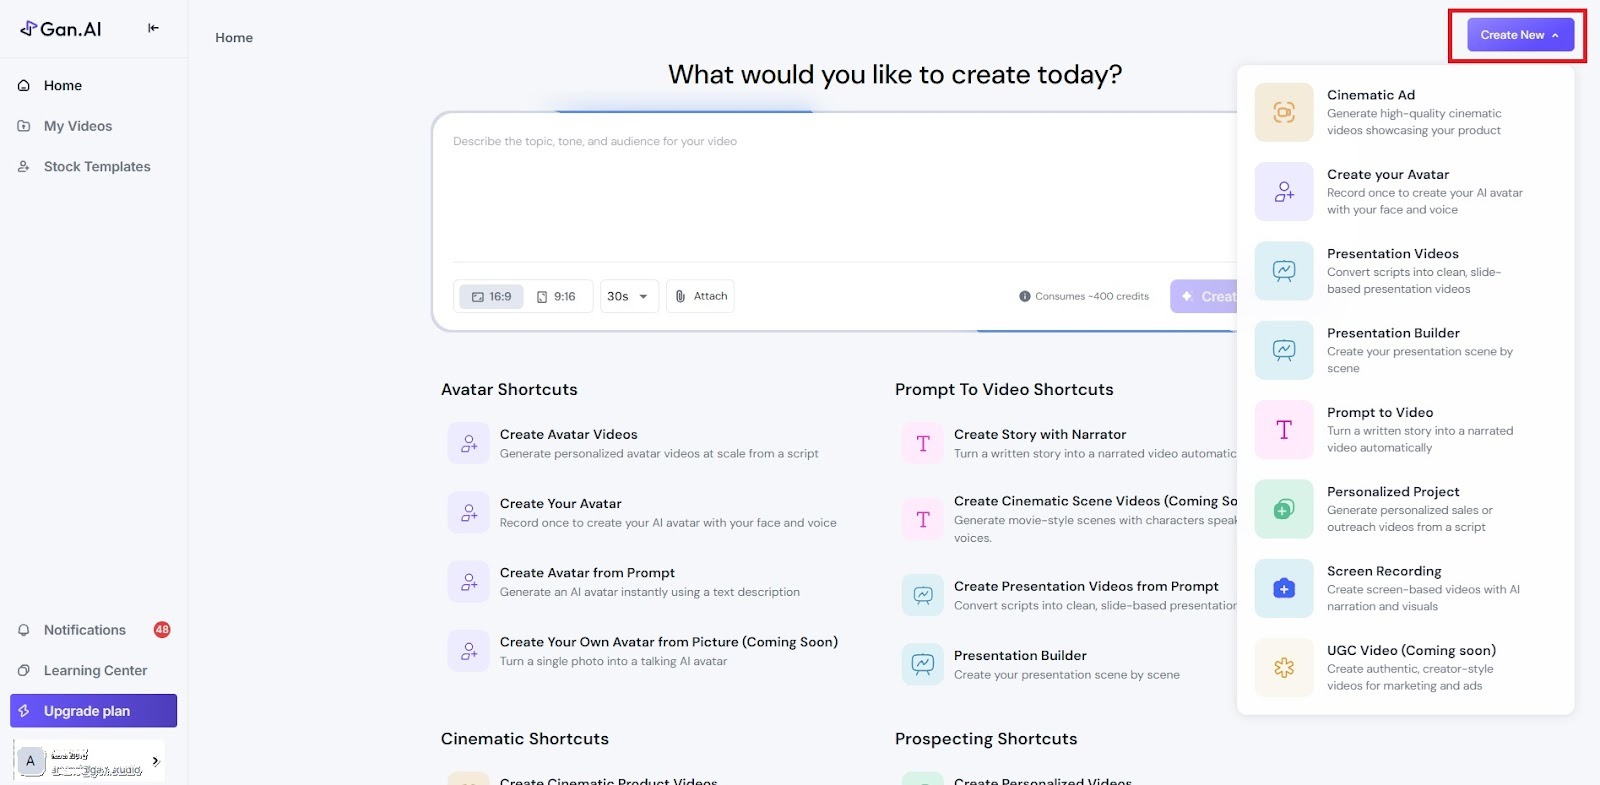
* Click “**Create Now**” to instantly generate and proceed with the creation.

<figure><img src="/files/wdjggaIDKLgAJ6ccNWEZ" alt=""><figcaption></figcaption></figure>

1. Cinematic Ad

* Generates high-quality cinematic videos designed for product promotion and advertising.

Use Case:

* Product advertisements
* Brand marketing campaigns
* Visually rich promotional videos

2. Create Your Avatar

* &#x20;Allows users to record themselves once to create a custom AI avatar with their face and voice.

Use Case:

* Personalized avatar videos
* Consistent brand spokesperson
* Sales, training, or explainer videos

3. Presentation Videos

* &#x20;Converts written scripts into clean, professional, slide-based presentation videos automatically.

Use Case:

* Business presentations
* Educational content
* Corporate training videos

4. Presentation Builder

* &#x20;Enables users to build presentations scene-by-scene, giving more control over structure and flow.

Use Case:

* Detailed presentations
* Custom storytelling
* Step-by-step visual explanations

5. Prompt to Video

* &#x20;Transforms a written story or prompt into a fully narrated video automatically.

Use Case:

* Storytelling
* Informational videos
* Script-to-video automation

6. Personalized Project

* &#x20;Generates personalized sales or outreach videos from a script, tailored for individual viewers.

Use Case:

* Sales outreach
* Lead engagement
* Personalized marketing communication

7. Screen Recording

* &#x20;Creates screen-based videos enhanced with AI narration and visuals.

Use Case:

* Product demos
* Tutorials and walkthroughs
* Feature explanations

8. UGC Video (Coming Soon)

* &#x20;Creates authentic, creator-style user-generated content videos for marketing and advertising.

Use Case:

* Social media ads
* Influencer-style promotions
* Trust-based marketing video<br>

<p align="center"><strong>My Videos</strong></p>

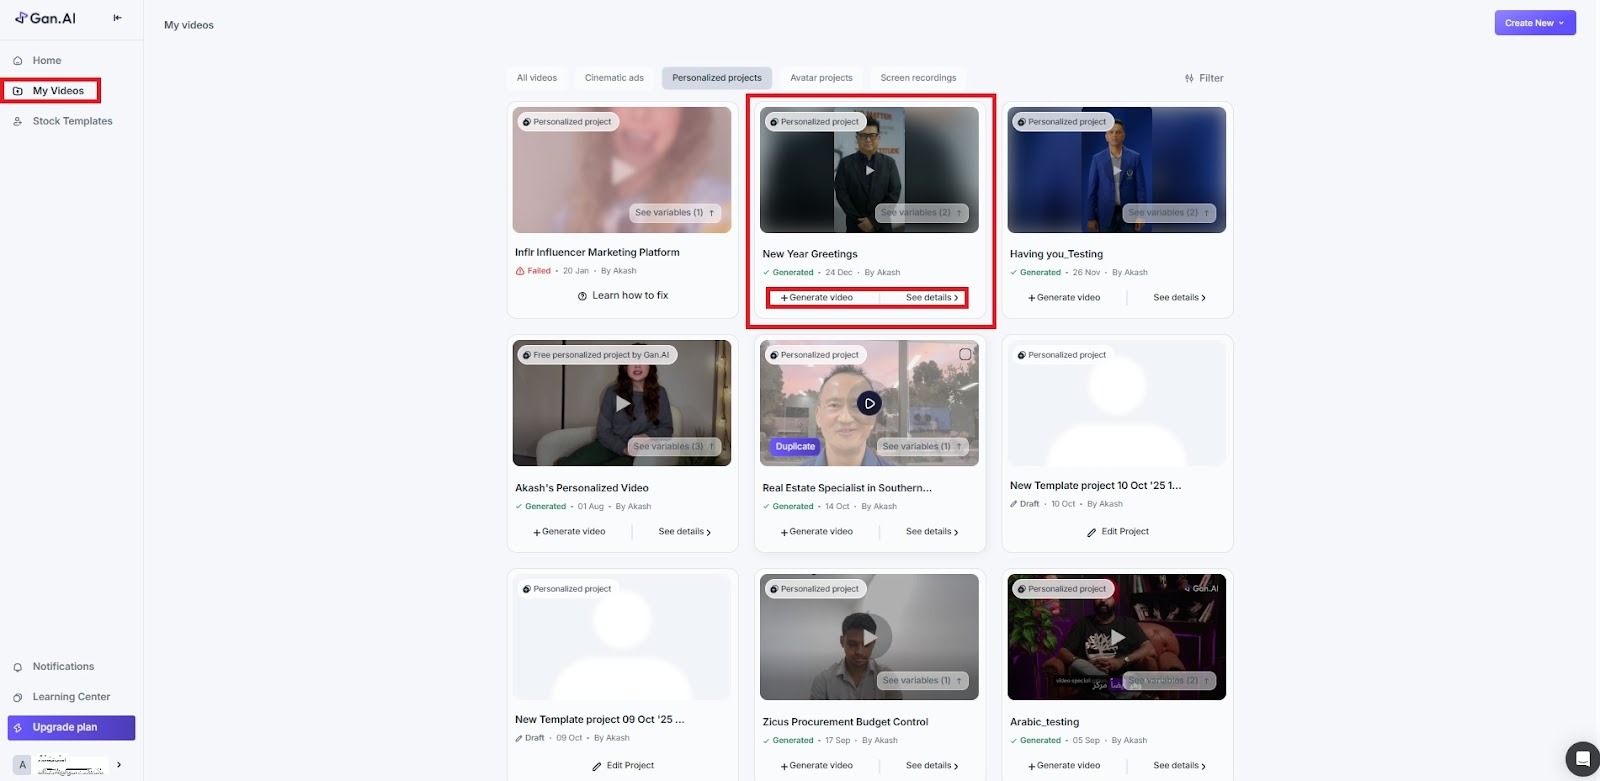
<figure><img src="/files/1IJp4VcLru53gy3bDADj" alt=""><figcaption></figcaption></figure>

From “**My Videos,”** you can view, manage, and edit all your saved projects. This section is your project library, where all your created, uploaded, or AI-generated videos are stored. It’s designed for quick access and easy management of your entire content library.

&#x20;                                                                                   **Stock Templates**

<figure><img src="/files/C9qrcAuHsv3CH4jzN4rm" alt=""><figcaption></figcaption></figure>

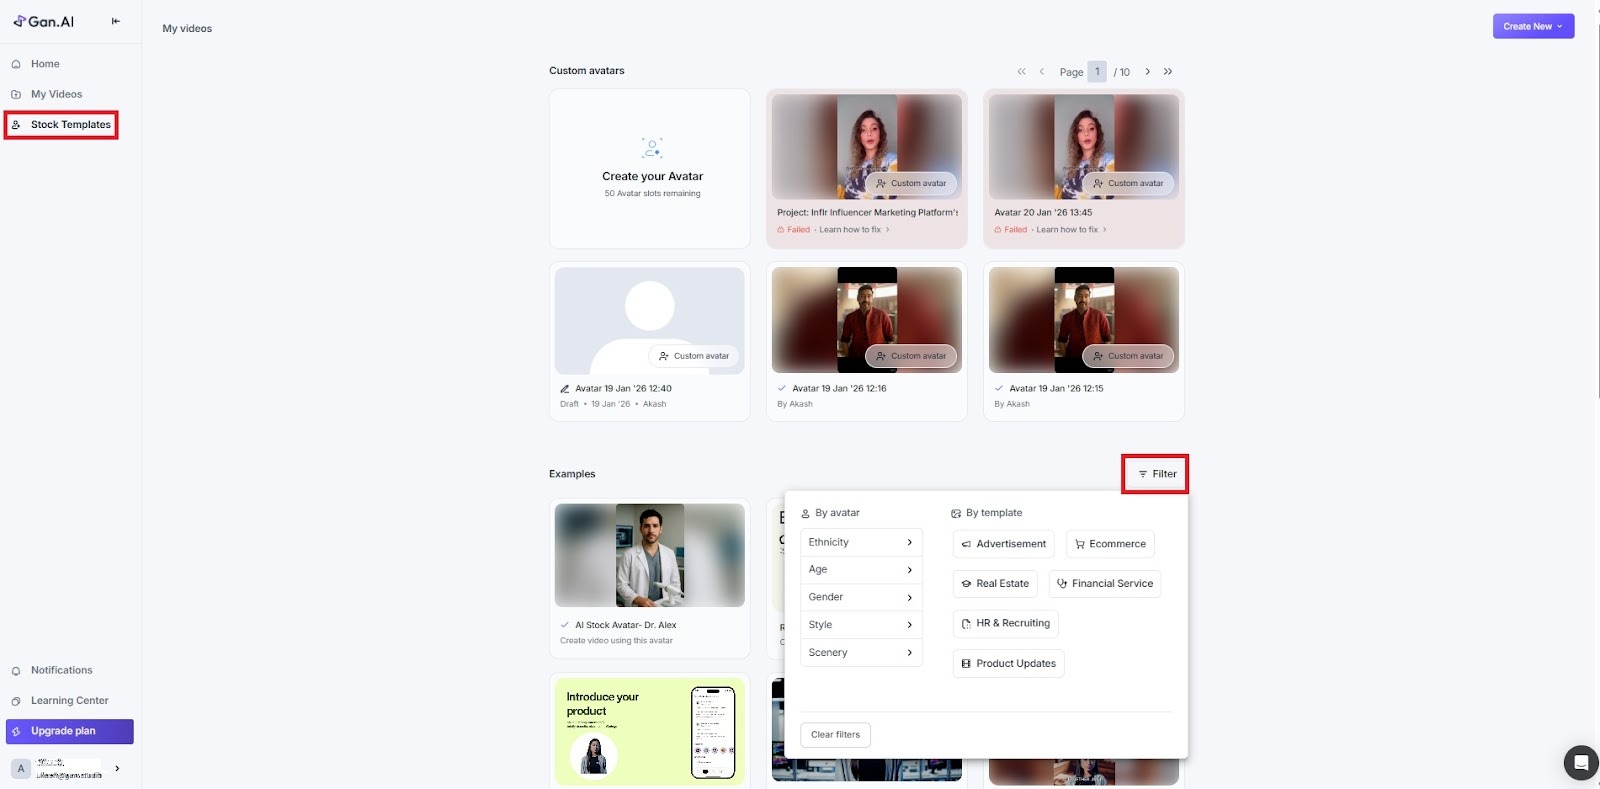
This section allows you to manage your existing AI avatars or create new ones.\
You can record or upload your own video to [generate an AI avatar](https://www.gan.ai/create-your-free-realistic-ai-avatar-generator-maker-online) that speaks your scripts naturally, matching your tone and facial expressions. You can also use our stock Avatars and generate the videos.\
It also lets you preview, rename, and organize your avatars for different projects, ensuring quick access when creating new videos.

💡 **Tip: Keep multiple avatars for various communication styles — for example, one for marketing outreach and another for internal training videos.**

**Notifications:** All account, avatar, and project-related updates will appear in the **Notifications** tab, ensuring you never miss important activity.

<figure><img src="/files/fgj5Nr3TJVwtiKNZzT3n" alt=""><figcaption></figcaption></figure>

<p align="center"><strong>Profile Menu Overview</strong></p>

Clicking the “**profile**” icon in the top-right corner of your Gan.AI dashboard opens your **Profile Menu**, where you can access important account-level settings, tools, and support options.

<figure><img src="/files/2haxb8rYc0xSMI7UR0MA" alt=""><figcaption></figcaption></figure>

* **Settings:** This section allows you to manage your account details.
* **Install Extension:** Use this option to install the Gan.AI Chrome Extension. The extension helps you create and share personalized AI videos directly from your email or CRM tools — such as Gmail or HubSpot — without needing to open the dashboard.

💡 **Tip: Once installed, pin the extension in your browser for easy access.**

* **Integrations:** This option provides access to all available third-party integrations for [Gan.AI](http://gan.ai). You can connect tools like HubSpot, Salesforce, Gmail, or LinkedIn to sync data and automate personalized video campaigns.\
  Integration simplifies your workflow and ensures seamless content delivery between your favorite platforms.

💡 **Tip: Always verify that your CRM or marketing tool permissions are active before connecting.**

* **Chat with Support:** Need help? Use this option to instantly connect with Gan.AI’s customer support team via live chat. You can ask questions, report issues, or request guidance on using advanced features — directly from your workspace. The support team typically responds within minutes during business hours.

**💡 Tip: Before reaching out, check the Help Center — most quick answers are already available there.**

* **Sign Out:** Click Sign Out to log out of your Gan.AI account safely. Always sign out when using shared or public devices to protect your account and project data.

💡 **Tip: Your ongoing projects are autosaved — you can continue right where you left off after logging back in.**

With the Gan.AI Dashboard as your central workspace, you have everything you need to create, customize, and manage high-impact AI videos—all in one intuitive interface. From generating ideas and avatars to organizing projects, integrating tools, and tracking performance, every feature is designed to streamline your workflow and empower you to produce professional-grade content effortlessly. Explore each section, experiment with tools, and let Gan.AI help you transform your video creation process from start to finish.


# Product Overview

Gan.AI empowers brands to produce studio-quality videos in minutes using AI avatars, cinematic video ads, personalized content, and faceless generative videos. Discover the right tool for your goals.

### 1. AI Avatar

Bring your brand to life with intelligent digital avatars.

GAN.AI’s AI Avatar feature allows you to create a realistic, human-like [AI spokesperson](https://www.gan.ai/ai-generated-spokesperson-video-creator-maker) who can speak, emote, and represent your brand in any language or tone.\
You can use these avatars to generate studio-quality spokesperson videos — without requiring cameras, actors, or production setups.

#### Key Highlights

* Create a digital version or an [AI talking head video](https://www.gan.ai/talking-heads-ai-video-generator)
* Speak in multiple languages and accents
* Customize voice tone, gestures, and expressions just by giving a simple prompt.
* Ideal for corporate videos, tutorials, and marketing explainers
* Save time and cost compared to traditional shoots

#### Popular Use Cases

* Internal training or HR videos
* Product demos and walk-throughs
* Personalized greetings or onboarding videos
* Multilingual content creation

***

### 2. Cinematic Ads

AI-generated, high-impact ad videos for brands.

Our [Cinematic AI Video Ad Generator](https://www.gan.ai/best-online-ai-video-ad-advertisement-maker-creator-generator-free) helps marketers produce story-driven, cinematic-quality video advertisements. All powered by AI creativity and automation.\
These videos combine rich visuals, dynamic scenes, and emotionally engaging storytelling tailored to your campaign objectives.

#### Key Highlights

* [AI-powered script-to-video generation<br>](https://www.gan.ai/best-ai-script-text-to-video-generator-creator-maker-tool-free)
* Pre-trained visual storytelling templates<br>
* Automatic music and transition synchronization<br>
* Ultra-realistic lighting, motion, and color grading<br>
* Designed for social media, OTT, and digital ads

#### Popular Use Cases

* Brand campaigns and product launches<br>
* E-commerce and fashion promos<br>
* Festive or seasonal ad creatives<br>
* Influencer-style short-form video ads

***

### 3. Video Personalization

Deliver unique, [AI personalized videos](https://www.gan.ai/ai-personalized-videos) for every customer — at scale.

GAN.AI’s Video Personalization Engine allows you to automatically replace names, logos, messages, and visuals inside videos to create millions of hyper-personalized outputs — all dynamically generated from a single template.

#### Key Highlights

* Create 1-to-1 personalized videos at a massive scale<br>
* Integrates with CRMs (like HubSpot, Salesforce, etc.) and email platforms<br>
* Add personalized names, product offers, and messages dynamically<br>
* Automate bulk video generation via API or Zapier integration<br>
* Export in multiple formats or host via shareable links

#### Popular Use Cases

* Personalized marketing campaigns<br>
* Customer onboarding and retention videos<br>
* Birthday, milestone, or thank-you messages<br>
* Sales follow-ups and account-based marketing

***

### 4. Faceless Generative Videos

[Create AI videos](https://www.gan.ai/free-best-ai-video-generator-creator-maker-from-text) without showing a person on screen.

GAN.AI’s Faceless Generative Videos use generative AI to produce voice-over-based videos with visuals, motion graphics, and storytelling — no human face required.\
Perfect for brands that prefer abstract, explainer, or narrative-based video content.

#### Key Highlights

* Generate videos from text prompts, scripts, or blogs<br>
* Combine AI voice-overs with dynamic visual storytelling<br>
* Auto-generate relevant B-rolls, transitions, and effects<br>
* Ideal for content creators, educators, and explainer videos<br>
* Supports multiple voice styles and tones

#### Popular Use Cases

* YouTube or Instagram explainers<br>
* Product feature overviews<br>
* Educational or tutorial videos<br>
* “Faceless” content for privacy-conscious brands

***

### 5. Why Brands Love GAN.AI

GAN.AI combines automation + creativity + personalization — all in one platform.

| Feature                        | Benefit                                       |
| ------------------------------ | --------------------------------------------- |
| AI-powered avatars & voices    | Create videos without cameras or actors       |
| Video personalization at scale | Engage every user individually                |
| Seamless integrations          | Works with CRMs, emails, and automation tools |
| Cinematic visual engine        | Produce ad-quality videos quickly             |
| Developer-friendly APIs        | Automate end-to-end video workflows           |

***

Need Help Choosing the Right Product?

Our experts can guide you in selecting the best GAN.AI product for your business needs.

***

**Quick Summary**

| Product                    | Purpose                                        |
| -------------------------- | ---------------------------------------------- |
| AI Avatar                  | Create lifelike digital spokespersons          |
| Cinematic Ads              | Generate studio-quality branded ad videos      |
| Video Personalization      | Automate 1-to-1 personalized customer videos   |
| Faceless Generative Videos | Create AI-driven videos without showing faces. |

With this guide, you now have a clear understanding of how Gan.AI’s suite of products can transform the way you create, scale, and personalize video content. Whether you're looking to build lifelike AI avatars, produce cinematic-quality ads, deliver hyper-personalized customer experiences, or generate faceless explainer videos. Gan.AI empowers you to do it all—faster, smarter, and at scale. Explore the tools, experiment with ideas, and unlock a new era of AI-driven video creation for your brand.<br>


# Chrome Extension by Gan.AI

Gan.AI Chrome Extension: Record Screen & Webcam, Personalize Videos, Embed in Gmail, and Manage Content Easily

The Gan.AI Chrome Extension brings your video creation and personalization workflows directly into your browser — letting you record, edit, share, and automate videos without leaving Chrome. This means faster turnaround, fewer steps, and more scalable outreach for your campaigns.

<figure><img src="/files/pj7boNfqHlI2P6d7AYAb" alt=""><figcaption></figcaption></figure>

### Key Features

* One-click screen + camera recording: Launch directly from your toolbar.
* Shareable landing pages: Every recording becomes its own shareable link or embed.
* No watermark, no fuss: High-quality recording with your brand, no hidden branding.
* Installation Link: <https://chromewebstore.google.com/detail/ganai-free-screen-camera/ilbgkfmhfigfdabdhjpjcabmfplmomld>

***

### Installation & Setup

Follow these steps to install and start using the extension:

1. **Install from Chrome Web Store**

* Open the Chrome Web Store and search for “Gan.AI – Free Screen & Camera Recorder” or click the direct link.
* Click Add to Chrome and confirm.

<p align="center"><strong>OR</strong></p>

* Click on the “**Install Extension**” button to directly open the Chrome Web Store to download the extension.&#x20;
* Click **Add to Chrome** and confirm.

<figure><img src="/files/CtSKm58Xwb1xXh31AyYG" alt=""><figcaption></figcaption></figure>

2. **Pin the extension**

* After installation, click the puzzle icon in Chrome toolbar → click the pin icon next to Gan.AI to keep it visible.[ ](https://help.gan.ai/studio-by-gan.ai/chrome-extension/installing-and-setting-up?utm_source=chatgpt.com)
* The Gan.AI icon will now appear in the top-right of your browser.

<figure><img src="/files/FAXgrrnR8eH0XOIJVTyh" alt=""><figcaption></figcaption></figure>

<p align="center"><img src="/files/xv1PpuVllnISXYV64J6T" alt=""></p>

<p align="center"></p>

3. **Sign In / Create Account**

* Click the icon → you’ll be prompted to sign in or create a free account if you don’t already have one. (You’ll then link your recordings with your Gan.AI dashboard.)

4. **Allow permissions**

* When you first record, Chrome will ask for permission to access your screen, webcam, and mic — to enable full functionality.

<figure><img src="/files/5Q4Hb7GRSjaPdjaNaDGU" alt=""><figcaption></figcaption></figure>

5. **Ready to record**

* You’re all set! Click the Gan.AI icon anytime to start a new recording.

<figure><img src="/files/k5WliSJSfh13xrJckEBm" alt=""><figcaption></figcaption></figure>

***

### **Recording & Sharing Videos**

The Gan.AI Chrome Extension enables you to record your screen, webcam, or both, and then share or export your video with ease — right from the browser. This streamlined workflow is perfect for demos, personalized outreach, training videos, or any scenario where speed and clarity matter.

Step-by-Step Guide

1. **Open the Recorder:**&#x20;

Click the Gan.AI icon in your browser toolbar to open the extension’s pop-up.<br>

<figure><img src="/files/ALq48DveoFncO5wGUDvt" alt=""><figcaption></figcaption></figure>

2. **Select Your Source:**

   Choose what you want to capture:

   * Webcam only
   * Screen only (full screen, window or tab)
   * Screen + Webcam together

   You can also select an external microphone or camera if connected.

<figure><img src="/files/oSUTGbSpoWPsfAbNsHys" alt=""><figcaption></figcaption></figure>

3. **Choose Capture Mode**

You’ll be prompted to pick exactly what you intend to record: a browser tab, a specific window, or your entire screen.

<figure><img src="/files/xVSF9FFBO79uUvAIJJj4" alt=""><figcaption></figcaption></figure>

4. **Start Capturing:**

Click the “Start Recording” button to proceed with the recording.

5. **Stop Recording:**

When you’ve captured what you need, click Stop. The video will automatically upload or appear in your Gan.AI dashboard for further processing.

<p align="center"><img src="/files/UCkFtr3VmnMUg4WkJJgM" alt=""></p>

<p align="center"></p>

6. **Access Your Video**

   * Once done, your video will show in your dashboard. You can:
   * Give the video a title
   * Edit/truncate it
   * Add thumbnails or captions
   * Share it via link, embed code, email, or directly in your workflow.

   <figure><img src="/files/fXVoRrSWfw8fu1iV2C8F" alt=""><figcaption></figcaption></figure>

7. **Outlook Sharing & Delivery Options**

   * **Direct Sharing:** Share the video directly via Gmail, Outlook, LinkedIn, and Facebook.
   * **Shareable link:** Copy the URL and distribute via email, chat, or social media.
   * **Embed code:** Embed the video in your website, landing pag,e or blog.
   * **Download/export:** If your plan allows, download the video as a file to use in other tools or platforms.

<figure><img src="/files/8i1c5b9qBbKVoHPa8qSY" alt=""><figcaption></figcaption></figure>

8. **Best Practices & Tips:**

   * Record in a quiet environment to enhance audio clarity.
   * Choose “Screen + Webcam” when you want both yourself and your screen visible (for demos or walkthroughs).
   * Use a relevant, concise title immediately after recording — this helps identify videos later.
   * For outreach: personalize your video by naming the recipient directly or referencing their company/role.
   * Keep sharing links short, set clear calls-to-action, and monitor engagement metrics to refine future videos.

9. **Troubleshooting**

| Issue                                        | Possible Fix                                                                                                         |
| -------------------------------------------- | -------------------------------------------------------------------------------------------------------------------- |
| The extension doesn’t open                   | Ensure it’s pinned in Chrome toolbar and enabled in chrome://extensions.                                             |
| No recording button appears                  | Check that permissions for screen/mic/camera are allowed in Chrome settings.                                         |
| Video not appearing in dashboard             | Refresh the dashboard or sign out/sign in; check network connection.                                                 |
| Share link not working or shows a blank page | Verify the video is published, the link is copied correctly, and required sharing settings are enabled on your plan. |

***

### Using with Gmail

With the Gan.AI Chrome Extension, you can send personalized AI-driven videos **directly from** **Gmail**, streamlining outreach, demos or client follow-ups in your inbox. No leaving Gmail, no heavy attachments—just a click to record or insert a video and send.

#### **How to Send Videos via Gmail:**

**Step 1: Open Gmail and Compose:**

Open your Gmail account in Chrome and click Compose to start a new email.

**Step 2: Use the Gan.AI Icon in the Compose Toolbar**

In the compose window’s toolbar (bottom of the email), you’ll see the Gan.AI icon. Click it.

<figure><img src="/files/SXCV9bTGPIvAuHQNHSQy" alt=""><figcaption></figcaption></figure>

**Step 3: Choose Your Action**

You’ll be presented with two main options:

* Record New Video – Launch the recorder to capture a quick webcam/screen video right inside Gmail.
* Insert Video – Choose an existing video from your Gan.AI library to embed in the email.

<figure><img src="/files/4Kzna2ltLTU71ACSQ70v" alt=""><figcaption></figcaption></figure>

**Step 4: Insert Video Link or Thumbnail**

After choosing/recording your video:

* Select Insert Link (plain link) or Insert Link & Thumbnail (link plus a clickable thumbnail image) into the email.
* The recipient sees an inviting preview and can click to play on a branded landing page.

<figure><img src="/files/8CejZScmdZD2dFWHlLCA" alt=""><figcaption></figcaption></figure>

**Step 5: Write Your Message & Send**

Personalize your message, then send the email.\
Your recipient receives it like any other email—no large attachment, just a link they can view.

<figure><img src="/files/ThR9VjLMSoEiyQ2ovxS5" alt=""><figcaption></figcaption></figure>

***

### Best Practices & Tips:

* Use Insert Link & Thumbnail when you want higher engagement (thumbnail invites clicks).
* Keep the recorded video short (1-2 minutes) when sending via email—helps boost click-through and viewer completion.
* Use the email body to provide context or a call-to-action (“Watch this quick demo and let me know your feedback”).
* Personalize recipient-specific details either in the email or inside the video (name, company, role) for a stronger impact.
* Test send to yourself before mass-sending to ensure the link/thumbnail renders properly.

***

### Troubleshooting

| Issue                                            | Possible Fix                                                                                                  |
| ------------------------------------------------ | ------------------------------------------------------------------------------------------------------------- |
| Gan.AI icon not showing in Gmail compose toolbar | Ensure the extension is installed and enabled; refresh Gmail or log out/in.                                   |
| Inserted link/thumbnail not visible              | Make sure the email client supports link previews; test as plain link if needed.                              |
| Recorded video not available in library          | Wait a few seconds for upload; check your internet connection and refresh your library.                       |
| Video plays but shows branding or watermark      | Verify you are using a plan that supports no-watermark sharing; contact support for account-specific details. |

***

### Adjusting Camera

For the best video quality when using the Gan.AI Chrome Extension, it’s important to correctly configure your camera, microphone, and audio input settings. This ensures your recordings look and sound professional regardless of device. Follow the steps below to adjust your settings easily and avoid common issues.

When you choose to record  **Screen + Camera**, multiple features appear:

<figure><img src="/files/0mkhIYcBeVOey4a5tiaL" alt=""><figcaption></figcaption></figure>

**Circular or square preview** – change the look of your camera by clicking on the icons below your camera preview.

<p align="center"><img src="/files/S3JTXFI36z1tfJrA9cOy" alt=""></p>

**Resize** your camera preview by clicking on the icon below your camera preview.

<p align="center"><img src="/files/aXKRwGLu4MBk3x0gZ9Ib" alt=""></p>

**Change the position of the camera window**

By default, the camera window appears in the bottom-left corner. Drag the camera window and leave it where you'd like – the Gan.AI extension will also save the settings for the current and future videos!

<figure><img src="/files/iQaDUDiSykL10CFmuB0X" alt=""><figcaption></figcaption></figure>

**Intro banner** – add your name and designation to your videos

<figure><img src="/files/h0l07in5MM3pM8Uj1EHV" alt=""><figcaption></figcaption></figure>

**How to set up an intro banner:**

Click on **Enable banner** below your camera preview:

<figure><img src="/files/7n7gayE3fDfQy6U8l8P7" alt=""><figcaption></figcaption></figure>

Click on **Edit text** and type your name and designation intro

<figure><img src="/files/hzSa4YDsUmfN2ycwLv9Y" alt=""><figcaption></figcaption></figure>

Click on the Color palette icon to add the color highlight to your banner

<figure><img src="/files/nJjeoZdrxhfb8E7lKgp9" alt=""><figcaption></figcaption></figure>

***

**Best Practices**

* Use natural, soft lighting (front-lit) to avoid shadows and maintain clean visuals.
* Position the camera at or slightly above eye-level for a professional angle.
* Choose a quiet environment when possible — external mic + noise reduction makes a big difference.
* For screen + webcam recordings: close unnecessary applications to reduce CPU/GPU load and avoid lag.
* After any system update or hardware change, revisit your settings to ensure nothing has defaulted back.

***

### **Troubleshooting**

| Issue                        | Possible Fix                                                                                                                                |
| ---------------------------- | ------------------------------------------------------------------------------------------------------------------------------------------- |
| No video or black screen     | Check camera permissions in Chrome: chrome://settings/content/camera. Ensure the correct camera is selected.                                |
| No audio or mic mute         | Check microphone settings in Chrome: chrome://settings/content/microphone. Ensure the correct device, and input meter moves when you speak. |
| Echo / poor sound quality    | Enable noise reduction / echo cancellation in settings. Consider using a different mic or headphones.                                       |
| Video lag or choppy playback | Lower video quality from 1080p to 720p. Close other heavy programs. Check CPU/GPU usage.                                                    |
| Settings reset after restart | Ensure you click Save/Apply. Consider uninstalling and reinstalling the extension if settings don’t persist.                                |

***

### **Drawing Highlights**

Drawing highlights allows you to call attention to specific areas of your screen while recording a video. This is a useful technique for emphasizing important points, buttons to click, or segments of your screen that need explanation.

Here are the steps:

* Launch the screen recording and set up your recording window/parameters as desired.
* Start your recording and navigate to the "**Drawing tools**" in the menu below the screen.

<figure><img src="/files/c223MSAkIw56bhG1p5JV" alt=""><figcaption></figcaption></figure>

Within the Drawing Tools, you'll see options to select the highlight color and line thickness/width. Choose a color that will be highly visible against your screen background - recommended options are red, green, or yellow.

<figure><img src="/files/VfTRWH76tWchX8jozgr2" alt=""><figcaption></figcaption></figure>

Set the line to be thick enough to stand out clearly, but not so thick that it obscures what you're highlighting. The thickness of a middle range is generally effective.

\
The highlight "**ink**" will temporarily display on your recorded screen for several seconds, allowing you to encircle or underline the sections you want to emphasize.

<figure><img src="/files/RVhnHIMwHL05JA060Sga" alt=""><figcaption></figcaption></figure>

***

### Best Practices

* Use bright colours that contrast with your content (e.g., yellow on a dark background) so annotations stand out.
* Keep drawings minimal and intentional — excessive markings can distract rather than clarify.
* When doing a demo, draw just ahead of explaining — the viewer’s eyes follow the mark.
* For training videos, pause briefly after drawing something important so viewers have time to absorb the visual highlight.
* After recording, playback once to ensure the annotations appear as expected, especially if there’s motion or a camera switch.

***

### **Troubleshooting**

| Issue                                      | Possible Fix                                                                                                           |
| ------------------------------------------ | ---------------------------------------------------------------------------------------------------------------------- |
| Drawing toolbar doesn’t appear             | Ensure you selected “Screen + Webcam” or “Screen only” mode; some modes may temporarily disable annotation tools.      |
| Annotations not visible in final video     | Confirm you clicked Stop properly (which finalizes the drawing layer). Then refresh your dashboard and open the video. |
| Drawing lag or delay                       | Lower the recording resolution (e.g., switch from 1080p to 720p); close other heavy browser tabs/apps.                 |
| Wrong colour or thin line difficult to see | Use the palette to select a contrasting colour; increase line thickness.                                               |
| Undo/Redo not functioning                  | Click stop, retry recording; check for extension updates in Chrome Web Store.                                          |

With the Gan.AI Chrome Extension, your video creation workflow becomes faster, simpler, and infinitely more flexible. Whether you’re recording quick demos, sending personalized outreach from Gmail, highlighting key points during walkthroughs, or managing videos directly in your dashboard, every tool is built to streamline your process and enhance communication. Explore the features, apply the best practices, and let the extension help you create clear, compelling videos—right from your browser, whenever you need them.


# Our Products


# Stock Templates

Gan.AI’s AI Avatars let you produce realistic, on-camera presenters using just a script. Customize avatars, edit scenes, add elements, change backgrounds, and render high-quality videos effortlessly.

**What exactly is an AI Avatar?**

An AI Avatar is a lifelike digital version of a real person that can speak, move, and express emotions using artificial intelligence. It reads your text or script aloud with realistic lip-sync and gestures — creating human-like videos without the need for cameras or live recording.

**Your AI Avatar Awaits: Quick and Fun Creation Steps**

**Access the Avatars page**

To [create an AI avatar,](https://www.gan.ai/create-your-free-realistic-ai-avatar-generator-maker-online) log in to your Gan.AI account and click on the Avatar option under the sidebar navigation menu.

<figure><img src="/files/zrKYG00JiQrZWyayVkHW" alt=""><figcaption></figcaption></figure>

**Choose a Stock Template**

After selecting "**Stock Templates**," you’re taken to a gallery displaying 40 AI avatars under the "**Examples**" section, each suited for diverse professional needs. The "**Filter**" option enables you to categorize avatars by attributes such as gender, style, or context, making it easy to find the ideal avatar for your video project. Simply apply your desired filter and click to select.

<figure><img src="/files/v0Y0Dl1NeU7Byj6Tfxwz" alt=""><figcaption></figcaption></figure>

#### Gan.AI AI Avatar Template - Complete Guide

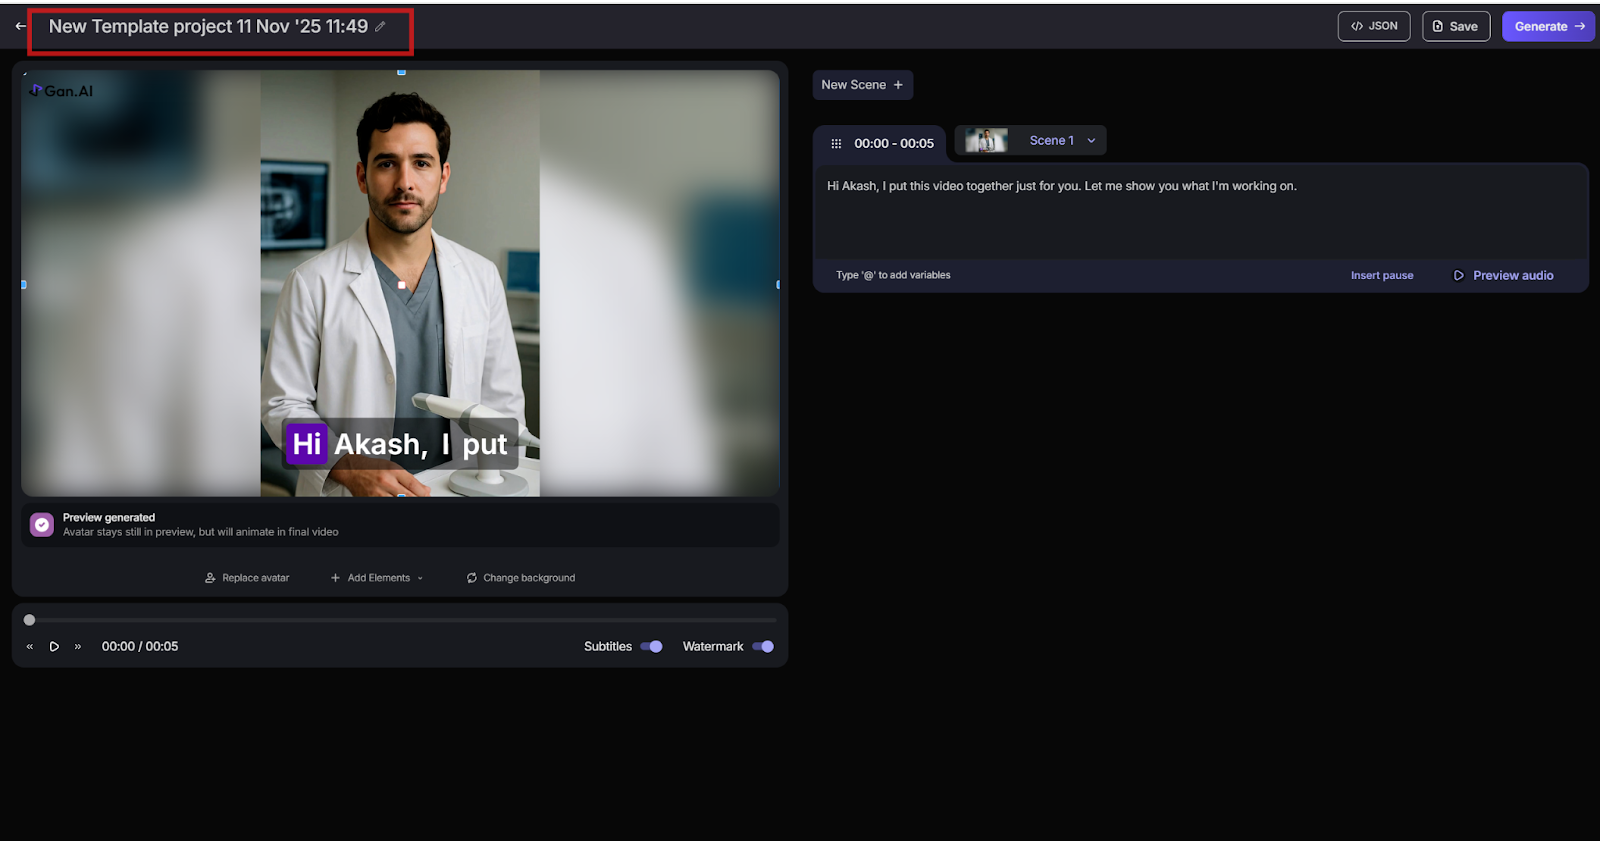
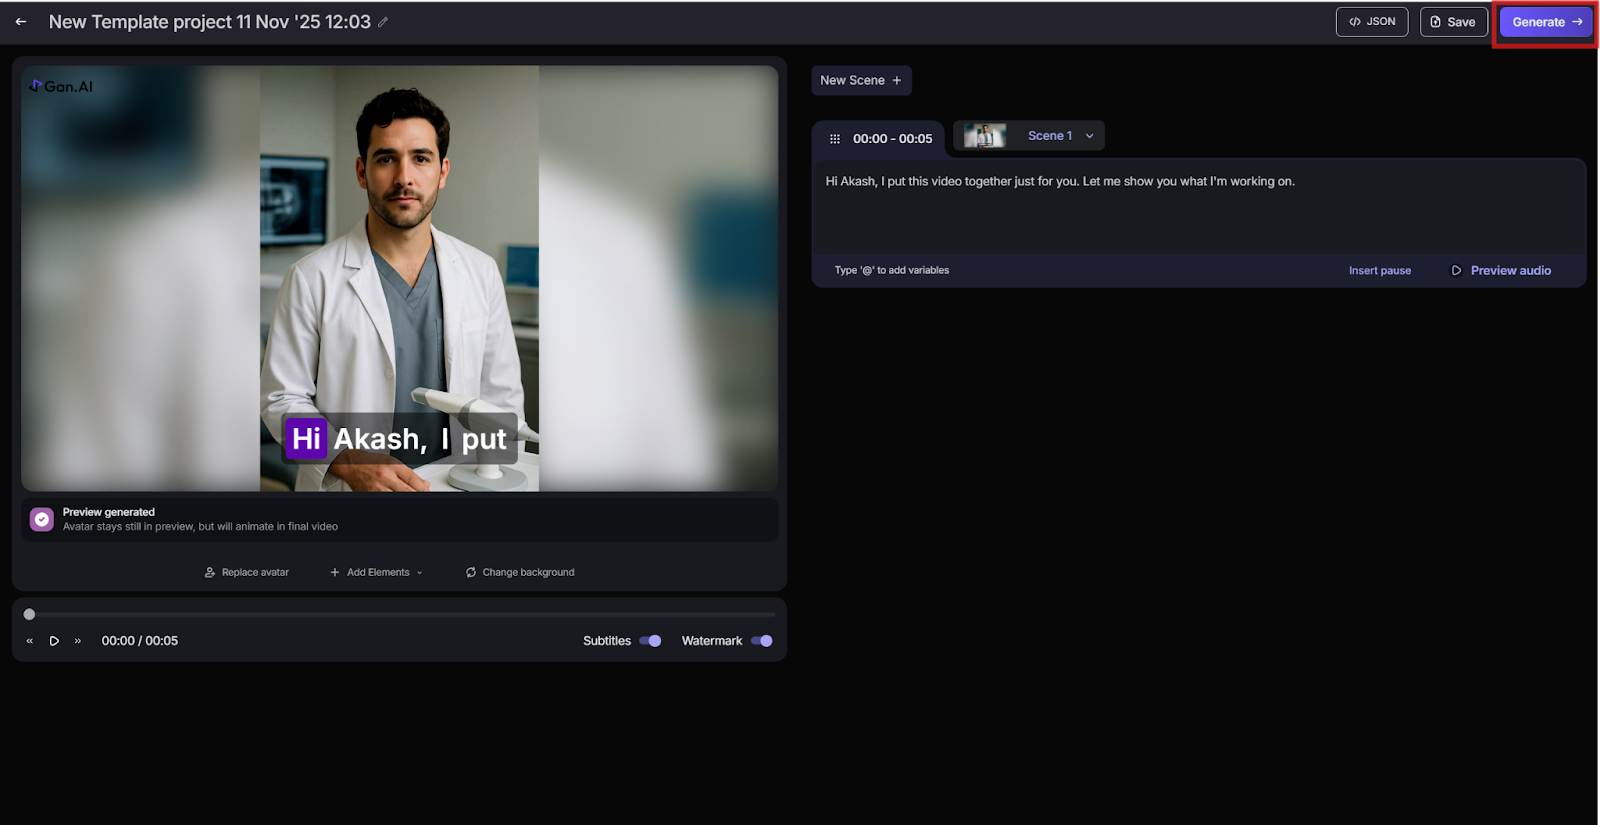
**Project Title Bar**

At the very top of the screen, you can set or edit the project title for your video. Simply by clicking the pencil ✏️ to rename it anytime for easier tracking.

<figure><img src="/files/sS27qrUe0rfJSAdf8OiM" alt=""><figcaption></figcaption></figure>

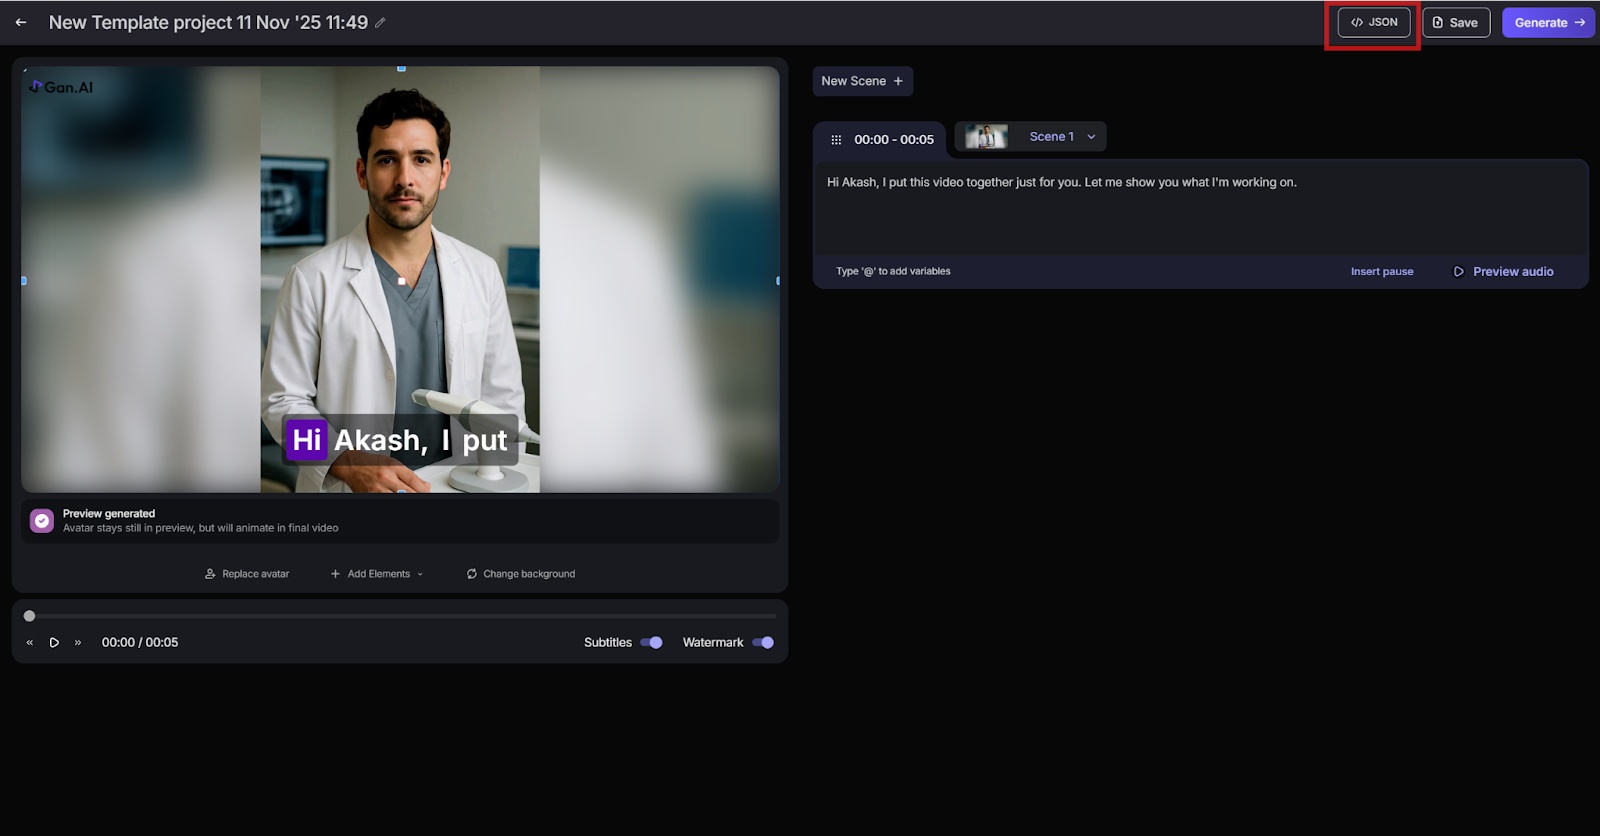
**JSON Button (\</>)**

Let's developers view or export the technical JSON structure of the project.

<figure><img src="/files/lA2MdBBLEvjy1OsHwTbc" alt=""><figcaption></figcaption></figure>

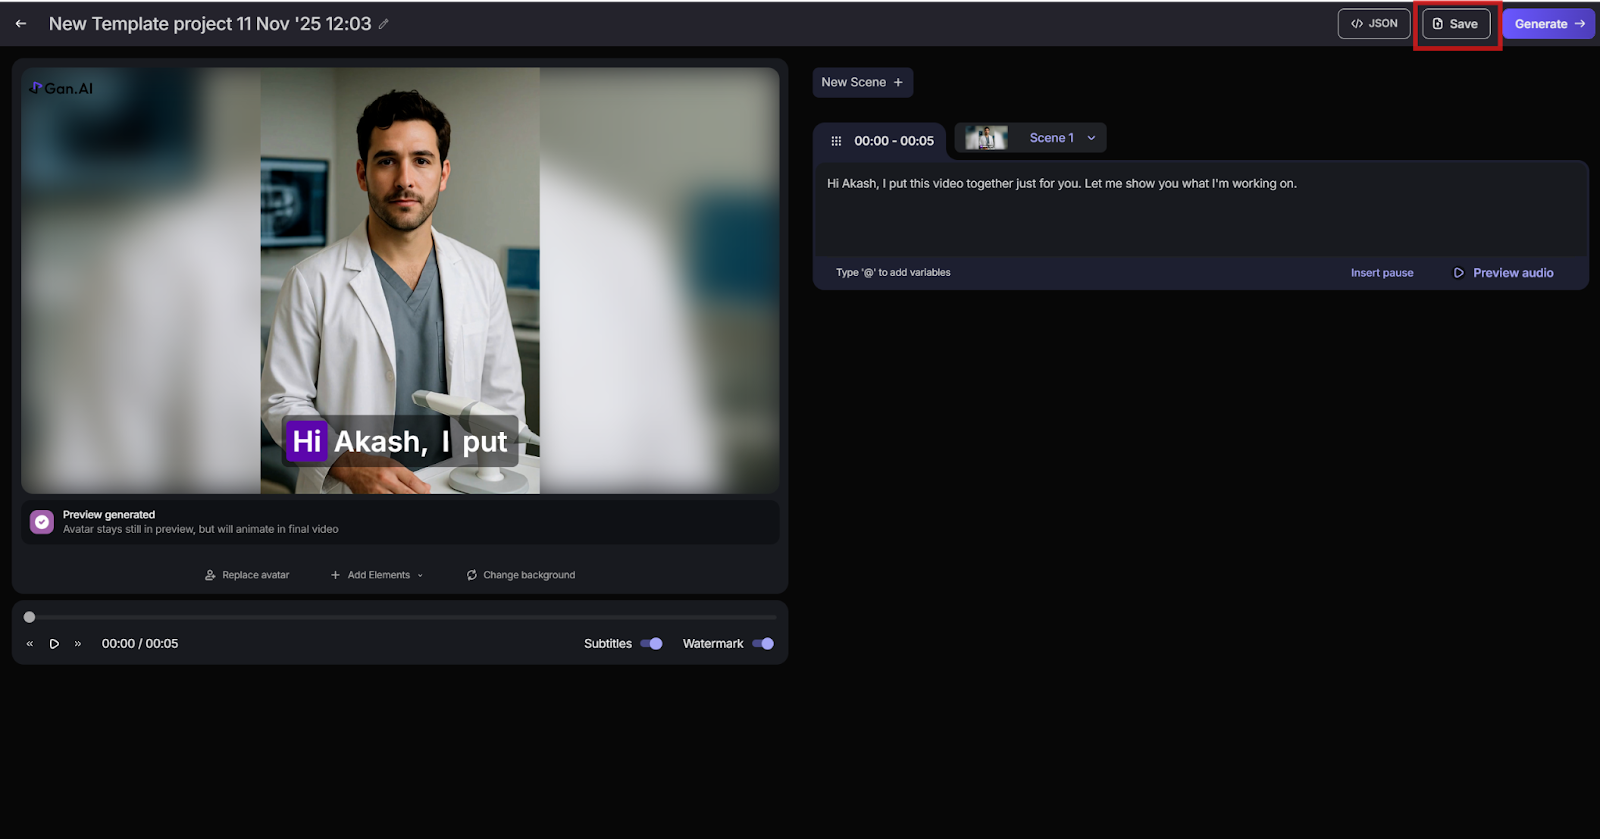
**Save Button:**

Located toward the top-right, beside “Generate.” Save ensures your edits are stored before rendering.

<figure><img src="/files/eXvmhht6stt20bSRvuT2" alt=""><figcaption></figcaption></figure>

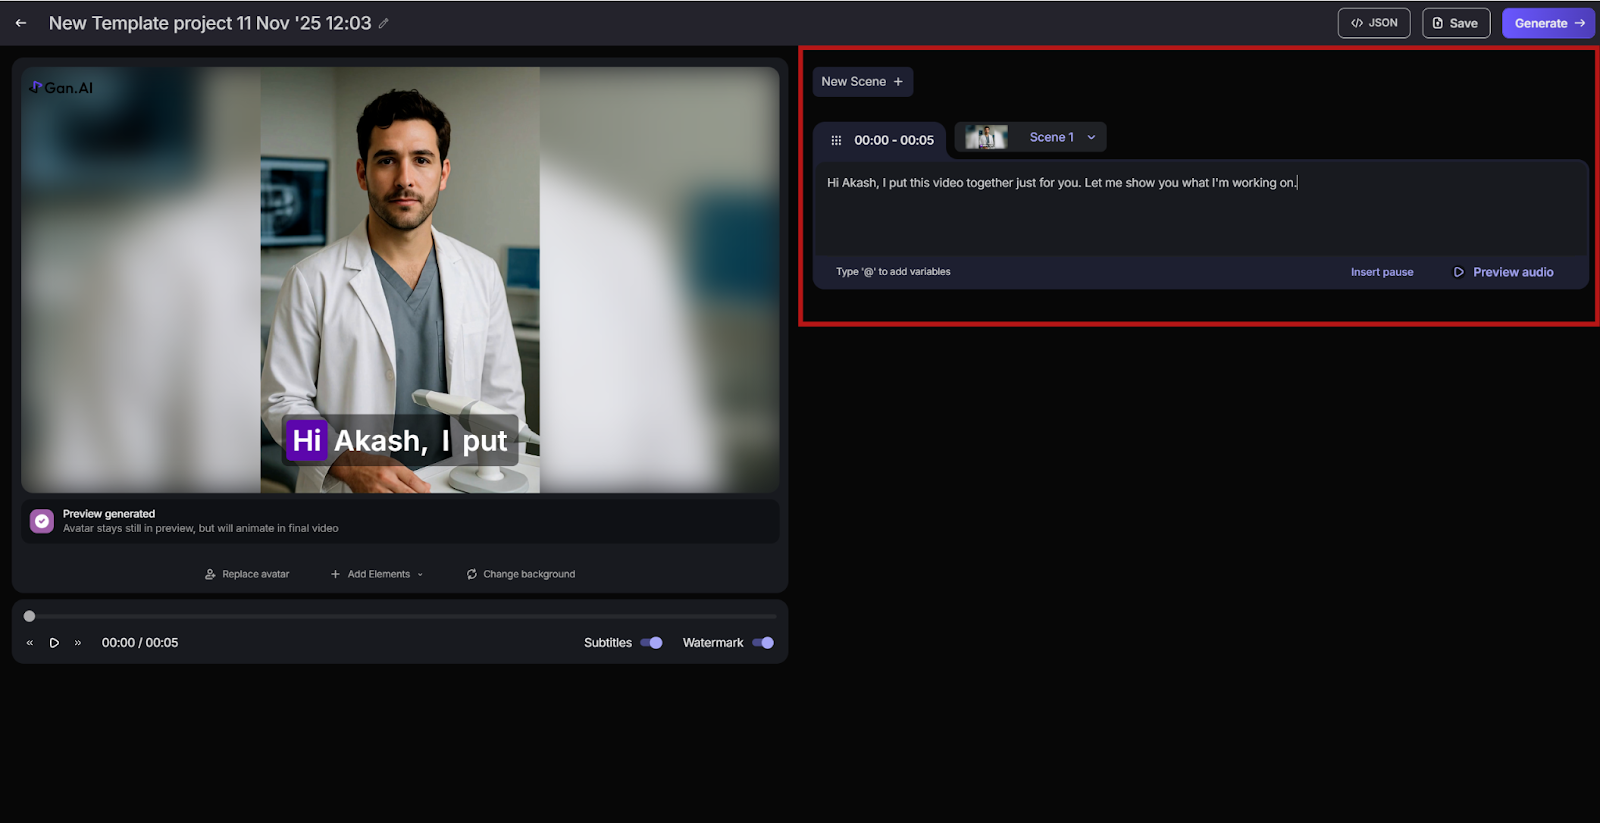
**Scene & Script Editor (Right Panel)**\
\
This section lets you write or edit the dialogue your avatar will speak. You can add new scenes, insert pauses, or preview audio. The editor supports multi-scene AI video creation where each scene has a separate script, making it ideal for longer or segmented video projects. By clicking on **Preview Audio,** one can hear the input script and its tone quality. If not satisfied, one can regenerate the audio.\
\
Type your message or narration in this box. The AI avatar uses this text to generate natural speech once rendered. You can personalize scripts using dynamic placeholders such as **@name** or **@company** for creating individualized videos at scale.

Use ‘**Insert Pause**’ to add natural breaks within your avatar’s speech, improving flow and realism. Click ‘Preview Audio’ to hear how the AI voice reads your text, allowing you to fine-tune tone, pronunciation, and pacing before rendering the complete video.

<figure><img src="/files/5OU8RfK7qRzTDsoeEyyK" alt=""><figcaption></figcaption></figure>

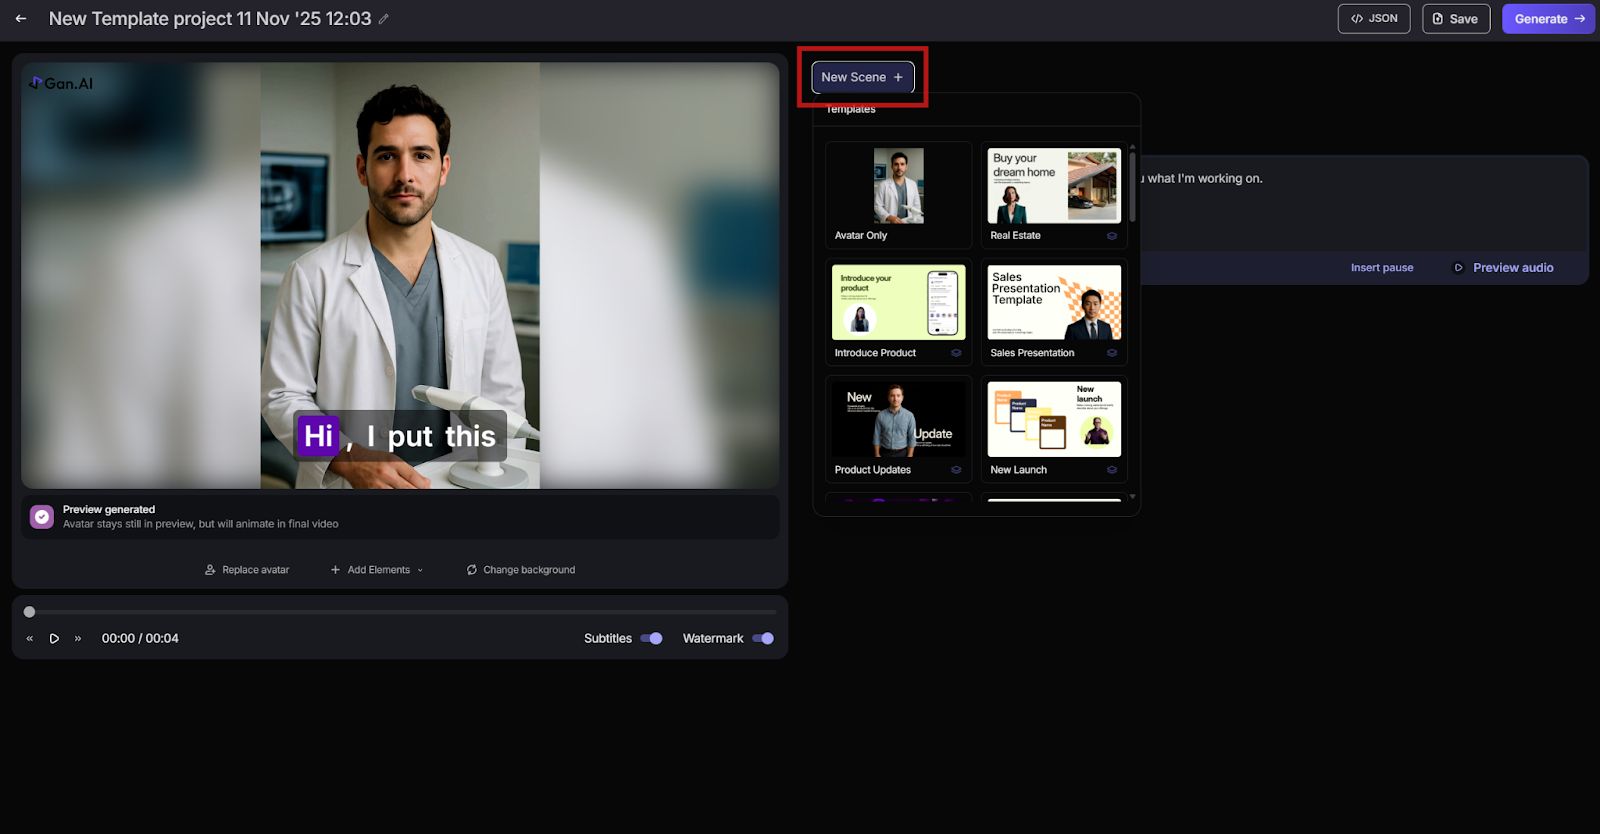
**New Scene (+) Button**

Found at the top of the script panel, this button adds a new scene. Each scene represents a separate segment of your video and can include different avatars, backgrounds, or messages. This is helpful when building structured training, storytelling, or multi-part promotional content.

<figure><img src="/files/uoTzOXBw0jsq99tpNNqv" alt=""><figcaption></figcaption></figure>

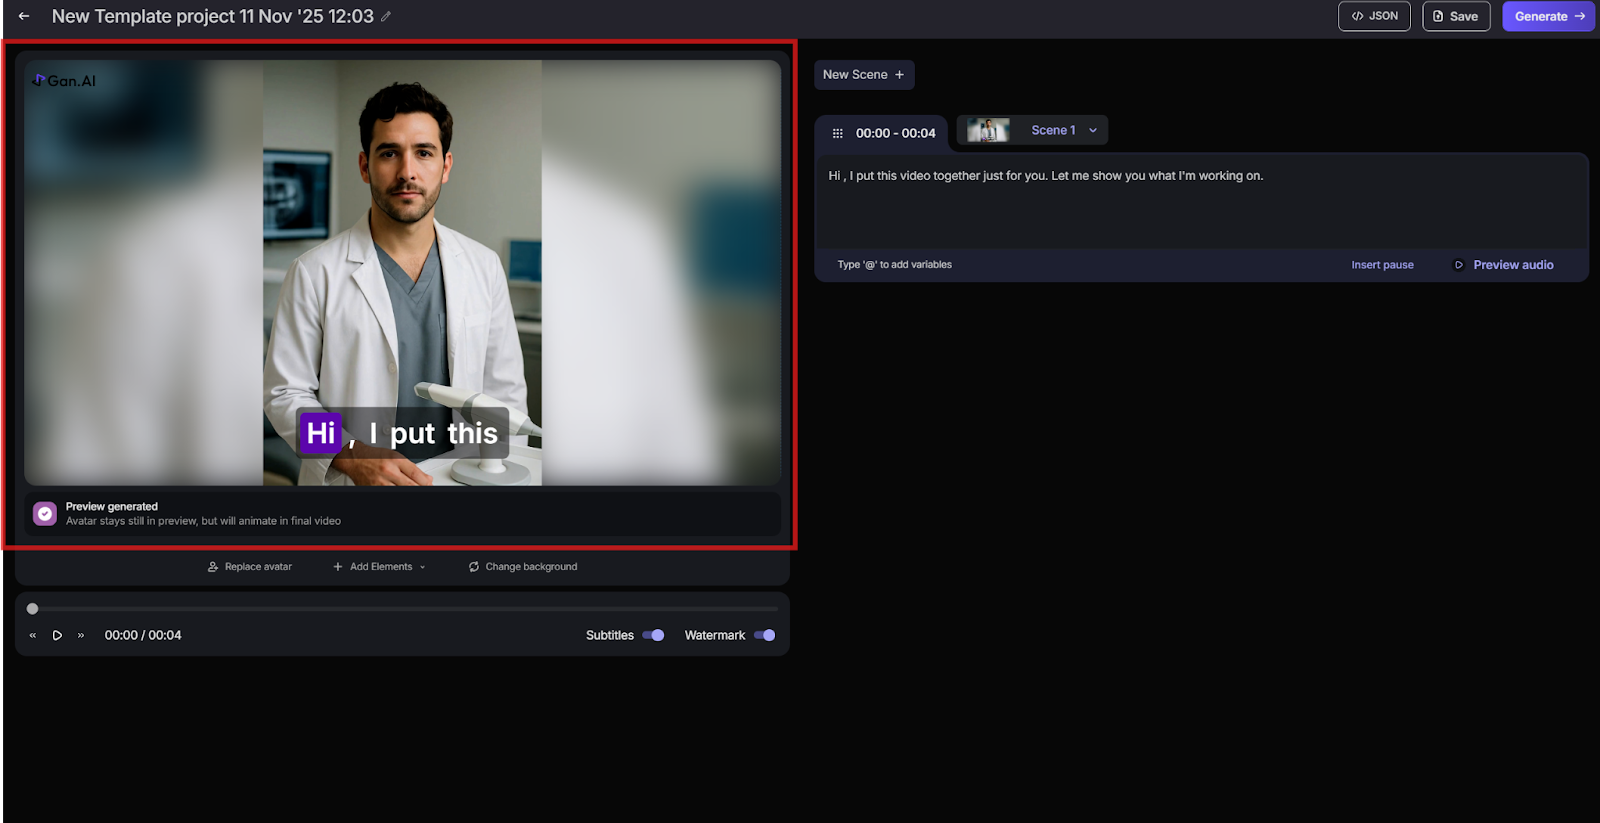
**Video Preview Window**&#x20;

This is the main preview area where you can view your avatar’s setup, background, and subtitles. The avatar remains static in preview mode to improve performance. Movement and lip-syncing appear only in the final rendered video. Use this space to confirm visual alignment and branding.

<figure><img src="/files/Rso0jFes5n0RrLK265y1" alt=""><figcaption></figcaption></figure>

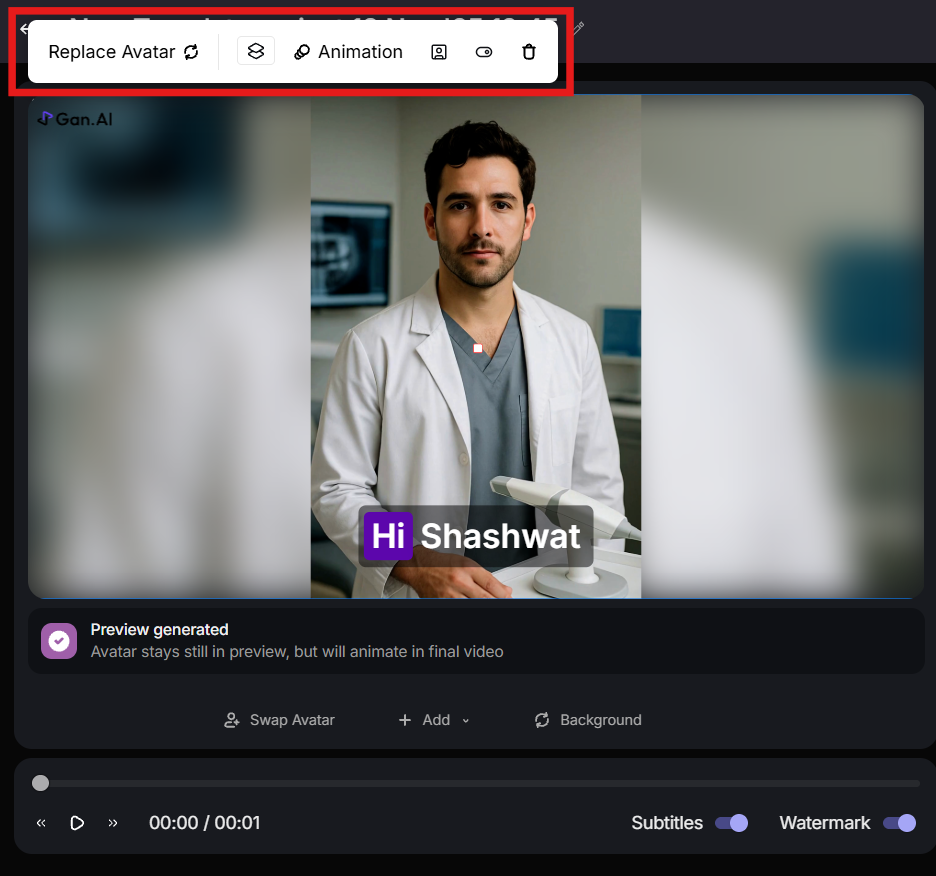
**Edit Bar**

If you click on the avatar, an editing toolbar will appear at the top. From there, you can customize and edit your avatar settings.

<figure><img src="/files/nDxDaWWU02WtW2bbtlE3" alt=""><figcaption></figcaption></figure>

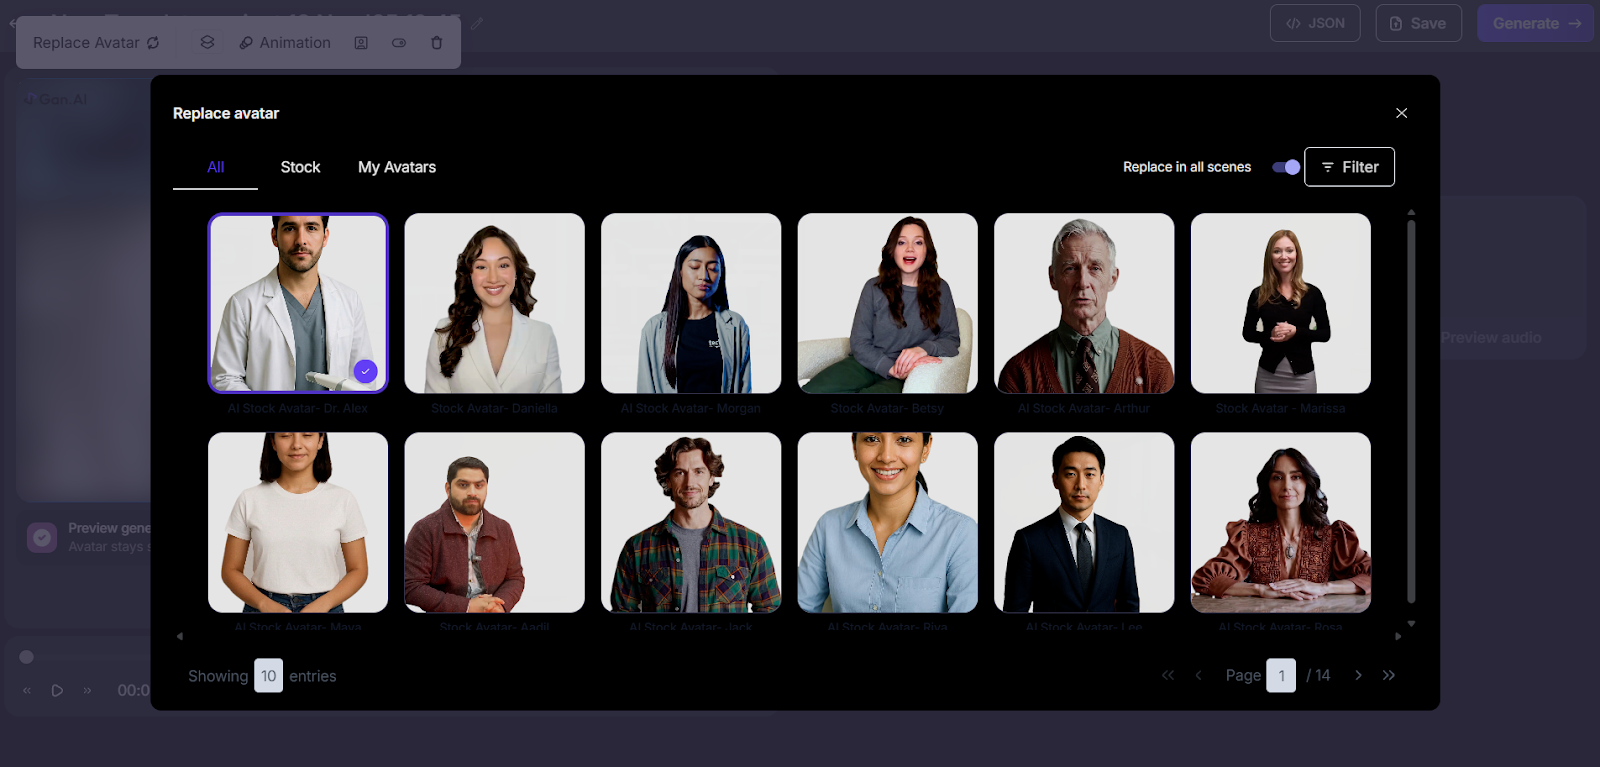
**Replace Avatar Option**

This button lets you change the avatar model. You can choose between custom avatars (created from real people) or stock avatars. It’s useful for testing different looks or tones that best match your message or campaign requirements.

<figure><img src="/files/v1R7msBVp4k06d6B9IRM" alt=""><figcaption></figcaption></figure>

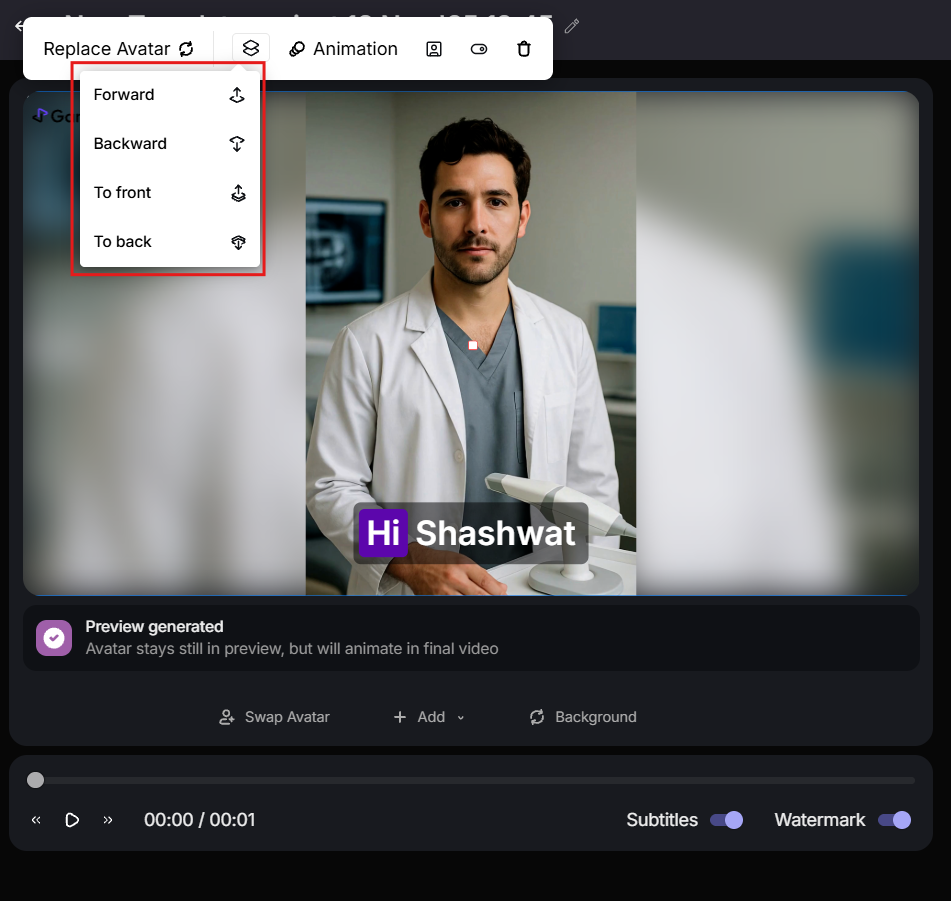
**Layer option**

Use the layer menu to change the order of elements by moving them forward, backward, to the front, or to the back.

<figure><img src="/files/ve3y6gK5mcpVEa04tayB" alt=""><figcaption></figcaption></figure>

**Animation**

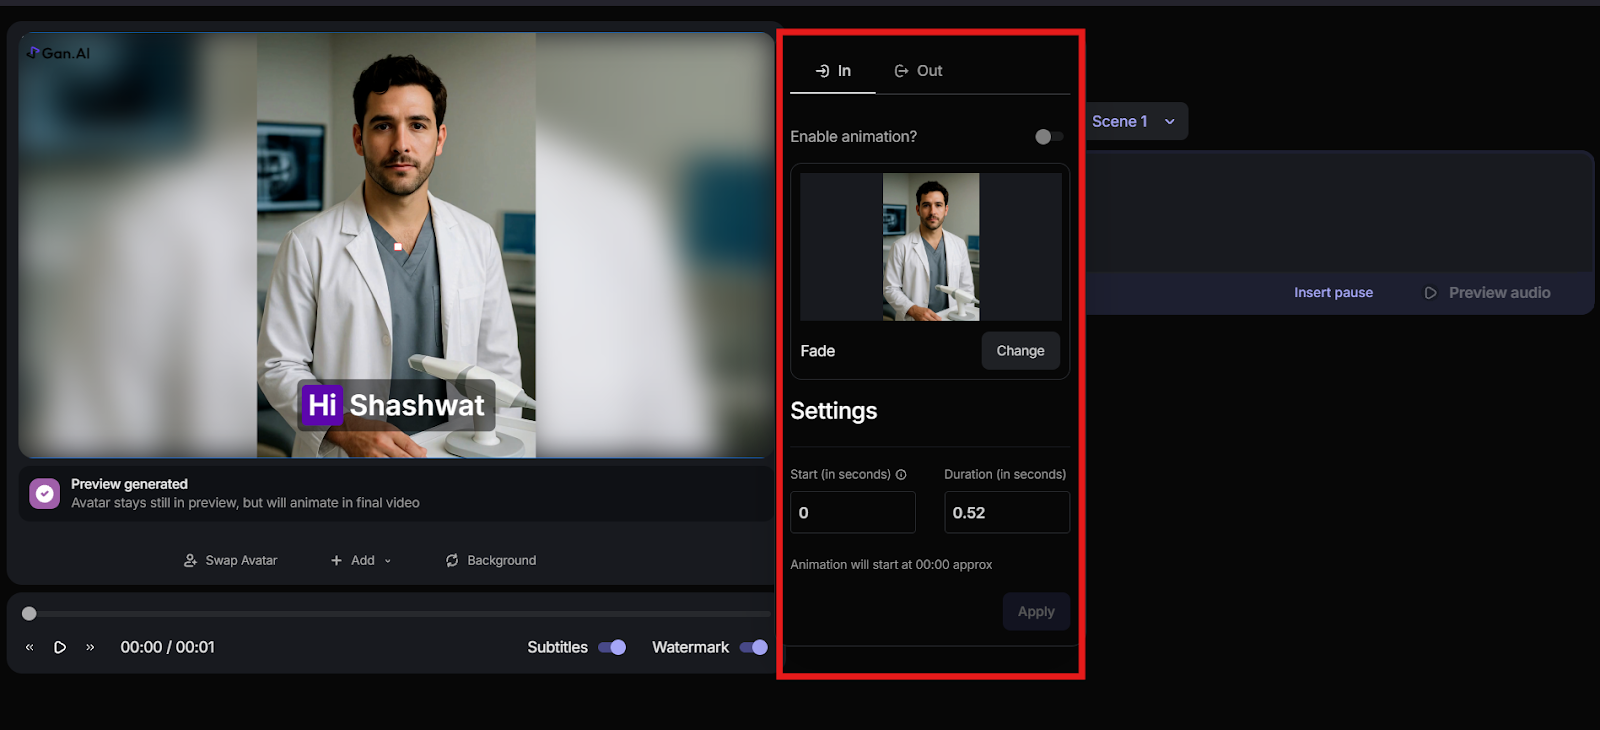
Click on Animation to apply different animations. The animation panel lets you enable entry (In) and exit (Out) animations for your avatar, and you can also customize start time and duration in seconds for precise timing.

<figure><img src="/files/YTLdcVuVKh2UjIPtWiRE" alt=""><figcaption></figcaption></figure>

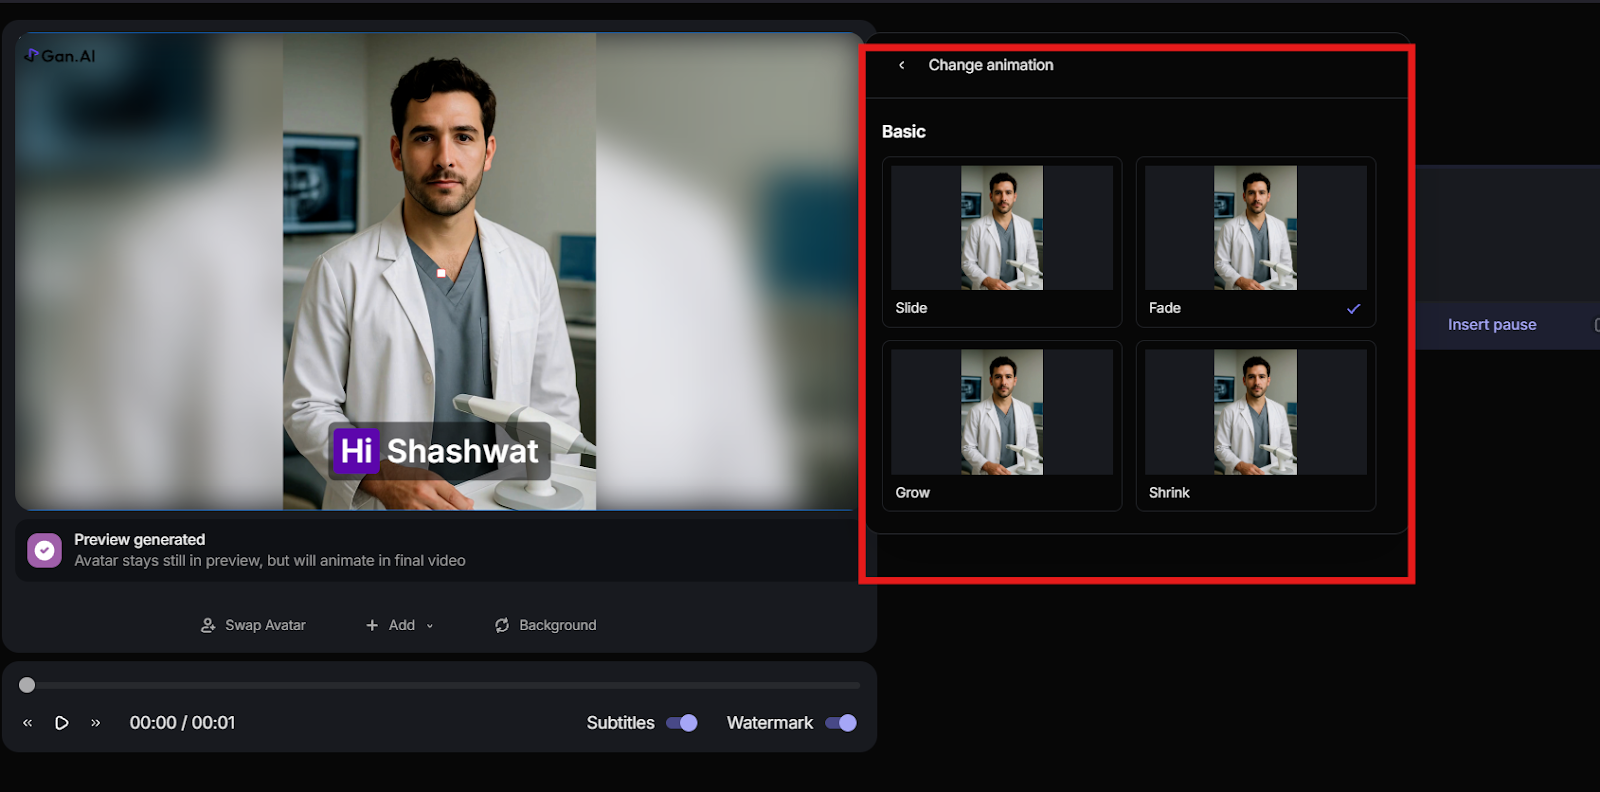
Click on **Change** to select different animation styles like Fade, Grow, Shrink, or Slide.

<figure><img src="/files/BVfqBjCrVljYZNmgCi0P" alt=""><figcaption></figcaption></figure>

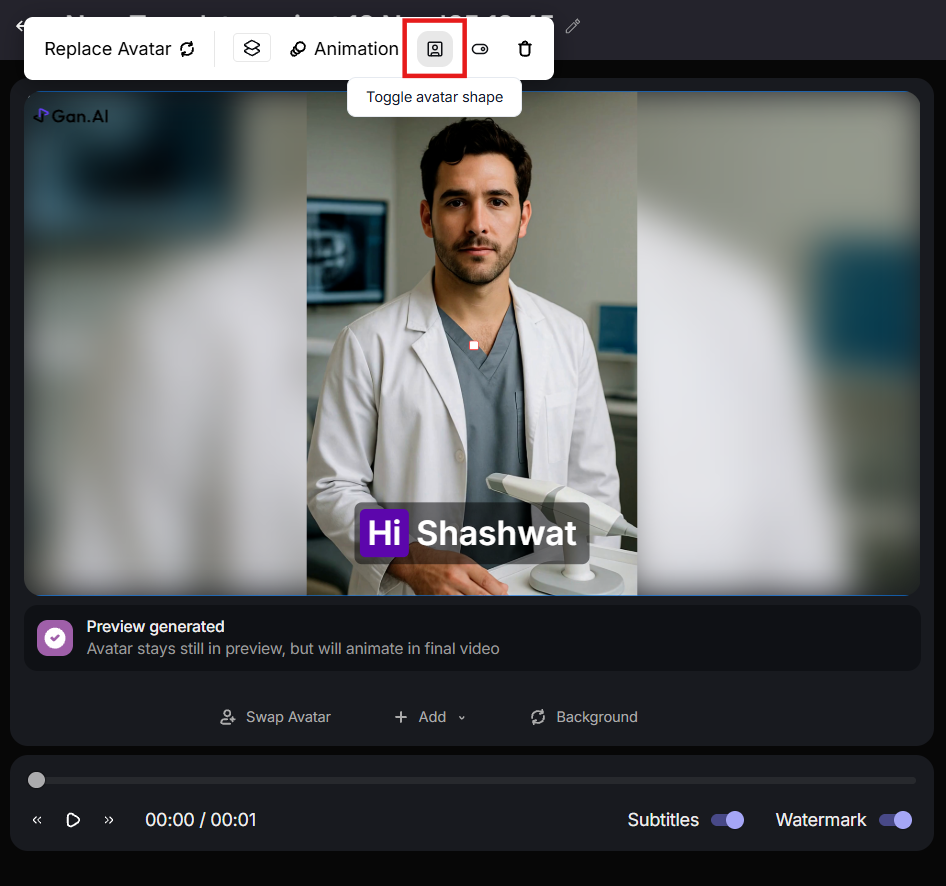
**Toggle Avatar Shape**

Turn on the Avatar Toggle to view and adjust the avatar’s shape.

<figure><img src="/files/Q8TIksaq1qHjFVFpCz8g" alt=""><figcaption></figcaption></figure>

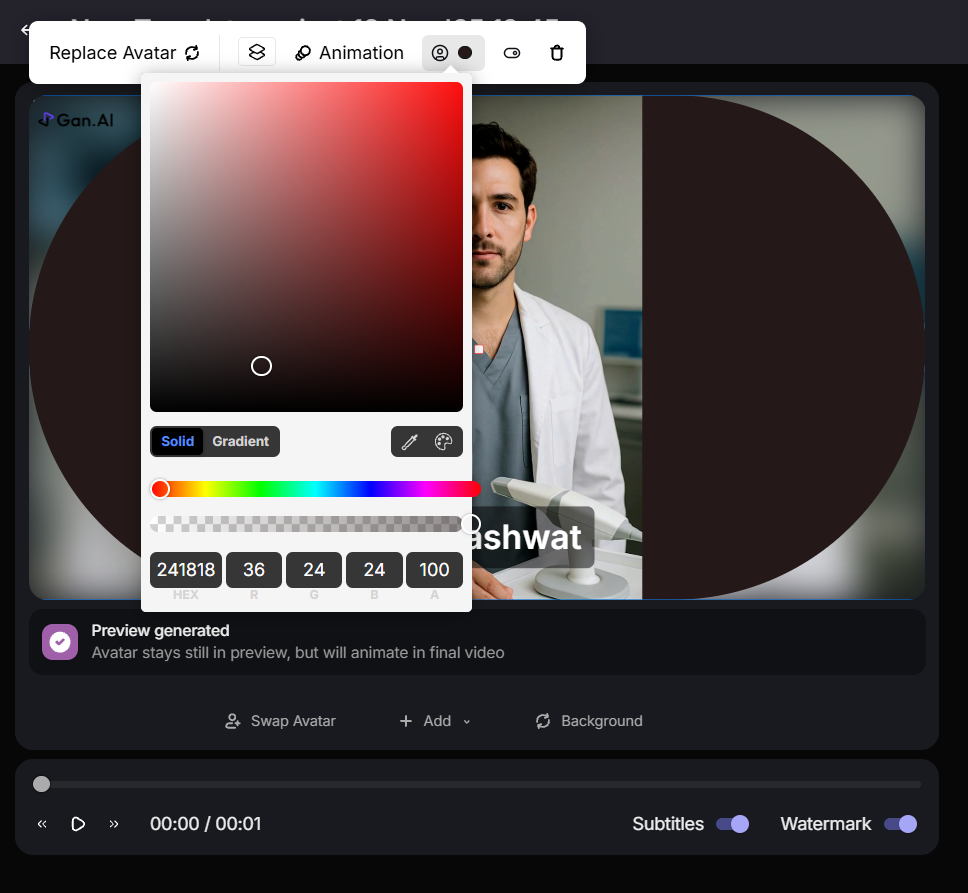
You can also customize the background color behind the avatar toggle.

<figure><img src="/files/ueGJdspjWPVHD8B2O3pb" alt=""><figcaption></figcaption></figure>

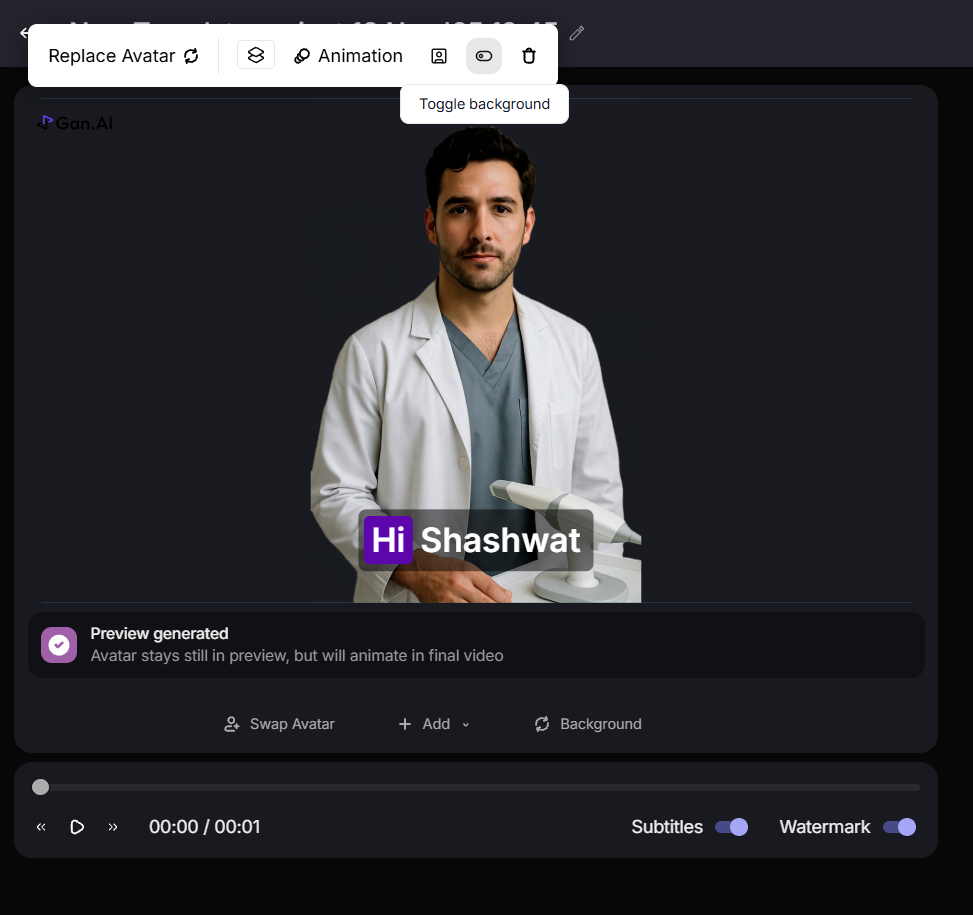
**Toggle Background**

Click on the Toggle Background option to turn the avatar’s background on or off.

<figure><img src="/files/P1MbtjyqwlfVNVxcs36z" alt=""><figcaption></figcaption></figure>

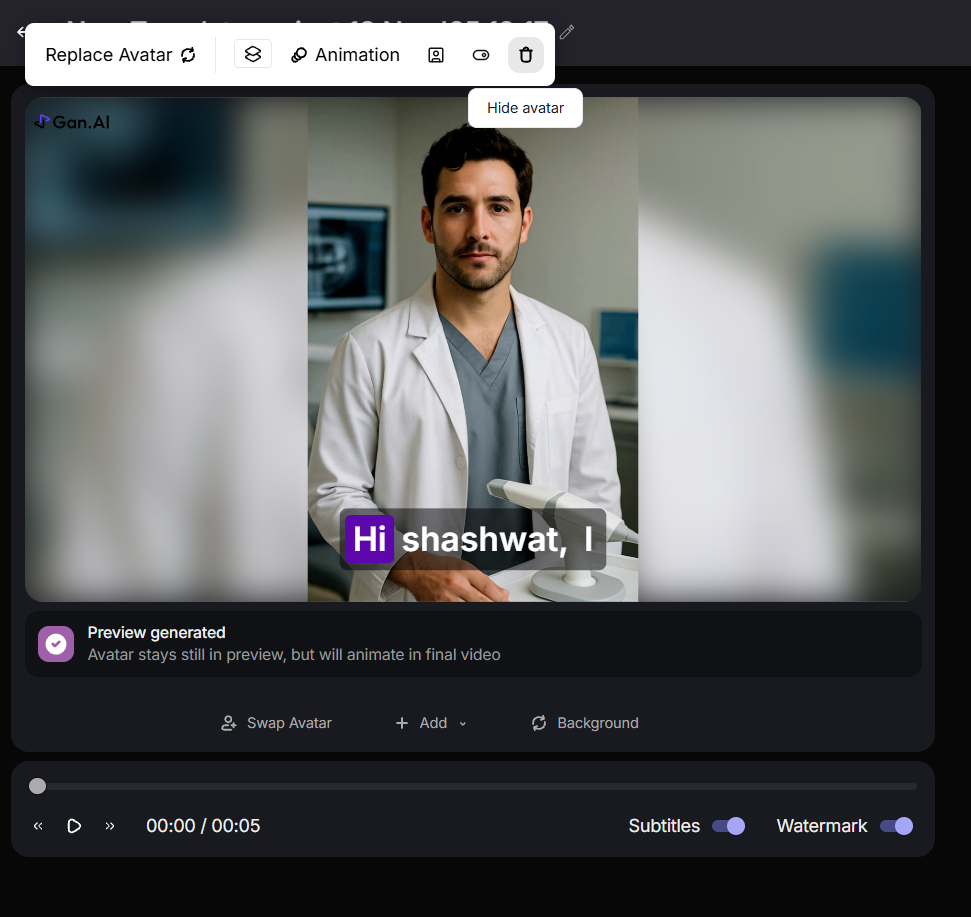
**Hide Avatar**

Select Hide Avatar to remove the avatar from view.

<figure><img src="/files/bSrcjNfRXGl5PcaghzmX" alt=""><figcaption></figcaption></figure>

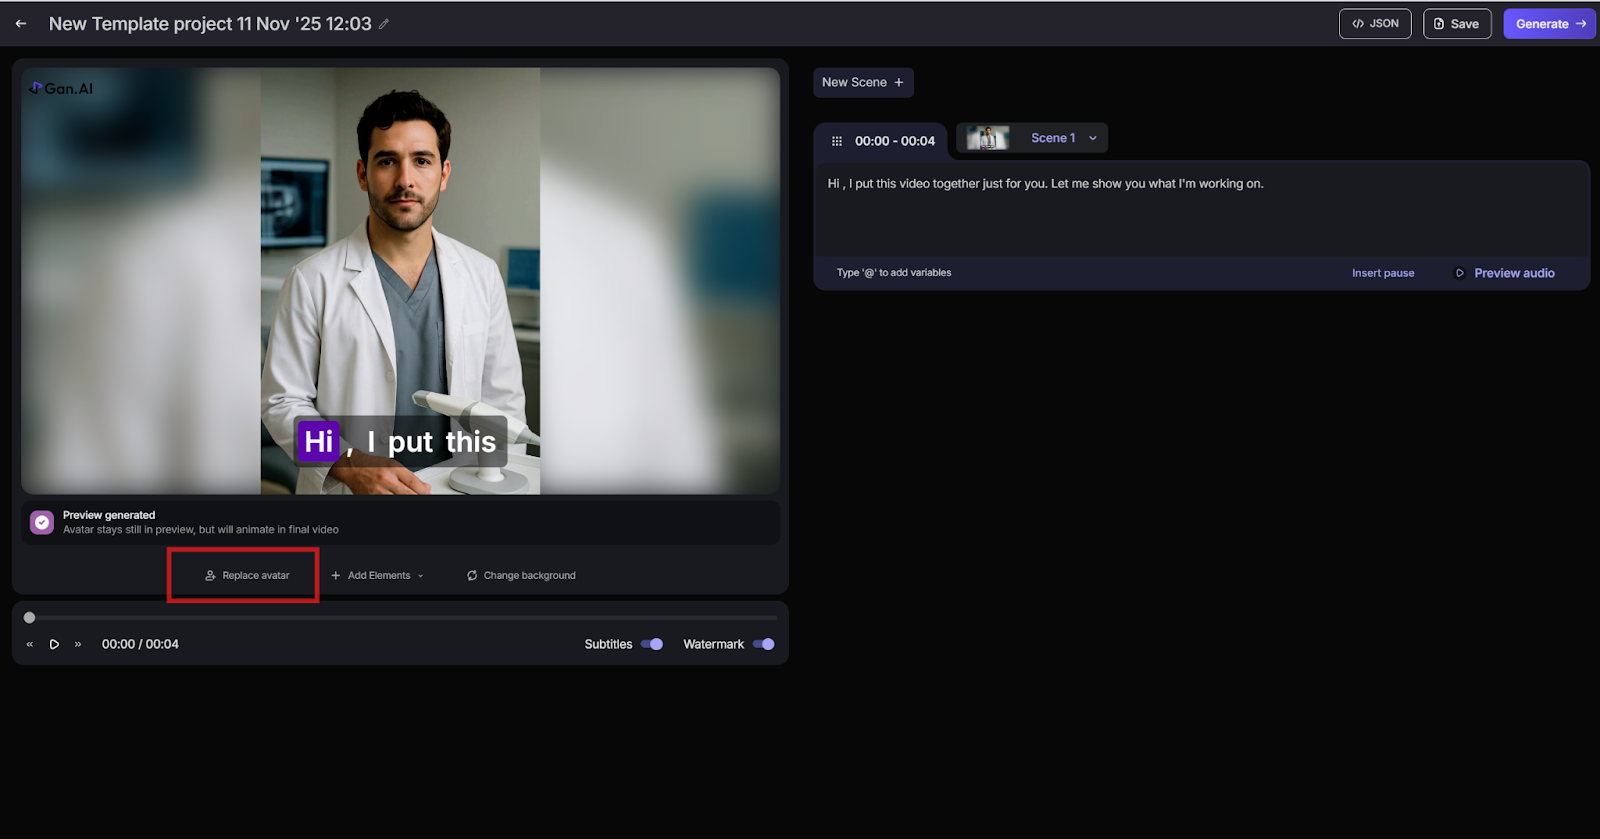
**Replace Avatar**

This button lets you change the avatar model. You can choose between custom avatars (created from real people) or stock avatars. It’s useful for testing different looks or tones that best match your message or campaign requirements.

<figure><img src="/files/5aKx2CzqvJA76emAxlfw" alt=""><figcaption></figcaption></figure>

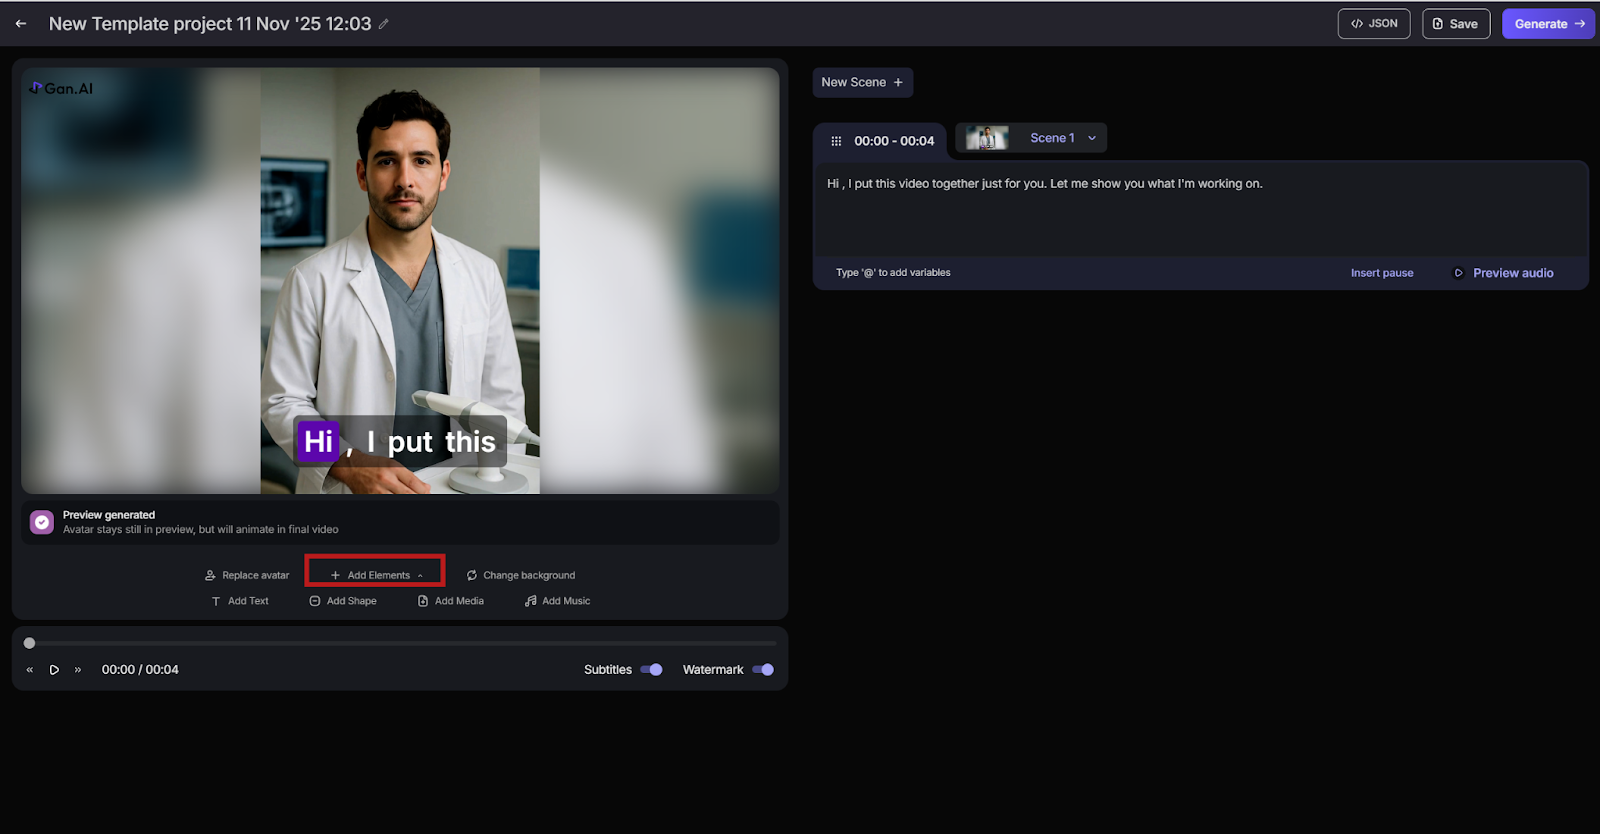
**Add Elements Button**

The Add Elements option in Gan.AI lets you enhance your video by adding visual and audio components directly to the scene. Located below the preview window, it allows you to insert text, shapes, logos, images, and background music to make videos more engaging and branded. Use it to highlight key messages or include brand assets. Keep elements balanced so your avatar remains the main focus, ensuring a clean, professional, and visually appealing final video.

<figure><img src="/files/EBbcDwGgYf4yEGvI92HP" alt=""><figcaption></figcaption></figure>

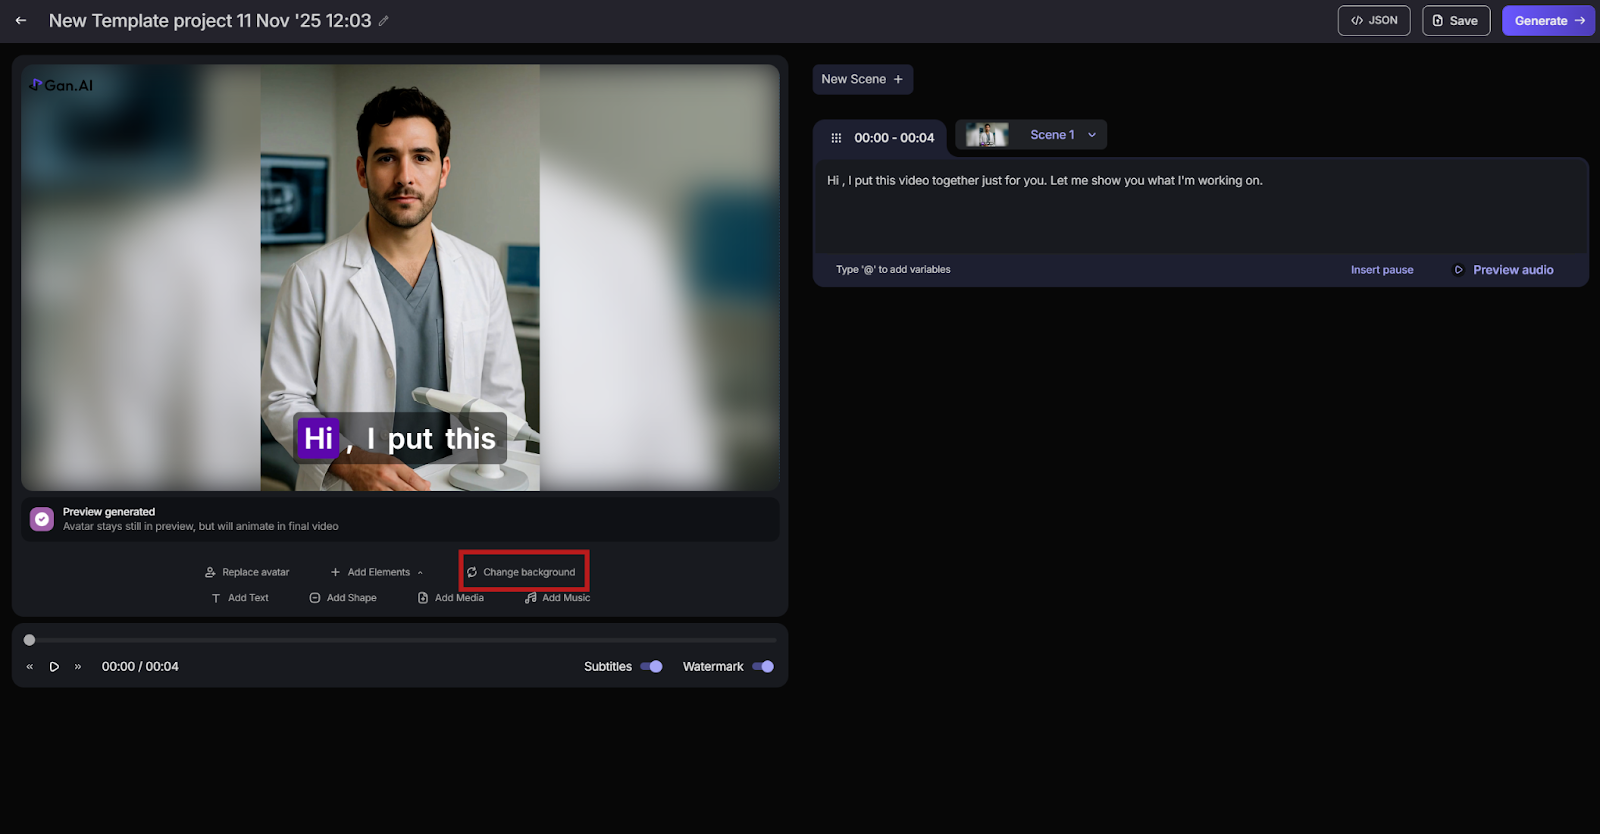
**Change Background Button**

This option allows you to switch your video background. You can use a plain color, an uploaded image, or even a video background. Matching your brand’s theme helps maintain consistency across campaigns and creates a polished, studio-quality presentation.

<figure><img src="/files/opfuChhJ2ouosJ6DsN94" alt=""><figcaption></figcaption></figure>

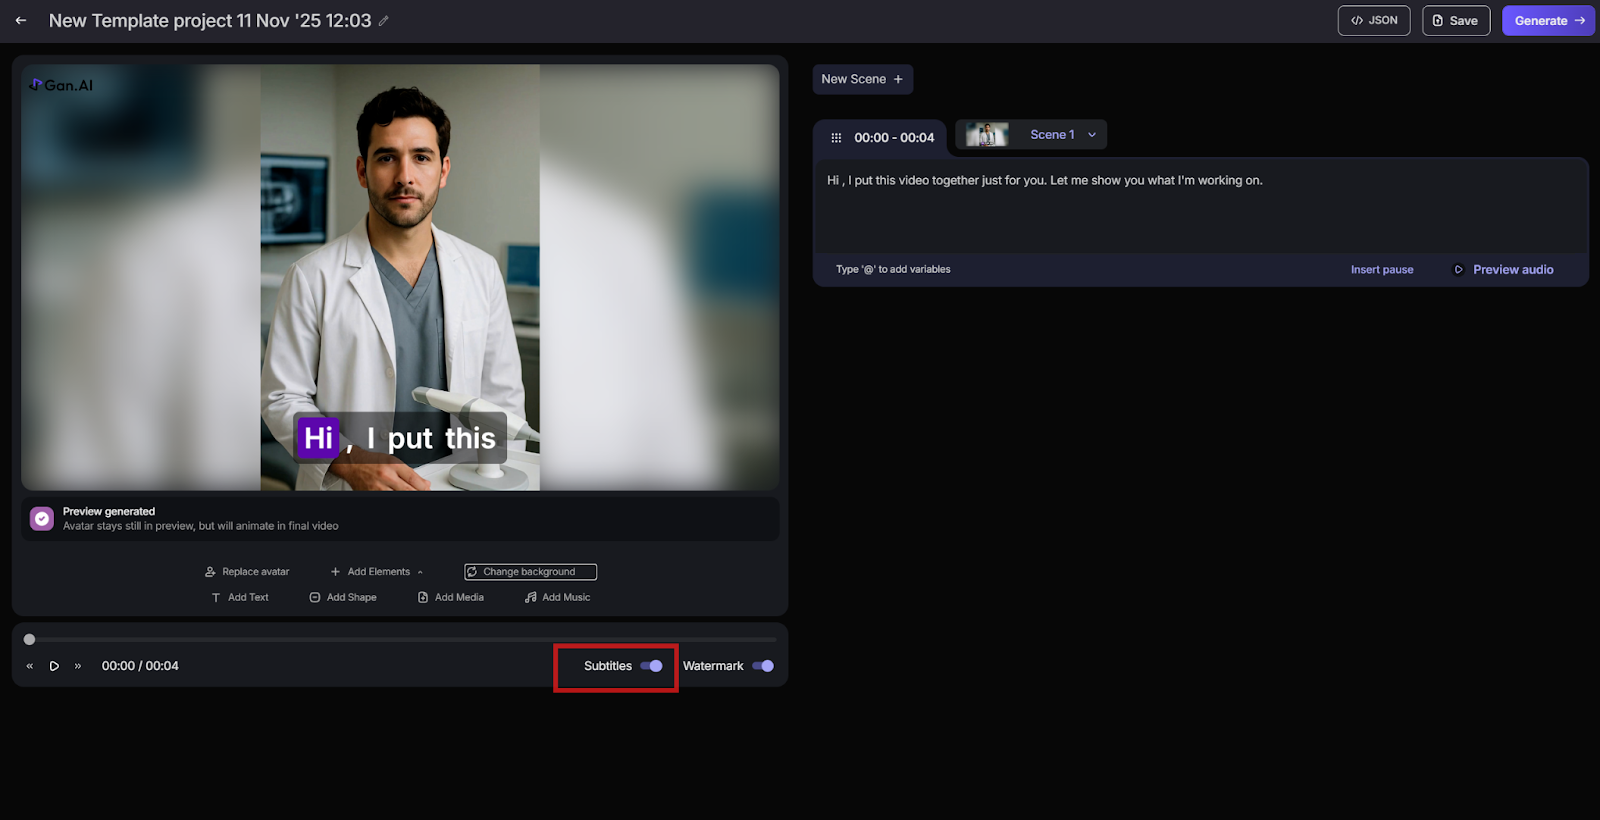
**Subtitle Toggle (Bottom Bar)**\
\
Enables or disables subtitles for your video. Subtitles are essential for accessibility and better viewer engagement, especially in multilingual or sound-off environments. Keep them on to make your message more inclusive and easy to follow.

<figure><img src="/files/rIRy0FTg3wAe2xMOhzES" alt=""><figcaption></figcaption></figure>

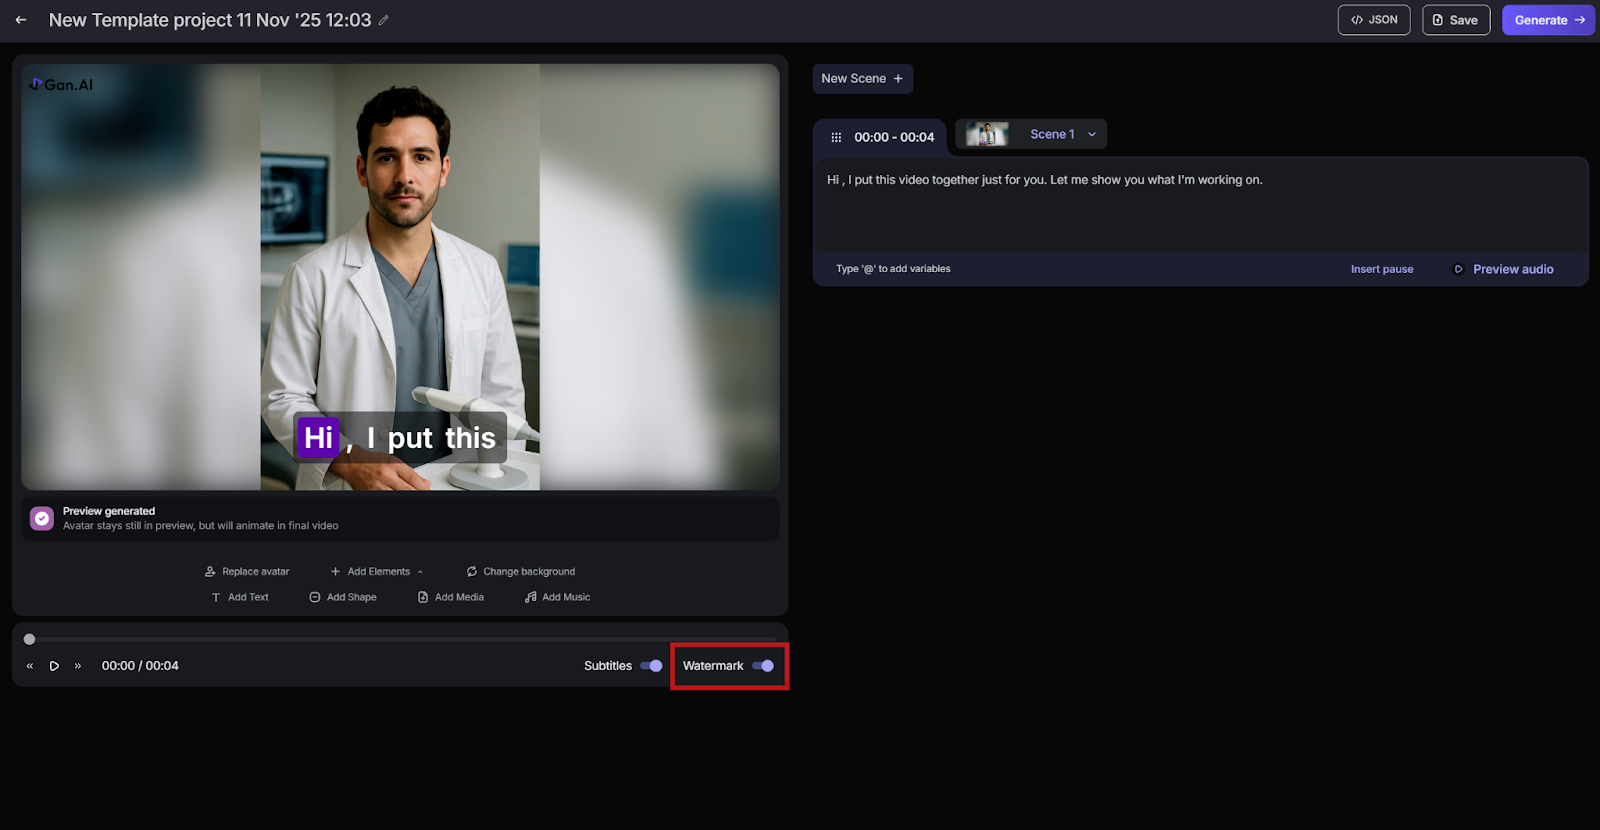
**Watermark Toggle (Bottom Bar)**

Let's you turn your brand watermark on or off. Watermarks protect your video from misuse and reinforce brand identity.

<figure><img src="/files/cL7WIeo1k23va2ukS6ij" alt=""><figcaption></figcaption></figure>

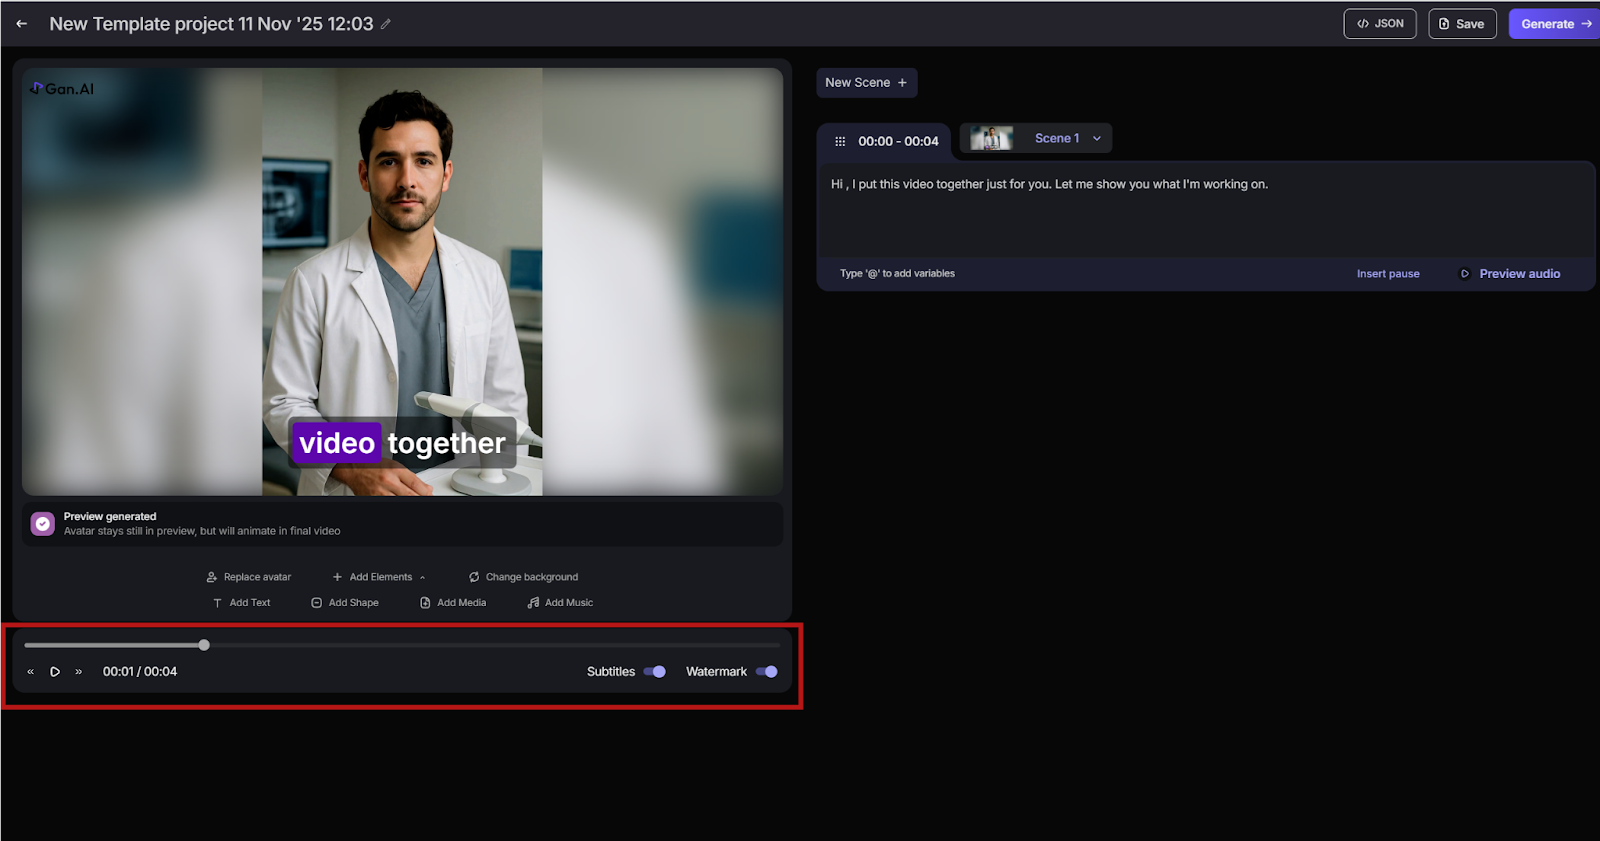
**Timeline Bar (Bottom Section)**

Displays the video’s duration and playback timeline. You can play, pause, or scrub through your video preview to review timing and flow. It’s useful for adjusting scene length, verifying transitions, and ensuring speech aligns smoothly with visuals.

<figure><img src="/files/wWlUrFmf7Smp2fs8TAHV" alt=""><figcaption></figcaption></figure>

**Generate Button**

The Generate button is the final step in the Gan.AI Avatar creation process. When clicked, it starts rendering your video — converting the typed script into speech, syncing it with your selected avatar’s lip movements, expressions, background, and visuals.

<figure><img src="/files/RYrrWd79FtPLoPviq2VG" alt=""><figcaption></figcaption></figure>

Once complete, the rendered video appears in your My Videos section for preview and download.

<figure><img src="/files/Dp2uUhHZQyptAMHXeGGl" alt=""><figcaption></figcaption></figure>

With Gan.AI’s AI Avatars, you have everything you need to turn simple scripts into compelling, human-like videos that scale effortlessly. From customizable scenes and animations to background options, branding tools, and precise audio controls, every feature is designed to help you create professional, polished content—without cameras, studios, or complex editing. Explore the editor, experiment with different avatars and elements, and watch your ideas come to life through truly lifelike digital storytellers.


# Video Personalization

Create hyper-personalized videos at scale with Gan.AI. Automatically customize names, company details, locations, and messages to deliver highly targeted, high-impact video experiences.

## **Why Personalized Videos Matter**

Personalization is powerful because it makes every video feel unique and special for each viewer. With Gan.AI, you can create thousands of customized videos from just one recording. It uses AI to change names, locations, and other details so every message feels personal and real. This helps businesses connect better, boost engagement, and increase sales. Personalized videos capture attention and build trust much more than general ads. Gan.AI also saves time by automating so many versions quickly, making marketing easy and effective. In today’s noisy world, personalization using Gan.AI helps your brand truly stand out.\\

\
This results in:

* Higher engagement - Personalized videos grab viewers’ attention by making content relevant to them. When people feel valued and addressed directly, they watch longer and interact more, boosting overall engagement with your message.
* Higher click-through rates - Tailored calls-to-action and content in personalized videos encourage viewers to click links or buttons. This personal touch can increase click-through rates several times compared to generic videos.
* Higher conversion rates - Personalization helps move viewers down the sales funnel by addressing their specific needs and preferences. This boosts the likelihood they will complete a desired action like signing up or buying, driving better conversion rates.
* Stronger customer relationships - Personalized content builds trust and loyalty by showing customers you understand and care about them individually. This leads to long-term relationships, higher satisfaction, and increased retention.

And all without re-recording the same message repeatedly.

## **Key Highlights**

1. Create 1:1 personalized videos at scale

* Record once — Gan.AI generates thousands of individualized versions automatically.

<figure><img src="/files/GOasvjrD9RKt1jl5YVW0" alt=""><figcaption></figcaption></figure>

<figure><img src="/files/Ra4Blmq5aii0E2tfQAmD" alt=""><figcaption></figcaption></figure>

2. Dynamic personalization fields

* Insert personalized details such as:\
  a. Name\
  b. Company\
  c. Industry\
  d. Product recommendations

<figure><img src="/files/iHWdh016GhpUwQzNNvfe" alt=""><figcaption></figcaption></figure>

3. Deep CRM integrations

* Connect to platforms like HubSpot, Salesforce, Zoho, Outreach, and more to pull viewer data directly.

4. Fully automated video generation

* Trigger video creation via:  \
  a. API  \
  b. Zapier  \
  c. Webhooks  \
  d. CRM workflows  \
  e. CSV imports

5. Flexible output options

* Export videos, generate shareable landing pages, or embed personalized links across channels.

<figure><img src="/files/dquqMxWW074aTLEuGIQu" alt=""><figcaption></figcaption></figure>

<figure><img src="/files/nCtFalmeHFGD12YozCfg" alt=""><figcaption></figcaption></figure>

## Popular Use Cases

* Personalized Marketing Campaigns - With Gan.AI, marketers can create tailored videos addressing each viewer by name or location. This makes messages more relevant and engaging, leading to higher brand awareness and better campaign performance.
* Sales Follow-ups & Account-Based Marketing - Sales teams use personalized videos to follow up with leads, focusing on specific accounts. This strengthens relationships by showing understanding of the customer’s needs and increases chances of closing deals.
* Customer Onboarding & Retention - New customers receive welcoming, customized videos to guide them through the product or service. Personalized onboarding increases satisfaction, reduces churn, and builds loyalty.
* Milestone, Thank-You & Celebration Videos - Gan.AI helps send timely videos for birthdays, anniversaries, or achievements. These heartfelt messages deepen emotional connections and brand affinity.
* Lifecycle Drip Sequences - Automated personalized videos sent over time nurture leads or customers throughout their journey, keeping communication consistent, relevant, and effective at every stage.

With Gan.AI Personalized Videos, you can transform a single recording into thousands of meaningful, 1:1 customer interactions—instantly and at scale. By blending automation with true human-like personalization, Gan.AI helps you deliver messages that resonate, convert, and build lasting relationships. Whether you're boosting sales, nurturing leads, or celebrating customer milestones, personalized video ensures your brand stands out with communication that feels thoughtful, relevant, and genuinely individual.


# Cinematic  Ads

Design cinematic ads with AI-powered avatars and visuals. Create film-style, personalized videos quickly, customize tone and assets, and render studio-quality results.

**Why Cinematic Ads using Gan.AI?**

Cinematic ads using Gan.AI let brands create stunning, film-quality videos in minutes—without cameras, actors, or studios. Powered by our AI avatar generator and voice technology, Gan.AI turns simple scripts into emotionally engaging, personalized ads that connect with every viewer. It’s fast, scalable, and cost-effective—perfect for brands that want high-impact storytelling with cinematic flair and human-like authenticity.

**KEY FEATURES**\
\
**AI-Generated Cinematic Quality:** Create movie-like AI video ads using avatars, voices, and visuals.

**No Studio Needed:** Produce professional videos without cameras, actors, or heavy production costs.

**Mass Personalization:** Customize ads for different names, regions, or languages—instantly and at scale.

**Emotion-Led Storytelling:** Blend visuals, sound, and narrative to form deeper audience connections.

**Multi-Platform Compatibility:** Perfect for YouTube, Instagram, LinkedIn, and all digital ad platforms.

**Faster Production, Higher Impact:** Deliver premium-quality ads quickly while boosting engagement and brand recall.

**Your Cinematic Advertisements: Quick and Fun Creation Steps**

Once you log in, you’ll land on the Gan.AI Home screen. At the top, you’ll see the text box asking, “What would you like to create today?” — this is where your cinematic ad journey begins. Enter a short, engaging script or tagline describing your product or story.

<figure><img src="/files/DxDhHm7a1gS05IjJX0sX" alt=""><figcaption></figcaption></figure>

After you have finished your script or tagline. You need to upload an image as it plays a critical and multi-faceted role in creating cinematic ads with Gan.AI. It transforms basic text-to-video generation into a rich, visually sophisticated narrative experience.

<figure><img src="/files/MA5YuH7BYtJwrJaN2Uh0" alt=""><figcaption></figcaption></figure>

Ensure your script or prompt includes all specifications: tone (professional, dramatic, upbeat). Include these details explicitly so Gan.AI generates exactly what you need without revisions. More specificity = better results.

**Settings Section**\
Located in the middle of the pop-up window, just under the description box. This area lets you configure video layout, orientation, and upload media assets. It includes multiple UI components -\
\
**Orientation**\
Defines your video’s aspect ratio or frame size. It contains 2 aspects -\
\
**16:9 (Widescreen)** – Ideal for YouTube, LinkedIn, or websites.

**9:16 (Vertical)** – For Instagram Reels, TikTok, or mobile-first ads.

<figure><img src="/files/Kb8rn5eTlTEgFt3XIgZ0" alt=""><figcaption></figcaption></figure>

**Choose an ad Style:** \
Selecting the right ad style defines the look, mood, pacing, and storytelling approach of your video.

<figure><img src="/files/x5ghFz6dYuzDTFgZDKBd" alt=""><figcaption></figcaption></figure>

<figure><img src="/files/1W15zdWWY5TJ9TSCgNDz" alt=""><figcaption></figcaption></figure>

<figure><img src="/files/jSaWkwVX5Hv1P3EbyOlQ" alt=""><figcaption></figcaption></figure>

**Duration:** It will allow you to select the duration of the video you want to create.

<figure><img src="/files/rYPF34Z3Z0pxl4mMHrfM" alt=""><figcaption></figcaption></figure>

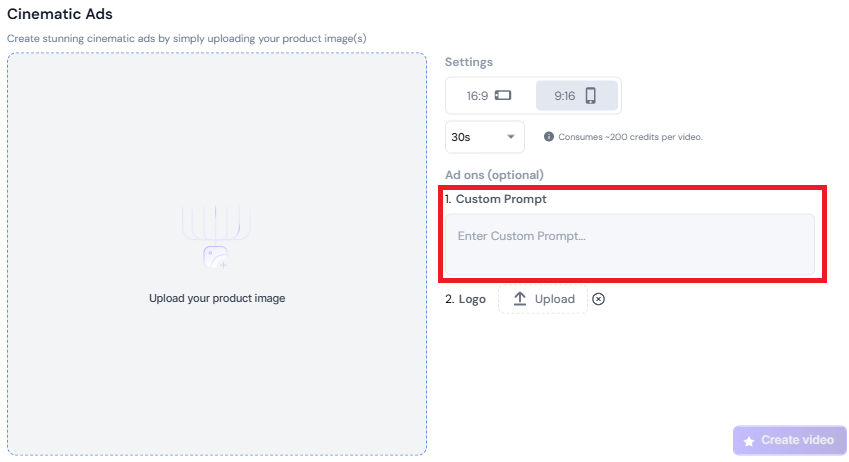
**Custom Prompt**

This is the main input box where you type your creative brief or video ad idea. It guides the AI to generate scenes, tone, and structure accordingly.

<figure><img src="/files/8KtMml255XdHmrqIyiO0" alt=""><figcaption></figcaption></figure>

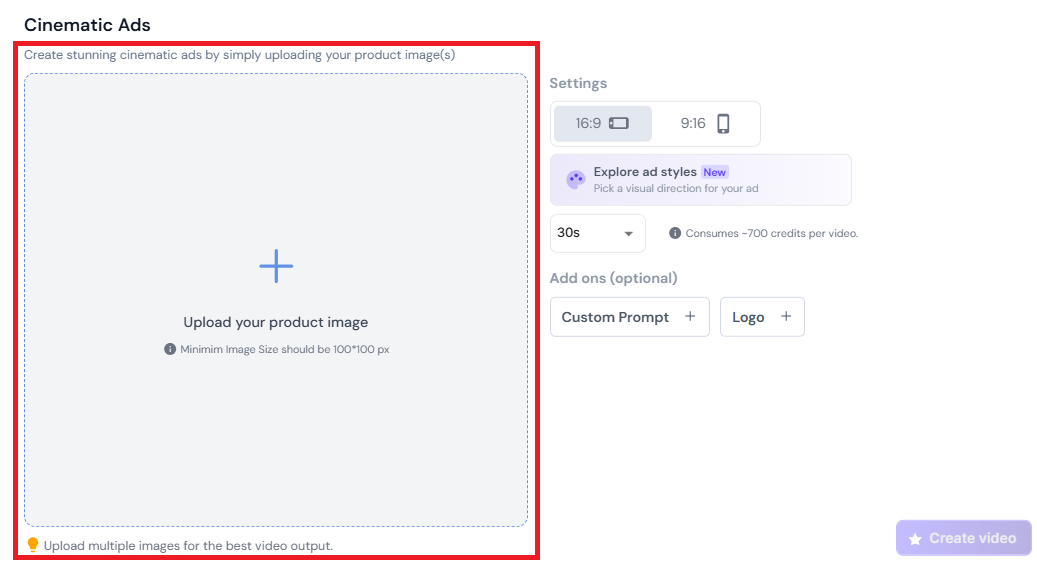
**Product Images – “Upload Your Product Image"**

<figure><img src="/files/WmFfdIoiun3pGI1xrC1A" alt=""><figcaption></figcaption></figure>

Use the “Upload Image window" to add the product image you want to use for creating the ad.

**Logo Button**

The Logo feature lets you add your brand identity directly into the cinematic ad. It ensures that your videos consistently represent your company or product visually, maintaining brand recognition, trust, and professionalism.

<figure><img src="/files/CKfIqmj87CC2rxTwTcxu" alt=""><figcaption></figcaption></figure>

**Create Video Option**\
Once everything has been finalized, kindly click on the Create Video option. The cinematic advertisement will appear under the My Videos Tab.

<figure><img src="/files/PD2L6oDi2RbxCK1yS5ol" alt=""><figcaption></figcaption></figure>

<figure><img src="/files/xEYJUcCkx8zrhJKaLVYg" alt=""><figcaption></figcaption></figure>

**Another way to start your cinematic ads journey is to click on the “Create Now” option and select cinematic ads.**

<figure><img src="/files/x3uvri9gmDZ6UvKyhAdr" alt=""><figcaption></figcaption></figure>

After clicking on the Cinematic Ads option, you need to upload an image and fill all the requested fields, as it plays a critical and multifaceted role in creating cinematic ads with Gan.AI. It transforms basic text-to-video generation into a rich, visually sophisticated narrative experience.

<figure><img src="/files/QITJzie486SuaQyYF7pg" alt=""><figcaption></figcaption></figure>

**Edit Option**

In case you want to edit your advertisement. You can do it by simply clicking on the Edit Video option.

<figure><img src="/files/2qQSFtib4txr958X65DG" alt=""><figcaption></figcaption></figure>

**Project Title Bar**

At the very top of the screen, you can set or edit the project title for your video/Ad. Simply by clicking the pencil ✏️ to rename it anytime for easier tracking.

<figure><img src="/files/SatFED4EqWFWWNJ2rO6b" alt=""><figcaption></figcaption></figure>

**Save Button:**

Located towards the top-right, beside “Generate.” Save ensures your edits are stored before rendering.

<figure><img src="/files/qWyDHWvhW6kOrRGJsUww" alt=""><figcaption></figcaption></figure>

**New Scene (+) Button**

Found at the top of the script panel, this button adds a new scene. Each scene represents a separate segment of your video and can include different avatars, backgrounds, or messages. This is helpful when building structured training, storytelling, or multi-part promotional content.

<figure><img src="/files/KQtXVIoo6iF3PP6fRhqo" alt=""><figcaption></figcaption></figure>

**Video Preview Window**&#x20;

This is the main preview area where you can view your cinematic ad.

<figure><img src="/files/pAVQS84J3x2jR36DtkKv" alt=""><figcaption></figcaption></figure>

**Show Avatar**

This button lets you choose and change the avatar model. You can choose between custom avatars (created from real people) or stock avatars. It’s useful for testing different looks or tones that best match your message or campaign requirements.

<figure><img src="/files/pCRDwnKsHkNwfx6N4hlF" alt=""><figcaption></figcaption></figure>

**Add Elements Button**\
\
The Add Elements option in Gan.AI lets you enhance your video by adding visual and audio components directly to the scene. Located below the preview window, it allows you to insert text, shapes, logos, images, and background music to make videos more engaging and branded. Use it to highlight key messages or include brand assets. Keep elements balanced so your avatar remains the main focus, ensuring a clean, professional, and visually appealing final video.

<figure><img src="/files/gffRIpeN8oEu96mzgYoy" alt=""><figcaption></figcaption></figure>

**Change Background Button**

This option allows you to switch your video background. You can use a plain color, an uploaded image, or even a video background. Matching your brand’s theme helps maintain consistency across campaigns and creates a polished, studio-quality presentation.

<figure><img src="/files/v4aGV3nRghYEQ7OKE6Hi" alt=""><figcaption></figcaption></figure>

**Subtitle Toggle (Bottom Bar)**\
\
Enables or disables subtitles for your video. Subtitles are essential for accessibility and better viewer engagement, especially in multilingual or sound-off environments. Keep them on to make your message more inclusive and easy to follow.

<figure><img src="/files/71Pp6i0F47A6u4hpH1Jt" alt=""><figcaption></figcaption></figure>

**Watermark Toggle (Bottom Bar)**

Let's you turn your brand watermark on or off. Watermarks protect your video from misuse and reinforce brand identity.

<figure><img src="/files/71xkEyiE7hc5EkxJsp9U" alt=""><figcaption></figcaption></figure>

**Timeline Bar (Bottom Section)**

Displays the video’s duration and playback timeline. You can play, pause, or scrub through your video preview to review timing and flow. It’s useful for adjusting scene length, verifying transitions, and ensuring speech aligns smoothly with visuals.

<figure><img src="/files/3hz2aBzJvceW6v6urDqx" alt=""><figcaption></figcaption></figure>

**Generate Button**

The Generate button is the final step in the Cinematic ad creation process. When clicked, it starts rendering your video — converting the typed script into speech, syncing it with your selected avatar’s lip movements, expressions, background, and visuals.

<figure><img src="/files/sipK9krENVaO8mmZZh2z" alt=""><figcaption></figcaption></figure>

Simply by clicking on your cinematic ad. You can edit, download, and share it.

<figure><img src="/files/8AaOBcvFGEhUqAcgfaSy" alt=""><figcaption></figcaption></figure>

<figure><img src="/files/pI80udR5fp4xveR3fxzS" alt=""><figcaption></figcaption></figure>

With Gan.AI Cinematic Ads, you can turn simple ideas into stunning, movie-like stories that captivate audiences across every platform. From rich visuals and customizable scenes to branded elements, avatars, and seamless automation, every tool is designed to help you craft high-impact ads in minutes—not weeks. Explore the creative controls, refine your narrative, and let AI bring your vision to life with emotion, clarity, and cinematic brilliance.


# How Does the AI Model Work?

Discover how Gan.AI uses AI voice, lip-sync, and personalization tech to produce human-like videos at scale—boosting engagement, efficiency, and conversions.

Our models are trained on a large collection of videos and voice data, allowing them to understand and recreate a wide range of speaking styles — from friendly conversations to professional sales messages.\
With every new update, Gan.AI continues to improve its voice cloning and lip-syncing capabilities. This means your personalized videos sound more natural and look more realistic over time.

The AI is also designed to recognize subtle details like pronunciation, tone, and accent, ensuring every video feels authentic to your voice. It also adapts intelligently to different scripts and variable inputs, ensuring names, places, and custom fields blend seamlessly into the final video.

By combining these capabilities, Gan.AI enables you to scale personalized communication effortlessly while maintaining the quality and authenticity of a real human recording.

#### **How This Benefits You**

* **Authentic video personalization:** Deliver videos that sound and feel like you — not a machine.
* **Scalable efficiency:** Create thousands of personalized videos without re-recording each one.
* **Time savings:** Skip repetitive video shoots and editing work.
* **Consistent quality:** Every video maintains the same tone, accuracy, and visual flow.
* **Enhanced viewer engagement:** Personalized video marketing captures attention and increases the likelihood of viewer interaction.
* **Data-driven customization:** Easily integrate viewer details through CSVs or APIs to automate large-scale personalization with precision.
* **Improved conversion rates:** Personalized messaging helps build trust and drives stronger responses across sales, marketing, and onboarding campaigns.
* **Automation-ready:** Set up your templates once and generate new personalized videos anytime without additional effort.

Gan.AI’s technology does the heavy lifting. So you can focus on connecting with your audience through engaging, human-like videos. It ensures every personalized message feels natural, relevant, and tailored to each viewer.&#x20;

With Gan.AI, you can scale your communication without sacrificing authenticity or quality.


# Personalized Project


# Recording your first AI-personalized video?

Gan.AI lets you turn one recording into thousands of personalized videos. Use variables, CSV imports, and AI lip-sync to deliver truly one-to-one viewer experiences.

Personalized projects let you generate multiple personalized video copies from a single video. This personalization is powered by variables. You can create variables for any part of the video you want to personalize. We offer various types of variables that you can easily configure, allowing you to later input the specific values to replace the original content.

This level of personalization ensures a highly tailored experience for your audience with minimal effort, at scale.

By leveraging these powerful personalization tools, you can deliver content that feels truly one-to-one, even when reaching massive audiences.

Personalized Projects also support seamless data imports, allowing you to feed viewer-specific details through CSV files and generate tailored outputs in just a few clicks.

Whether you're creating marketing campaigns, sales outreach, training videos, or customer onboarding flows, this feature helps you boost engagement, retention, and conversion rates.

Ultimately, Personalized Projects empower you to automate large-scale personalization while maintaining the authenticity and human touch of your original recording.

<figure><img src="/files/up6jcJrLfg7PTgmwksMo" alt=""><figcaption></figcaption></figure>

### Recording your first AI-personalized video?

#### Preparation Tips:

* Ensure your face and lips are clearly visible.
* Use good-quality microphone and camera equipment; higher quality inputs lead to better output.
* Avoid head-covering gear or glittery jewellery, which could obstruct lip movements.
* Record in a well-lit environment so your facial features are accurately captured.
* Maintain a steady posture and avoid sudden movements to ensure smoother lip-sync results.
* Speak at a natural pace and maintain a consistent tone for optimal voice cloning accuracy.
* Use a clean background with minimal distractions to keep the focus on your face.
* Ensure there is minimal background noise to avoid interference with audio clarity.

#### Step-by-Step Guide

**Step 1: Choose your recording mode**

* Log in to Studio by Gan.AI, go to the **AI Personalized Videos** section → click **Create New Video.**
* Choose whether you’ll record live (webcam/screen) or upload a pre-recorded video.

<figure><img src="/files/CGa8fILBppobrThCpeJw" alt=""><figcaption></figcaption></figure>

**Step 2: Set up your frame & lighting**

* Position yourself about 3 ft (≈ 1 m) from the camera.[ ](https://help.gan.ai/studio-by-gan.ai/ai-personalized-videos/recording-your-first-ai-personalized-video?utm_source=chatgpt.com)
* Don’t zoom in too much; mid-frame or full-body works best.
* Ensure lighting is even (front-lit), background is simple and non-distracting.
* Check that your lips are clearly visible and free of obstruction (hair, jewellery).

**​​Step 3: Speak naturally and clearly**

* Record in a neutral tone — avoid over-emphasising variable words (e.g., first-name, company name) so the AI can generalise better.

<figure><img src="/files/ovv2xN6gfBMaEsZTAich" alt=""><figcaption></figcaption></figure>

* Maintain a consistent pace, avoid large facial expressions or exaggerated movements, which may confuse lip-sync.
* Don’t move your head, body, or hands
* Avoid abrupt or active movements with your head, hands, and face while speaking the sentences with variables.

**Step 4: Record or upload your base video**

* If recording live: click Record, and proceed with your script.
* Avoid background noise, such as AC, fans, traffic, etc.
* Record in a quiet place with no distractions, so that the voice cloning model turns out perfect!
* If uploading: ensure the file is high-quality (HD preferred) and meets the platform’s technical requirements.
* After recording/uploading, review the video for clarity of audio, lip-sync, and visuals.

With Personalized Projects in Gan.AI, you unlock the power to turn one recording into limitless, hyper-personalized video experiences—each tailored with dynamic visuals, voice cloning, and seamless data-driven variables. Whether you're scaling marketing outreach, enhancing sales engagement, or personalizing onboarding journeys, this feature empowers you to deliver truly human, one-to-one communication at massive scale. By combining automation with authenticity, Personalized Projects ensure your message stays relevant, impactful, and deeply personal—every single time.


# Tips for recording and setup

Get the best results in Gan.AI personalized videos with proper recording setup. Follow tips for lighting, audio, framing, and script prep to ensure accurate lip-sync and voice cloning.

### Setup & Recording Checklist

Follow these best practices before hitting record:

#### **Script & Personalization Mode**

* If using Voice AI variables (i.e., you want the video to dynamically insert names or other personalized words): make your script specific, e.g., “Hi James” rather than just “Hi there”.

#### **Equipment Quality**

* Use a good-quality microphone and camera — the better your source, the better the personalization output.
* Ensure your environment is quiet, without background noise like AC, fans, traffic, etc.

#### Framing & Movement

* Position yourself at least 3 feet (\~1 meter) away from the camera, allowing space for natural movement and making sure lip movements are clearly visible.
* Keep your head inside the camera frame at all times — avoid going out of view or moving out of frame.
* Avoid sudden movements while recording — smooth, steady delivery helps the AI lip-sync accurately.
* The beard shouldn’t be too long if possible, keep it short so that the lip-sync looks better.

#### Background & Visuals

* Choose a simple, consistent background; avoid backgrounds that move or change — these can confuse the AI while processing.
* If you plan to use dynamic background scrolling (e.g., your website in motion), do not share your screen while recording—this should be applied after recording.

#### Final Review Before Generation

* Preview your recording: check audio quality, background noise, lip sync, and head framing.
* If any issues are visible (e.g., heavy shadow, too much movement, voice distortion), consider re-recording.

#### Best Practices

* Keep your script clear and conversational — a friendly tone helps personalization feel authentic.
* Limit recording time: shorter videos (\~1-2 minutes) often perform better and make personalization more efficient.
* Use natural lighting (front-lit) and ensure you’re visible without glare or shadows.
* If using personalization variables, test a few sample entries first (e.g., name, company, city) before generating a large batch.
* Maintain consistent audio volume and tone — large variations can impact voice-cloning accuracy.
* Stick to a single speaker and minimal background movement — multiple speakers or fast transitions can reduce accuracy.

By following this setup and recording checklist, you ensure that your personalized videos achieve the highest possible accuracy, clarity, and realism. Investing a few extra minutes in proper lighting, framing, audio quality, and script preparation dramatically improves lip-sync performance, voice cloning, and visual consistency. With the right setup, Gan.AI can deliver crisp, natural, and hyper-personalized outputs at scale—helping your videos feel authentic, professional, and truly tailored to every viewer.


# Personalize with variables

Personalize videos at scale with Gan.AI variables. Customize names, companies, subtitles, thumbnails, voice lines, and landing pages using dynamic text and Voice AI.

#### What are variables?

Variables are essential components for adding personalization to your video projects. They serve as placeholders for the dynamic information you want to customize—such as names, company details, or other unique data points.

Instead of creating separate video versions for each prospect, you can define specific elements as variables. These variables are automatically replaced with the personalized values you provide during the rendering process.

By setting up variables, you can efficiently produce multiple versions of the same video—each tailored to individual viewers—without recording or editing new footage every time. Depending on your project setup, these variable values can be updated either manually or through automated data integration.

#### **Different Types of Variables**

* **Voice AI Variables** — These allow you to change spoken content (voice clone & lip-sync) in the video itself.&#x20;
* **Text Variables** — These are placeholders for text elements across the project: script lines, landing page headings, thumbnails, subtitles.

#### **Different types of personalization**

1. **Voice AI & lipsync:**

* You can customize the spoken content in your videos by adding **Voice AI variables**. These variables allow you to modify specific parts of your script using your cloned voice, giving each video a unique and personal touch. To create a voice variable, simply **click or select one or more words** in your script. The selected words will be marked as variables that can be dynamically replaced during video generation. Please note that videos containing voice personalization **may take up to one week to process**, as they require additional voice synthesis and review time.

2. **Video landing pages:**

* Each personalized video copy is hosted on a unique landing page. Use text variables in landing pages to personalize titles, headings, call-to-actions, social links, and even redirection URLs. You can create highly engaging experiences for each viewer by addressing them by their name and including relevant details throughout the page.

<figure><img src="/files/mH2GxKIkLQi8hlic2Qgz" alt=""><figcaption></figcaption></figure>

3. **Personalized Thumbnails:**

* Thumbnails provide a quick snapshot of your video and play a key role in capturing viewer attention. You can personalize them to boost engagement by adding **text variables**—allowing you to dynamically include details such as the viewer’s name or other customized information. Additionally, you can **choose between static or animated thumbnails**, or **upload your own custom thumbnail** to best represent your video.

<figure><img src="/files/r8SJhTTBpNvQQfw6qXEU" alt=""><figcaption></figcaption></figure>

<p align="center"><sup>Example of an animated personalized thumbnail with the name as a variable</sup></p>

4. **Personalized subtitles:**

   You can personalize subtitles in your video by using **text variables**. This allows each version of the video to display unique details—such as the viewer’s name, company, or location—directly within the subtitle text. Personalized subtitles make your content feel more relevant and engaging for each viewer. For example, instead of a generic greeting, the subtitle could read: “**Welcome, John from TechCorp!**”

<figure><img src="/files/tgQBaiVaBriMBPCgIqP1" alt=""><figcaption></figcaption></figure>

<p align="center"><sup>Example of a name variable in subtitles</sup></p>

5. **Automatic Background:**

* The Automatic Backgrounds feature enables you to add dynamic, personalized background content behind your video for each recipient. Rather than a static background for all viewers, you can display custom content such as a viewer’s website, LinkedIn profile, a branded image, or a tailored video clip—creating an immersive, personalized experience at scale. As of now, we only support LinkedIn profiles and Facebook profiles as automatic background only.

<figure><img src="/files/nGPkRHJ8Xcl4sGFjreDq" alt=""><figcaption></figcaption></figure>

By combining Voice AI variables, text-based customization, personalized thumbnails, subtitles, and dynamic backgrounds, Gan.AI gives you complete control over how each viewer experiences your video. Variables turn a single recording into a deeply personalized message—one that feels intentionally crafted for every individual. With these tools, you can deliver highly relevant, immersive, and human-centric interactions at scale, all while saving significant time and effort in production. The result is smarter communication, stronger engagement, and a truly custom experience for every recipient.


# Setting up your personalized project

Set up your personalized video project in Gan.AI by mapping variables, configuring voice and visual personalization, and preparing your base video for large-scale generation.

**Note:** You must create and map **at least one variable** before you can publish the project.

This step also ensures that your base video, script, and data inputs are fully synchronized for accurate personalization at scale. Double-check all configurations during this stage, as they directly impact the quality and consistency of your final generated videos.

#### Step-by-Step Guide

**Step 1: Navigate to the Personalized Projects Section**

* Log in to your Gan.AI account.
* Click on the "Home" or "My Videos" page from the left sidebar and select the "Create New" option in the top corner
* Click “Create New Personalized Project” to begin.

<figure><img src="/files/I6CcCSfj4xtE4gPCmrD8" alt=""><figcaption></figcaption></figure>

**Step 2: Upload/Record Your Base Video**

* Choose the base video you recorded or record a new video.
* Rename the project from the top left corner if required.

<figure><img src="/files/Je9M8aPktWVwigQKjtOG" alt=""><figcaption></figcaption></figure>

* Ensure it meets your campaign requirements (see Tips for Recording & Setup article).

<figure><img src="/files/uNEvcGeTa68uIFhxQO0h" alt=""><figcaption></figcaption></figure>

**Step 3: Select the checkbox**

Once the video is uploaded, please select the checkboxes as requested and continue with the video personalization.

<figure><img src="/files/OXUCYVpX7rA849albtPm" alt=""><figcaption></figcaption></figure>

**Step 4: Assigning Voice AI variables**

* Click on a word or select multiple words where you want to apply video personalization.
* Enter the name of the variable you are creating (Tip: to personalize a client's name, enter the variable name as 'name'), then click on Save.

<figure><img src="/files/SEQrAXTAgvSfZ8c0RH2i" alt=""><figcaption></figcaption></figure>

After selecting the Voice AI variables, please click on Proceed and submit the video for model training.

**Once your video is submitted, the Gan.AI team will begin the model training process. You’ll receive an email notification as soon as your personalized video model is trained and the final project is ready to use.**

#### **Best Practices**

* Use variable names that are intuitive and match your data source (**e.g., @FirstName, @City**).
* Avoid placing too many variables in a single sentence — this could impact layout readability.
* Ensure your base video and background visuals are clean and consistent so personalization appears natural.
* Please ensure that the video you upload includes all final edits and changes, as Gan.AI does not trim or edit videos once they are submitted.
* Before sending your video for personalization, make sure you’re completely satisfied with the final version.
* Trim your videos before model training — trimming is not possible after training is complete.
* If your campaign videos are color corrected, ensure that your training videos are color corrected in the same way for best results.
* Keep variable text short to prevent overflow issues in on-screen elements.
* Maintain consistent lighting and framing in your base video to avoid visual mismatches during variable replacements.
* Use high-quality audio in your base recording to ensure accurate voice cloning and cleaner output.
* Test your variables with sample data before full generation to verify lip-sync, timing, and placement.

**Pro Tip: If your voice is not detected in the script, we recommend re-recording your video to ensure better clarity and accuracy. This helps the system correctly capture and process your voice.**

**For the best results, speak clearly and minimize background noise during recording.**


# Edit video landing page

Design and personalize your Gan.AI video landing page—add branding, buttons, variables, and CTAs to enhance viewer engagement and drive better campaign results.

Once you’ve set up your personalized video project, the next step is to **customize the landing page** that each recipient will see. The landing page is where your personalized video lives, and its design, branding, CTAs, and variable usage influence viewer engagement and conversion. This article guides you through everything from branding to button configuration to previewing your page.

#### **Customizing Design & Branding**

You can make the landing page look and feel like your brand by customizing visual assets and layout.

1. **Change Logo**

* Click the “**Your Logo**” button at the top of the landing-page editor.[ ](https://help.gan.ai/studio-by-gan.ai/personalized-projects/setting-up-your-personalized-project/edit-video-landing-page?utm_source=chatgpt.com)
* Upload your logo image and optionally link it to your company website.
* Set alignment (Left / Center / Right) based on your page layout.

<figure><img src="/files/3VZu4furs8cHNp7DTlZh" alt=""><figcaption></figcaption></figure>

2. **Upload Favicon**

* Ensure no element is selected in the editor (**click on blank background**).
* Click **Upload Image** under the favicon upload section and select your icon.

<figure><img src="/files/JzyxHnnho43c9f32SJY3" alt=""><figcaption></figcaption></figure>

3. **How to add/edit a background color:**

* Use the color picker to select a solid color or linear gradient background for the page.

<figure><img src="/files/qKqKj1Ut1eDbRIYBU4Wb" alt=""><figcaption></figcaption></figure>

<figure><img src="/files/uFJkUxW3XrekP3T96yvr" alt=""><figcaption></figcaption></figure>

4. **How to add a background image**

* Click on the '**Upload image**' button under the upload background image to upload your image.
* Adjust your image as needed, and click '**Save**' once you are satisfied with the changes.

<figure><img src="/files/Cbom7D6R8IimXKhZHW2C" alt=""><figcaption></figcaption></figure>

<figure><img src="/files/H12oipzC1aRAqPFU5cJB" alt=""><figcaption></figcaption></figure>

5. **How to add/remove Gan.AI branding**

* This option allows you to enable or disable the display of the **Gan.AI branding** at the footer of **your landing page**.

<figure><img src="/files/fvre081sFjCxV9wXKGI8" alt=""><figcaption></figcaption></figure>

6. **How to create/reuse variables**

* Adding variables in your landing page helps increase engagement & conversion rates. You can create new variables or reuse already created ones.
* To create a new variable, **type @** followed by the **variable name** and press enter.
* To reuse an already created variable, type '**@**' in the text box & choose the desired variable from the list.

**(Tip: Enhance your client's experience by adding a 'Name' variable to your heading. Eg. Hi @name)**

**Note:** Text variables can be created directly within the text box, while only voice variables created in the previous step can be added

You can also add variables to buttons, button URLs, social links, etc.

#### **Configure Buttons & CTAs**

\
**Call-to-Action (CTA)** buttons are one of the most important elements on your video landing page. They direct viewers toward the next step — booking a meeting, visiting your website, downloading a resource, or sharing the video.\
The Gan.AI landing page editor allows you to fully customize button types, design, personalization, and actions to match your campaign goals.

1. **Adding a New Button**

* Open your project’s Landing Page Editor.
* Button placeholders are predefined in each template, which can be customized as per the requirements.&#x20;
* Click on the button you want to modify and under '**Button Type**”.
* Enter the redirection link under '**Enter CTA URL**' if required.
* A total of 5 button types are available currently.

<figure><img src="/files/HckN09P8D3PU2wAscoZ0" alt=""><figcaption></figcaption></figure>

2. **Regular Link Button:**

* A regular link button redirects viewers to the specified link. This is helpful if you want the viewers to visit another platform after watching the video

<figure><img src="/files/CuFzkJAYXD4lnU2h5e9N" alt=""><figcaption></figcaption></figure>

3. **Download Button:**

* A download button allows viewers to download the video displayed on the landing page.

<figure><img src="/files/szprDDFAWFgEPJfk5Iwr" alt=""><figcaption></figcaption></figure>

4. **Share Button:**

* A share button allows the viewer to share the link to the landing page through various mediums.

<figure><img src="/files/kzbUY6x42E68rXJTd8tu" alt=""><figcaption></figcaption></figure>

5. **Social Button:**

* A social button lets you add links to your organization’s social media profiles, like Facebook, LinkedIn, and Instagram.
* Add the link to your social media handle under '**Social link**'

<figure><img src="/files/Qe0gpJgwEhgUPGgIj6Fy" alt=""><figcaption></figcaption></figure>

6. **Call Button:**

* A call button lets you add your contact number to a button, so if a viewer presses this, they can call you. This is helpful if most of your viewers are opening the link on their mobiles.
* Under '**Button Type**', choose 'Call Button' and now select the **country code** & **add your contact number**.

<figure><img src="/files/el8WVrCF57aulg1MZrhx" alt=""><figcaption></figcaption></figure>

<figure><img src="/files/uFJc0jiS2fK3sDs73dg5" alt=""><figcaption></figcaption></figure>

7. **Changing dimensions of your CTA Button**

By default, your CTAs are set to ‘**Auto Adjust**’, which automatically adjusts the button width based on the text length. However, if you’d like to manually set the height and width of your button, follow these steps:

* Select the CTA button you want to modify.
* In the menu, under Button Details, choose ‘**Fixed Size’**.
* Adjust the width and height as needed.

8. **Customizing Corner Radius and Border Width**\
   You can further style your CTA by changing its corner radius and border width:

* Select the CTA button you want to modify.
* In the menu, under Button Details, find ‘**Corner Radius**’ and ‘**Border Width’**.
* Adjust each setting according to your design preferences.

9. **Changing colors in your CTA**

* Select the CTA button you want to modify
* In the menu, look for '**Button color**', '**Border color**' & '**Icon color**'
* Now adjust them according to your needs
* You can also upload a font of your choice by clicking the Font dropdown button and selecting ‘**Upload Font**’.

<figure><img src="/files/fJtPACxwvbwn825jVmTZ" alt=""><figcaption></figcaption></figure>

<figure><img src="/files/SOf0ehceUKPGyFHFkfmE" alt=""><figcaption></figcaption></figure>

10. **Personalizing your CTA URLs**

You can also personalize your **CTA URL** by adding a text variable in your regular by following these simple steps:

* In the left menu, under 'Button Details', in the 'CTA URL' input (in a regular button), **type '@'**
* Now choose the desired variable from the list
* To create a new variable, click the '+' button next to 'Text' in the menu, assign a name to the variable, and click 'Save
* Your CTA redirection link is now personalized

11. **Editing the Landing Page Description**

Updating the **title and description** customizes how your **video landing page link** appears when shared. The information you add here will be visible to viewers when you share your landing page link with others.

* **Website Title**\
  The **website title** is the text that appears in your browser tab and represents your website’s link. To set or personalize your website title, follow these steps:

1. Click on the ‘**Website Title**’ tab in the side menu.
2. Under ‘**Website Title**’, enter your desired title (for example, “Gan Product Demo”).
3. To personalize the title, type ‘**@**’ to select an existing variable or create a new text variable.

* **Website Description**\
  The **website description** is the text that appears when you share your **video landing page link** with others. To set or personalize your website description, follow these steps:

1. Click on the ‘**Website Title’** tab in the side menu.
2. Under ‘**Website Description**’, enter your desired description (for example, “Hi, we’re reaching out to invite you to sign up for our product demo.”).
3. To personalize the description, type ‘**@**’ to select an existing variable or create a new text variable.

<figure><img src="/files/3SCYrPkiJv2xyaN4BIRi" alt=""><figcaption></figcaption></figure>

12. **Preview Your Page**

Previewing your landing page allows you to review your design before saving and publishing. This helps ensure everything looks and functions as intended. To preview your page, follow these steps:

* Click ‘**Preview**’ in the top-right corner.
* Review your landing page to check layout, content, and personalization details.
* To make additional edits, click ‘**Exit Preview**’ to return to the editor.
* Once you’re satisfied, click ‘**Publish Changes**’ to finalize and go live.

With Gan.AI’s landing page customization, you can turn every personalized video into a fully branded, action-driven experience. By adding variables, clear CTAs, and consistent design, each viewer gets a page that feels tailored and professional. This simple setup boosts engagement, strengthens your message, and guides viewers toward the actions that matter most.


# Thumbnails

Enhance your video campaigns with dynamic, personalized thumbnails. Add variables, customize design, and auto-generate unique previews for every viewer.

### **What is a personalized thumbnail?**

Personalized thumbnails serve as customized previews of your video content, designed specifically for each recipient. They display a short, attention-grabbing snapshot of the video that can include the viewer’s name or a personalized message. Thus, making it far more engaging than a static image.<br>

You can easily **copy these thumbnails** and **paste them directly** into your **email editor**, **WhatsApp**, or **Slack** to share personalized video previews seamlessly.

#### **Why Use Personalized Thumbnails?**

* Personalized thumbnails attract attention: **A thumbnail that includes the viewer’s name or company creates a sense** of “**this is for me,**” which drives **higher click-through rates**.
* They improve consistency across your campaign: When thumbnails match the personalization in the video itself (name, company, dynamic visuals), it strengthens the message and credibility.
* They reduce manual work: Instead of creating dozens or hundreds of static thumbnail images per recipient, the system lets you use variables and generate customized versions automatically.

***

#### **How to Set Up Personalized Thumbnails?**

**Step 1: Navigate to the Thumbnails Section**

* In your personalized project, go to the “**Settings**” tab and select the "**Thumbnail**" option.

<figure><img src="/files/tO8tnkfliE5TdT8uWnLo" alt=""><figcaption></figcaption></figure>

<figure><img src="/files/Y0N8aQF5Snx2GJnfYmog" alt=""><figcaption></figcaption></figure>

**Step 2: Select the Thumbnail Preview type**

1. Studio by Gan.AI supports multiple thumbnail types for flexibility:

* **Static**: A still image from your video or a custom image upload (JPG/PNG).
* **Animated**: A short, silent GIF extracted from your video (movement can increase engagement).
* **Custom Upload**: Upload your own designed image (JPG/PNG) to act as the thumbnail.

<figure><img src="/files/AF7AeFHvCaGicRsPuVIi" alt=""><figcaption></figcaption></figure>

* You can also select a specific part of the video to use as the preview.
* If you choose an animated preview, the selected segment will be generated as a GIF.

**Step 3: Personalized Thumbnail Text**

* In the “**Thumbnail Text**” field (or editable area), type your default text. For example: “**@FirstName** from **@Company** – Your personalized video is here”
* To insert a variable: **type @**, then select from the drop-down list (or **type the exact variable name**).
* You may use multiple variables in one thumbnail line if needed (e.g., @FirstName, @ProductName, @City).
* If you’re already using variables for subtitles or landing pages, you can reuse the same variable names here for consistency.

<figure><img src="/files/DGkQIpJzll7QgB7KhhaR" alt=""><figcaption></figcaption></figure>

**Step 4: Edit Thumbnail Design**

* Click “**Edit Thumbnail Design**” to open the design editor.
* **Text Size:** Select an appropriate size for the text.
* **Text Color:** Choose contrast colours for readability (e.g., white text on dark background).
* **Text Transparency:** Adjust the Transparency for better readability.
* **Text Background / Padding:** Adjust padding or background colour/transparency for clarity. Text background can also be disabled here.
* **Positioning:** Drag and position the text box so it doesn’t overlap critical parts of the image or avatar.\
  After editing, click Save Changes.

<figure><img src="/files/yRmWhFt96P5RTvlzeWkf" alt=""><figcaption></figcaption></figure>

#### Best Practices for Thumbnail Personalized Setup

* Use **short and impactful text** — lengthy sentences may become unreadable in thumbnail format.
* Place your variable text in the top third or centre of the image so it remains visible in preview snippets across email clients or mobile devices.
* When using multiple variables, test examples with long values (e.g., long names or company names) to ensure the design accommodates all variations.
* Avoid placing the variable text near image edges or over busy backgrounds; ensure readability across devices.
* **Maintain brand consistency** — use your brand colours, logo, or fonts in the thumbnail design.

#### Troubleshooting Thumbnail Issues

| **Issue**                                             | **Possible Fix**                                                                                        |
| ----------------------------------------------------- | ------------------------------------------------------------------------------------------------------- |
| Thumbnail image appears blurry or low quality         | Use high resolution image for custom uploads. For GIFs, ensure source video quality is sufficient.      |
| Multiple variables overlap or text becomes unreadable | Reduce number of variables, shorten text, increase font size or redesign layout to allow more space.    |
| Animated thumbnail doesn’t play / appears as static   | Confirm GIF format is supported; re-upload as animated type; test in your email client or landing page. |
| Thumbnail image appears blurry or low quality         | Use high resolution image for custom uploads. For GIFs, ensure source video quality is sufficient.      |

Personalized thumbnails are a simple but powerful way to boost engagement, making each viewer feel the content was created just for them. By combining variables, clean design, and consistent branding, you can generate high-impact thumbnail previews at scale—without manual editing. A well-designed personalized thumbnail not only increases click-through rates but also strengthens the overall experience across your personalized video campaign.


# Subtitles

Gan.AI lets you create, edit, and personalize subtitles using variables, custom designs, and auto-transcription—perfect for improving clarity and viewer engagement.

#### Step-by-Step Guide

**Step 1: Navigate to the Subtitles Settings**

* Go to Personalize Project and select settings.
* Now click on “**Voice and Subtitles**” to personalize.
* On the same page, you can see the marked voice variables in the actual script.

<figure><img src="/files/9qv9nPCwQKyhtWOvvpHi" alt=""><figcaption></figcaption></figure>

<figure><img src="/files/xEKujwhCnkNynbKT6U0J" alt=""><figcaption></figcaption></figure>

**Step 2: Enable Subtitles for the Video**

* In the Subtitles section, go to “**Edit Subtitles**” and toggle “**Enable Subtitles**” so that the system starts generating captions.
* If your base video includes spoken content, the system will analyze the audio and align subtitle lines accordingly.

<figure><img src="/files/WvyFFnmqp107p1Rq7JSo" alt=""><figcaption></figcaption></figure>

<figure><img src="/files/RAiOU5Sz4FpltIl8LZGA" alt=""><figcaption></figcaption></figure>

<figure><img src="/files/piuVWJKw91bu5a6yTDYE" alt=""><figcaption></figcaption></figure>

**Step 3: Subtitles Options**

Once you have enabled the subtitles, two options will be available for the subtitles as below:

1. **Auto-Generated Subtitles**

* Gan.AI automatically transcribes your video and generates accurate subtitles aligned with the audio script.

**How it works:**

* The platform uses AI transcription to detect spoken words and place subtitles in sync with the video.
* Once generated, you can edit text and style the subtitles from within the editor.
* This method is ideal for most videos since it saves time and ensures alignment with the spoken script.

<figure><img src="/files/vNzX18CJeDr3DHEwBz8D" alt=""><figcaption></figcaption></figure>

2. **Upload Custom Subtitles**

* If you already have a subtitle file created elsewhere, Gan.AI lets you upload your own subtitle file instead of using auto-generated ones.

**To upload:**

1. Go to the **Subtitles** tab inside your personalized project.
2. Click “**Upload Subtitles**” (or Upload Custom File).
3. Select your .srt file from your system.
4. Once uploaded, preview the video to ensure proper timing and alignment.
5. You can still **edit or personalize** these subtitles inside the editor (add variables, adjust colours/size, etc.).

<figure><img src="/files/ClYeYla1d2lmTCz86mmB" alt=""><figcaption></figcaption></figure>

**Step 4: Personalize Subtitles Using Variables**

* To make subtitles personalized for each recipient: insert variables into the subtitle text (e.g., <mark style="color:$success;">@FirstName, @Company</mark>).
* Select the text you want to change and select from the available variables as per the requirements.
* Example: change “Welcome to the demo” → “Welcome, @FirstName from @Company!”
* Ensure that your data source (CSV or integration) contains matching columns for each variable you use. Ensure that your data source (CSV or integration) contains matching columns for each variable you use.

<figure><img src="/files/TJTT7vE870y79oYPWzr4" alt=""><figcaption></figcaption></figure>

**Step 5: Customize Subtitle Design**

1. Under Edit Subtitle Design, choose:

* Font size, color, and transparency
* Text and background colour
* Subtitle box transparency
* On-screen position (bottom, middle, or custom)

2. Preview changes live before saving.

<figure><img src="/files/PaljtEs8MM3ddN3gAorp" alt=""><figcaption></figcaption></figure>

<figure><img src="/files/iiYQL2CuFBsr6WUneMI7" alt=""><figcaption></figcaption></figure>

**Step 6: Preview and Publish**

* Click Preview to test both the subtitle accuracy and personalization by playing the video on the same page.
* For personalized projects, check at least two sample entries with variable substitution.
* When ready, click **Save & Close** in the top right corner.

<figure><img src="/files/L8CjDKmgkcw1TpTGrJdv" alt=""><figcaption></figcaption></figure>

#### Best Practices

* Always test auto-generated subtitles for accuracy, especially in videos with background noise or multiple speakers.
* Use short, readable lines (no more than two per frame).
* Keep variable placeholders consistent with your data sheet or CRM field names.
* Choose high-contrast text colours for accessibility.
* Preview on both desktop and mobile to ensure readability.

With Gan.AI’s subtitle tools, you can make your videos more accessible, more engaging, and more personalized—all within a few clicks. By combining auto-generated captions, custom uploads, and variable-driven personalization, every viewer receives a tailored experience that feels clear, relevant, and professional. Clean design, accurate timing, and thoughtful placement help ensure your subtitles enhance the message without distraction.


# Background music

Gan.AI makes it easy to upload, replace, and fine-tune background music. Customize audio levels, preview updates, and enhance your personalized video experience.

Gan.AI also lets you switch or update your BGM at any stage of your project, giving you full creative flexibility. Once applied, you can instantly preview the final output to make sure the music complements your message perfectly before saving the changes.

#### Step 1:

* Open Your Personalized Project
* Log in to Gan.AI Dashboard
* Go to My Videos
* Select the personalized project where you want to add or update BGM

<figure><img src="/files/rp49VDfmCwii1UFTa2Om" alt=""><figcaption></figcaption></figure>

**You will now enter the main Project Workspace.**

#### **Step 2:**

1. Open the Project
2. Once you are inside the project:

* Click Project Settings.

<figure><img src="/files/SpzbXfPDmhyzlIoJEfxy" alt=""><figcaption></figcaption></figure>

* Look for the Background Music option on the left panel.

<figure><img src="/files/gxXWDsTQgh8jDZcK8k80" alt=""><figcaption></figcaption></figure>

#### **Step 3: Add or Replace Background Music**

In the **BGM Section**, you will see the following option:

* Upload Your Own Custom BGM
* Click “Upload Audio File”
* Select your MP3 / WAV / AAC audio
* Wait for the upload to finish

<figure><img src="/files/NHg3szBW8ieYJrF46jiq" alt=""><figcaption></figcaption></figure>

**This is recommended if:**

* You have licensed music.
* You want brand-consistent sound.
* You need region-specific audio.
* You need the BGM of the exact length or a longer length according to the base video.

#### **Step 4: Adjust Audio Settings and Preview Your Video with BGM**

After uploading the BGM, you can fine-tune:

1. Volume Level

* Adjust the BGM volume as required to avoid overpowering the vocal text spoken by the speaker.
* Sync with Voiceover - Ensure the BGM complements the script pacing.

2. Click Preview Video to play back the updated version.

**Check:**

* Audio clarity
* Voice vs. BGM balance
* Timing
* Smoothness of transitions

**If the BGM is too loud:**

* Reduce BGM volume

<figure><img src="/files/SHM5q81njHlLetw9avE7" alt=""><figcaption></figcaption></figure>

#### **Step 5:** Save & Close to publish the Changes

When you're happy with the BGM:

* Click Save and Close.

<figure><img src="/files/7N2agxospRZmUXbkqYiU" alt=""><figcaption></figcaption></figure>

**Important:**

* Updating the BGM does not regenerate videos
* Future personalized videos will use the updated BGM automatically

#### **Step 6:** Re-Generate Videos (Only If You Want Re-Synced Audio)

If you want to refresh every personalized video:

* Go to **Generated Videos**
* Select specific videos
* Click Re-Generate

#### Best Practices for BGM in Personalized Videos

* Use soft, non-distracting music for sales outreach
* Use upbeat BGM for marketing ads
* Keep vocals louder than the background music
* Avoid copyrighted audio unless you own full rights
* Always preview before publishing
* Keep a backup of your original BGM files in case you need to switch versions later
* Use high-quality, royalty-free audio files to ensure the best output quality<br>

With Gan.AI’s flexible BGM tools, you can quickly shape the mood and emotional tone of your personalized videos. Whether you’re aiming for a subtle, professional ambience or high-energy marketing sound, the platform makes it easy to upload, adjust, and preview your audio in real time. Thoughtful music choices—paired with clear voice balance—help your videos feel polished, engaging, and perfectly aligned with your brand.


# Automatic Backgrounds

Create highly personalized videos with Automatic Backgrounds in Gan.AI. Add dynamic LinkedIn or Facebook backgrounds to engage viewers and automate large-scale customization.

#### Why Use Automatic Backgrounds?

Using dynamic backgrounds helps you:

* Establish an **immediate visual connection** with each viewer by showing relevant content behind the avatar or person in the video (e.g., their website, city, or company).
* Increase **viewer engagement and perceived personalization**, thereby improving click-through and conversion rates.
* Automate what would otherwise require manual video editing for each version—saving time and resources when creating personalized videos at scale.

<figure><img src="/files/hMxX51zTspT3bFrCSpAO" alt=""><figcaption></figcaption></figure>

#### How to Set Up Automatic Backgrounds

**Step 1: Enable Automatic Backgrounds**

* Go to the Personalized project “**Settings**” and click on “**Automatic backgrounds settings**”.
* Use the “**Enable Automatic Backgrounds**” Option or click on the “**ON/OFF**” button in the top right corner.

<figure><img src="/files/gzx509X6xJnZSMH6cDUY" alt=""><figcaption></figcaption></figure>

<figure><img src="/files/nJS7NJMTeVuuN4d6GimO" alt=""><figcaption></figcaption></figure>

**Step 2: Add a Background**

* In the “**Automatic backgrounds settings**”, please click on “**Add background**”.

<figure><img src="/files/k3XNM08KmhW6MCt7ybiS" alt=""><figcaption></figcaption></figure>

**Step 3: Background/Camera settings**

* Background/Camera setting can be updated with the following options:

1. Assign a clear, descriptive name to the automatic background.
2. This name will be used to reference the personalized content
3. **Keep my face visible:** Choose whether to keep my face visible while scrolling the website or not.
4. **Camera bubble position:** Camera bubble position can be tweaked from this option. You can also directly drag and change the camera bubble position.
5. **Scroll Speed:** Select the background scroll speed: Slow/Medium/Fast options.
6. **Screen Share Quality:** Select the screen share quality from Low/Medium/High
7. **Pause scrolling:** Scrolling can be paused for a specific time duration by adding “**Pause start**” and “**Pause End**” times.

<figure><img src="/files/HPpsGPUtjI50T3LQkrwd" alt=""><figcaption></figcaption></figure>

**Step 4: Camera Bubble customization**

* Camera bubble position and size can be changed/updated by moving it.
* Multiple background positions can also be adjusted from this window.

<figure><img src="/files/toXoI8gN1kgaJ2CGSfbF" alt=""><figcaption></figcaption></figure>

**Step 5: How to add LinkedIn profiles as Backgrounds?**

{% embed url="<https://app.supademo.com/demo/cmhyhxxr84hac17y0yaurl9g0?utm_source=link>" %}

1. **For Chrome:**

* Log in to the Gan.AI account&#x20;
* Select the project for which the LinkedIn access code needs to be set up
* Click on '**Project settings.**'
* Go to **'Dynamic backgrounds**
* Go to your LinkedIn profile page and press **Cmd + Shift + C for Mac** or **Ctrl + Shift + I for Windows** to open the inspect window for the page, or right-click with the mouse and click “**Inspect**”.&#x20;
* Click on the **Application panel** at the top.&#x20;
* In the left panel, under the **Storage section**, click on the **Cookies** dropdown.&#x20;
* In the dropdown, click on the **LinkedIn URL**.&#x20;
* In the right section, copy the value corresponding to **li\_at** (as shown in the demo) and paste it in the Gan platform in the “**LinkedIn scrolling access**” “**li\_at**” box.

2. **For Safari:**
   * Log in to the Gan.AI account&#x20;
   * Select the project for which the LinkedIn access code needs to be set up
   * Click on '**Project settings**'
   * Go to **'Dynamic backgrounds'**
   * Go to your LinkedIn profile page and press **Cmd + Shift + C**.
   * Click on the **Storage panel** at the top.&#x20;
   * In the left panel, click on the **Cookies** dropdown.&#x20;
   * In the dropdown, click on the **LinkedIn URL**.&#x20;
   * In the right section, double-click in **li\_at** & copy its value (as shown in the demo).
   * Paste the copied value in the Gan platform.

**Step 7: How to add Facebook profiles as Backgrounds?**

{% embed url="<https://app.supademo.com/demo/cmhyoqkbr4r2t17y0cw4t2zzf?utm_source=link>" %}

1. **For Chrome:**
   * Go to your **Facebook profile page** and press **Cmd + Shift + C for Mac** or **Ctrl + Shift + I for Windows** to open the **inspect** window for the page, or right-click with the mouse and click “**Inspect**”.&#x20;
   * Click on the **Application panel** at the top.&#x20;
   * In the left panel, under the **Storage section**, click on the **Cookies** dropdown.&#x20;
   * In the dropdown, click on the **Facebook URL**.&#x20;
   * In the right section, copy the values corresponding to “**xs**” and “**c\_user**” (as shown in the demo) and paste it in the Gan platform in the “**Facebook scrolling access**” in “**xs**” and “**c\_user**” options, respectively.
2. **For Safari:**

* Go to your Facebook profile page and press **Cmd + Shift + C**.
* Click on the **Storage** panel at the top.&#x20;
* In the left panel, click on the **Cookies** dropdown.&#x20;
* In the dropdown, click on the **Facebook URL.**&#x20;
* In the right section, double click & copy the values corresponding to **xs** and **c\_user** (as shown in the demo).
* Paste the copied values in the Gan platform.

***

#### Troubleshooting & Common Issues

| Issue                                                                      | Likely Cause                                                        | Solution                                                                                         |
| -------------------------------------------------------------------------- | ------------------------------------------------------------------- | ------------------------------------------------------------------------------------------------ |
| Background variable shows blank or default instead of personalized content | Variable name mismatch or data missing                              | Confirm variable name exactly matches your data source column and that all rows have content     |
| Background appears too early or too late in the video                      | Timeframe settings incorrect                                        | Adjust Start/End times to the correct segment of the video                                       |
| Avatar or face is obscured by background content                           | Face visibility toggle set incorrectly or background covers subject | Enable “Keep face visible” or adjust bubble position / background layout                         |
| Scrolling appears choppy or low quality                                    | Screen share quality set too low or system resource constrained     | Increase quality setting, close other heavy apps, or re-record with higher system specs          |
| LinkedIn/Facebook background not loading                                   | Required access code missing, or permissions issue                  | Ensure cookie need values (li\_at, xs, c\_user) are provided and valid; refresh login and re-try |

Automatic Backgrounds add a powerful layer of personalization to your videos by instantly adapting the backdrop to each viewer. With dynamic LinkedIn or Facebook profiles and customizable scrolling settings, you can create highly immersive, relevant experiences at scale—without manual editing. This feature not only boosts engagement but also helps your message feel more tailored, modern, and memorable.


# Generating personalized copies

Gan.AI lets you create personalized video copies through bulk CSV uploads, single-video generation, or automated CRM/API workflows—fast and scalable.

**GAN.AI makes it easy to generate 1-to-1 personalized videos at scale using three different methods:**

* Automated Bulk Generation (CSV Upload)
* Manual Single Video Generation
* Integration-Based Automated Generation

This guide explains each method so you can choose the workflow that best fits your campaign.

#### Automated Generation (CSV Upload)

Ideal for **bulk video generation** — marketing campaigns, sales outreach, onboarding sequences, etc.

**When to Use This Method**

Use CSV upload when you want to generate **dozens**, **hundreds**, or **thousands** of videos at once.

**How It Works**

You upload a CSV file that contains personalization fields with headers matching your variable names.\
\
GAN.AI automatically generates personalized videos for each row.

**Steps**

* Go to your GAN.AI Dashboard
* Open the Personalized Video Project
* Click Generate Videos
* Select Import CSV

<figure><img src="/files/BhERPDA6b7vAxunpwr3L" alt=""><figcaption></figcaption></figure>

* Download the CSV Template.

<figure><img src="/files/HkUoFcStnlN0ZfcII3aL" alt=""><figcaption></figcaption></figure>

* Fill the CSV file with the headers matching your variables and save the CSV.
* Upload the CSV to the project and map the fields with the headers on the dashboard.

<figure><img src="/files/c02rGVY5aUaJB6InB7rL" alt=""><figcaption></figcaption></figure>

* Check the data you have uploaded using the CSV before generating the videos.
* Once checked, click Generate Video.

<figure><img src="/files/rx92ntU4Tq4lBaE1nvpa" alt=""><figcaption></figcaption></figure>

* Once the video generation is triggered, the videos will be available on your project dashboard.

<figure><img src="/files/DsbzWQfSd4dgL0sEeFDW" alt=""><figcaption></figcaption></figure>

#### Manual Generation (Create One Video)

Perfect for testing, one-off messages, or personal outreach.

**When to Use This Method**

* You want to send a personalized 1:1 video to a single person
* You need to test your template before launching a big campaign
* You want to customize details manually

**Steps**

* Open your personalized project in GAN.AI
* Click “Generate Videos”
* Select Enter Variables Manually.

<figure><img src="/files/C7qRQOrMnz9qK68XkjjK" alt=""><figcaption></figcaption></figure>

* Fill in the data with the headers matching your variables in the fields given.
* Check the data you entered in the fields before generating the videos.
* Once checked, click Generate Video.

<figure><img src="/files/x2nZw4hgGq1yW2R6RT2V" alt=""><figcaption></figcaption></figure>

7. Once the video generation is triggered, the videos will be available on your project dashboard.

<figure><img src="/files/GWS7Uddejn9YoJxUHhxG" alt=""><figcaption></figcaption></figure>

#### Integration-Based Generation (API, CRM, Zapier)

This is the most powerful method for fully automated, real-time personalization.

**Examples of Automated Workflows**

* Generate a personalized welcome video when a user signs up
* Send a personalized “Meeting Reminder” video via email
* Trigger a video when a HubSpot lead changes lifecycle stage
* Auto-create videos for abandoned cart recovery

**How to Set It Up**

1. Open the personalized project you want to set the automated integration for.
2. Go to Project Settings.

<figure><img src="/files/OUZRkBotCS264vJ6hmoa" alt=""><figcaption></figcaption></figure>

3. Go to Integrations

<figure><img src="/files/cXIowafsw2OHWaeUSfNG" alt=""><figcaption></figcaption></figure>

4. You can choose from the existing integrations as mentioned below and enable them accordingly.

* CRM (HubSpot, Salesforce)
* Automation (Zapier, Make)
* API / Webhook

<figure><img src="/files/q034DI7ZDKds0ou0iiEq" alt=""><figcaption></figcaption></figure>

5. Authenticate your account
6. Select your trigger event (e.g., “New Lead Created”)
7. Map personalization fields to GAN.AI variables
8. Activate the Workflow

#### **Troubleshooting**

**Videos stuck in the queue**

* Check if your CSV has formatting issues
* Ensure the integration trigger is firing correctly
* Try regenerating the project preview

**Variables are not being replaced correctly**

* Make sure CSV headers match the project variable names
* Review the integration field mapping
* Re-check placeholder formatting in your template

**Did not receive output links**

* Check email deliverability
* Confirm workflow settings
* Verify your export method (CSV download, API callback, etc.)

By choosing the right generation method—CSV upload, manual input, or automated integrations—you can scale personalized video creation exactly the way your campaign needs. GAN.AI makes the entire process fast, flexible, and reliable, ensuring every viewer receives a video that feels truly tailored to them.


# View Personalized Video Analytics

Track performance with Gan.AI’s analytics dashboard. View video views, clicks, retention, device split, geo insights, and viewer-level behavior to optimize campaigns.

#### How to View Analytics

**Steps to view analytics for a video:**

To access your analytics:

* Go to your Gan.AI Dashboard
* Open your personalized project
* Click the Analytics tab.

<figure><img src="/files/rzUUJpEmxikX1oRvKJFW" alt=""><figcaption></figcaption></figure>

* You will now see the Personalized Video Analytics dashboard, like the one shown in the screenshot.

<figure><img src="/files/Uz1HsMgZRjWj1ONHzcWP" alt="Analytics Dashboard"><figcaption></figcaption></figure>

**You can filter data by:**

* Country
* Date Range (Last 7 Days, 30 Days, etc.)

**Analytics Dashboard Overview**

Your analytics dashboard is divided into four key sections:

#### **Summary Section (Top Row)**

**This gives you a quick snapshot of your video performance:**

|  Video Copies Generated  |         Number of personalized videos successfully created        |
| :----------------------: | :---------------------------------------------------------------: |
|    Total Links Clicked   | Total number of times any links were clicked on your landing page |
|   Unique Links Clicked   |       How many unique viewers clicked a link (no duplicates)      |
|     Total Video Views    |                 Total number of video play events                 |
|    Unique Video Views    |           Number of unique viewers who played your video          |
|    Average Watch Time    |   Average number of seconds viewers watched out of total length   |
| Click Through Rate (CTR) |           % of viewers who clicked any link on your page          |
|      Video View Rate     |   % of people who opened the page and actually played the video   |
|   Video Completion Rate  |          % of viewers who watched the video till the end          |
|     Total CTA Clicks     |      Total number of CTA button clicks (e.g., “Book Meeting”)     |

#### **Key Metrics Graph (Middle Left)**

* This visual graph shows activity over time, including:

<figure><img src="/files/SwjbFwPzBIF4YURs7EE9" alt="Key Metrics Graph"><figcaption></figcaption></figure>

* Video copies generated
* Total link clicks
* Website views
* Video views

You can toggle each metric ON/OFF using the Show/Hide graphs option. This graph helps see daily performance trends across a selected period.

#### **Viewer Retention Graph (Middle Right)**

**This graph shows how long viewers watched the video.**

<figure><img src="/files/Glfl0ryx3Cg9ZJEzxdg8" alt="Viewer Retention Graph"><figcaption></figcaption></figure>

* X-axis = Video timeline in seconds
* Y-axis = Number of viewers

**Once viewers start watching:**

* You’ll see drop-off curves
* High-retention segments
* Completion percentage

**This is extremely useful for identifying:**

* Which parts of your video are engaging
* Where viewers lose interest

#### **User Data Section (Bottom)**

This includes:

<figure><img src="/files/QzTJ8VCR6AjsZvhb9JTa" alt="User Data Section"><figcaption></figcaption></figure>

* Viewer identity (if tracking enabled)
* Watch duration
* CTA action logs
* Click events
* Timestamped activity

This table helps identify high-intent leads.

#### **Trending Places, Trending Time & Device Split**

These sections of your analytics dashboard help you understand where your viewers come from, when they watch your videos, and what devices they use.

**Below is a detailed breakdown of each panel.**

<figure><img src="/files/ptA56k7yD2UHlt1O9dtu" alt="Trending Places"><figcaption></figcaption></figure>

**Trending Places (Geo Heatmap)**

The Trending Places section shows a world map displaying the geographical location of your viewers.

What it shows:

* Countries and cities where your personalized videos were viewed
* Number of video-related link clicks from each location
* Visual heat intensity (darker/colored regions = more activity)

Why it’s Useful:

* Helps you identify strong-performing regions
* Useful for regional campaigns and global outreach
* Let's sales teams prioritize leads by geography
* Allows marketing teams to optimize ad targeting

**Trending Time (Hourly/Weekly Activity Heatmap)**

The Trending Time panel shows a heatmap of what time of day and which day of the week your viewers tend to watch your videos.

What the grid represents:

| Horizontal axis |           Days of the week (Mon–Sun)           |
| :-------------: | :--------------------------------------------: |
|  Vertical axis  |          Time of day (morning → night)         |
|  Heatmap color  | Higher density = more views during that period |

Why It’s Useful:

* Shows peak engagement times
* Helps schedule follow-ups based on viewer habits
* Helps marketers send campaigns at optimal times
* Let's you adjust campaign timing for better open & watch rates

Example Use Cases:

* If most viewers watch between 9 AM – 12 PM, send future messages during this window
* If your audience is active on weekends, plan weekend sends.

**Device Split**

Located under the Trending Time panel

What Device Split Shows:

A breakdown of which devices viewers used to watch your [personalized video](https://www.gan.ai/ai-personalized-videos):

* Mobile
* Desktop

Why Device Insights Matter:

* Helps optimize landing page layout
* Ensures your video is mobile-friendly
* Useful for deciding whether to use vertical, square, or horizontal video formats
* Helps tailor messaging to mobile or desktop users

#### Key Features of Video Analytics

Below are the capabilities shown across the dashboard:

1. **Real-time Tracking**

Your metrics update instantly as users interact with your video.

2. **Engagement Visuals**

Retention graphs + key metrics trend give you an instant view of:

* When people watch
* When they drop off
* If your CTAs convert

3. **Viewer-Level Details**

If email tracking is enabled:

* Viewers are identified
* Their actions are logged
* You can follow up based on intent

4. **Country & Date Filters**

Analyze performance by:

* Specific markets
* Campaign date ranges

5. **One-click CSV Export**

Export all analytics data using **Download CSV** - You can download the analytics in a CSV sheet just selecting the dates you want the report for.

You can also view and download the generated reports in the past using the "**Generated reports Tab**".

<figure><img src="/files/bhCaA62Pne2uYn6LBl6V" alt=""><figcaption></figcaption></figure>

#### **Why Analytics Matter**

Analytics help you track engagement, intent, and performance, so you can:

1. **Improve conversion rates**

See how many viewers watched and clicked your CTAs.

2. **Understand viewer behavior**

Retention curves show where your video loses attention.

3. **Prioritize leads**

Identify who watched the most — perfect for your sales team.

4. **Optimize future messaging**

If drop-off happens early, you know your intro needs improvement.

5. **Measure success**

CTR, view rate, and completion rate show campaign ROI instantly.

\
With Gan.AI’s Analytics Dashboard, you get clear, actionable insights into every stage of viewer engagement—from clicks and watch time to retention trends and device behavior. These metrics help you understand your audience better, refine your messaging, and optimize future campaigns for higher conversions. Whether you’re in sales, marketing, or customer success, analytics turn your personalized videos into a data-driven growth engine.


# Training Script

A proper training script helps Gan.AI learn your tone, lip sync, and expressions. Record a 5–10 minute video matching your base setup for the best personalized results.

#### What is a Training Script?

A Training Script is a 5–10 minute piece of text script that you must record in the same style, tone, and setup as your base video.

GAN.AI uses this recording to train an AI model that:

* Matches your voice
* Matches your lip movements
* Matches your speaking rhythm
* Maintains your facial expressions
* Ensures seamless personalization for all future videos

#### Why is the Training Script Important?

The training script helps Gan.AI create the closest possible AI reproduction of your real speaking style.

This results in:

* Better lip sync
* Natural facial expressions
* Perfect voice cloning
* Accurate pronunciation
* Higher-quality personalized video outputs

If your training script is recorded differently from your base video (different angle, tone, lighting, or pacing), the model quality will reduce, and the personalized videos may look inconsistent.

#### What the Client Needs to Do

You will receive a 5–10 minute training script from the GAN.AI team in the same language as your base video.

**You must record this script:**

* In the same location
* With the same camera angle
* With the same lighting
* Using the same mic/sound setup
* Wearing similar clothes (if possible)
* Maintaining the same energy, tone, and delivery

This ensures both videos match perfectly.

#### Recording Guidelines

To achieve the best model accuracy, please follow these guidelines carefully:

1. **Match the Base Video Setup**

* Same background
* Same camera height
* Same framing (head + shoulders, full body, etc.)
* Same distance from the camera
* Same lighting conditions

2. **Match the Delivery**

* Speak clearly and naturally
* Maintain consistent tone and pace
* Avoid whispering or shouting
* Avoid reading too fast

3. **Technical Requirements**

* 1080p or higher video quality
* Stable camera (no shaking)
* Clean audio (no echo, wind, fans, or background noise)
* Record indoors

4. **No Cuts or Edits**

Record the script in one continuous video.\
\
**Do not:**

* Add background music
* Add subtitles
* Add transitions or filters
* Trim or edit the video
* You have to stay in one place, either sitting or standing, without moving much.

#### What Happens After You Submit the Training Script?

Once you provide the recorded training script video:

* Gan.AI begins training your personalized model
* The system analyzes your voice, face, expressions, and lip movement
* The model is prepared
* You will receive confirmation once the personalized model is ready
* You can then begin generating personalized videos.

#### Best Practices for Highest Quality Output

For the best-performing AI model:

* Use a quiet room
* Look directly at the camera
* Keep a consistent posture
* Do not change your speaking style midway
* Re-record if you make mistakes (start fresh)
* Maintain neutral or positive facial expressions
* Avoid complex background movement

For best results, follow the setup and recording guidelines closely, maintain consistent tone and posture, and ensure a quiet, well-lit environment. A carefully recorded training script allows Gan.AI to produce natural, high-quality personalized videos that accurately reflect your voice, expressions, and style, delivering a seamless and professional viewing experience every time.<br>


# Custom Branding

Customize your Gan.AI landing pages with logos, brand colors, favicons, and white-label options. Build fully branded, professional video experiences with no coding.

Whether you want a clean, solid color background or a custom image, Gan.AI handles it smoothly. Plus, you can decide whether to show Gan.AI's branding or go fully white-label. Your landing pages instantly reflect your brand identity, making every viewer experience feel professionally branded and polished.

<figure><img src="/files/gKxq3cjNeTZH30eMIxLO" alt=""><figcaption></figcaption></figure>

<figure><img src="/files/N5jEsvacLdp48wM9eLtt" alt=""><figcaption></figcaption></figure>

#### **Key Features**

* **Easy Logo Upload** – Upload your company logo and position it (left, center, or right) on landing pages with just a few clicks
* **Clickable Logo Links** – Add URLs to your logo so viewers can navigate directly to your website
* Custom Background Options – Choose solid brand colors, create gradients, or upload custom background images that match your visual identity
* **Favicon Customization** – Personalize the browser tab icon to reinforce brand recognition across all touchpoints
* **No Coding Required** – Intuitive drag-and-drop editor makes branding accessible to non-technical users
* **Real-Time Preview** – See changes instantly before publishing to ensure everything looks perfect
* **White-Label Option** – Toggle Gan.AI branding on or off for fully customized or co-branded experiences
* **Instant Deployment** – Activate branded experiences in minutes, not days
* **Consistent Brand Experience** – Maintain visual consistency across thousands of personalized video variations at scale
* **Color Palette Control** – Extend your brand

#### Setup

* **Access Project**

1. Open the Personalized Project you want to edit
2. Click "**Edit Landing Page**" in the top right menu

<figure><img src="/files/zbUrIV8N9V5tQklrtXqS" alt=""><figcaption></figcaption></figure>

3. Choose a template in the "**Template Editor**"

We have pre-designed landing page layout from four categories: Default Video, Book a Meeting, Forms, or Embed Custom Website. These AI-optimized templates provide conversion-ready structures you can fully customize with your branding, colors, logos, and buttons—without building from scratch.

<figure><img src="/files/xwpO5DmabudvwJIcGb9y" alt=""><figcaption></figcaption></figure>

With Gan.AI, branding your personalized videos and landing pages is effortless. By uploading logos, customizing colors, backgrounds, and favicons, and choosing white-label options, you can create a consistent, professional, and fully branded viewer experience—all in minutes and without any coding. This ensures every personalized video reflects your brand identity perfectly, boosting recognition and engagement at scale.


# Gan.AI Template Editor - Complete Guide

Gan.AI’s no-code landing page editor lets you customize templates, edit videos, branding, CTAs, backgrounds, and SEO settings, then preview and publish in minutes.

#### **Header Section (Top Navigation)**

The Gan.AI Landing Page Template Editor is a powerful, no-code interface that enables users to create, customize, and publish professional, branded landing pages in minutes. This comprehensive guide explains every element visible in the editor interface and how to use each feature effectively.

The **back arrow** is like the "exit door" of the template editor. It sits in the top left corner of your screen and shows the name of your current project. Whenever you want to leave this editing page and go back to your list of projects or the main dashboard, you just click this arrow. Think of it like pressing the "back" button on your browser—it takes you out of the editor without saving anything, so if you haven't saved your work, those changes will be lost. Use this button when you want to switch to a different project or exit the editor completely.

<figure><img src="/files/KAB5naEAKRsp3gCrsjXp" alt=""><figcaption></figcaption></figure>

#### Gan Branding Toggle

This switch on the right side of your header controls whether Gan.AI's logo appears on your landing page. Turn it ON to show Gan.AI branding alongside yours. Turn it OFF for white-label mode—hiding Gan.AI completely so only your company branding shows. Perfect for agencies delivering fully branded solutions to clients.

<figure><img src="/files/sRIiSGXpUjJvdgPvq25c" alt=""><figcaption></figcaption></figure>

#### Reset to Default Button

This button, next to the Gan Branding toggle, instantly deletes all your edits and restores the original template design. Use it when you've made too many changes and want to start fresh, or to compare your changes with the original. Warning: This action cannot be undone.

<figure><img src="/files/CHF5aaGv4oYn1SMwy201" alt=""><figcaption></figcaption></figure>

***

#### Preview Button

Click this button on the right header to see a full-screen preview of how your landing page looks to visitors. Test all buttons, links, and check how it appears on mobile and desktop devices. Always preview before publishing to catch any errors or issues.

<figure><img src="/files/VHbCmjjKF6ArVvSReBQE" alt=""><figcaption></figcaption></figure>

#### Save & Publish Button

This blue button on the far right header saves all your customizations and publishes your landing page instantly. Once clicked, all changes are permanent and cannot be undone—so always preview first!

<figure><img src="/files/snUrPR571rZpuaQ8ZQcA" alt=""><figcaption></figcaption></figure>

#### Left Sidebar - Website Settings & Template Selection

The left panel shows four template types to pick from:

* **Default Video** – Simple, video-focused layout
* **Book a Meeting** – Includes calendar booking feature
* **Forms** – Collects visitor information
* **Embed Custom Website** – Display external web content
* Click any template to preview instantly. Switch templates anytime without losing your customizations.

<figure><img src="/files/mbtpcdpzdmX7Buyw5q6q" alt=""><figcaption></figcaption></figure>

#### Center Preview Panel - Landing Page Display

**Headline Section**

The headline "Hey there, I have a video for you!" appears at the top of your page and is fully customizable. Change the text content, adjust font size and color, modify alignment, or add personalization tags like **@name** and **@company** to make it personal for each viewer. Click to edit—a blue selection box shows what you're working on.

<figure><img src="/files/s8wZ2zes3B5NZ5M0Ir5x" alt=""><figcaption></figcaption></figure>

#### Descriptive Text Section

The descriptive text below your headline explains what the video is about and encourages viewers to watch. You can freely edit this text, change fonts, colors, sizes, and alignment. Add personalization variables like @name or @company to make the message feel personalized to each individual viewer visiting your landing page.

<figure><img src="/files/VABk8AsX0Bm0HcKZIHdH" alt=""><figcaption></figcaption></figure>

#### Call-to-Action (CTA) Buttons - Top \&Bottom

Your page includes four customizable buttons: two download options and two share options. Download buttons let viewers save the video. Share buttons enable social media sharing on Facebook, LinkedIn, Twitter, and WhatsApp to boost virality. Customize button text, colors, sizes, and styling to match your branding and guide viewers toward your desired actions.

You can choose from both the top and the bottom as per your requirements.

<figure><img src="/files/N0cqqdeFk55LS8Perrx3" alt=""><figcaption></figcaption></figure>

#### Video Player Area

The video player embedded in your Gan.AI landing page is the central point where viewers interact with your content. The player displays your video with a centrally positioned play button that viewers click to begin watching.

At the bottom of the player, you'll find a progress bar showing the video timeline—viewers can click anywhere on this bar to jump to specific moments in the video, or drag it to scrub through the content.

The duration of the video is displayed in the format "0:00 / 0:35" (showing current time and total duration). On the right side of the player controls, you'll see a volume control icon that lets viewers adjust audio levels, a settings gear icon that provides playback options like quality selection and subtitles, and a full-screen button that expands the video to fill the entire screen.

These controls exactly match what your viewers will experience when they visit your published landing page, so understanding each function helps you anticipate user interaction patterns. When training other team members, emphasize that the video player is industry-standard and intuitive, requiring no special instruction for viewers to operate.

This familiarity ensures smooth, uninterrupted viewing experiences and higher engagement rates across your video campaigns.

<figure><img src="/files/gbzFvefP6llCaFEwr4gh" alt=""><figcaption></figcaption></figure>

#### Introduction Section

This section below your video lets you introduce your product or service in a short, engaging paragraph. Edit the text freely, customize fonts, colors, and styling to match your branding, and adjust positioning on the page. Keep the introduction brief and interesting to spark viewers' curiosity and encourage them to take action or contact you.

<figure><img src="/files/w3iGeJvFf4P2mbpQP8Pe" alt=""><figcaption></figcaption></figure>

#### Social Links Section

At the bottom of your landing page are four fields where you can add social media links. Add URLs for LinkedIn, Twitter/X, Facebook, Instagram, YouTube, or your website. This lets viewers follow you on their preferred platforms after watching your video. It's a simple way to build multi-channel engagement and keep your audience connected to your brand.

<figure><img src="/files/q9xyF9CgryUyQR5hvxiu" alt=""><figcaption></figcaption></figure>

#### Edit Background Button

Click the "Edit background" button in the top right to customize your page's look. You can choose a solid color using a color picker or enter custom hex codes, create colorful gradients for depth, or upload custom images like branded photos or textures.

<figure><img src="/files/fkqTGrp1FPFCtMd1UZJY" alt=""><figcaption></figcaption></figure>

#### Website Settings

The Website Settings panel contains three essential fields that optimize your landing page for search engines and brand visibility.\
First, enter a **Website Title**—this appears in the browser tab and search results, helping people understand your page's purpose at a glance.\
Second, write a **Website Description**—a brief summary that shows up in Google search results and social media shares, convincing people to click your link. Finally, Upload a **Website Favicon**—a small icon that displays in the browser tab next to your title, reinforcing brand recognition. Together, these three elements create a complete professional identity for your landing page, improving SEO rankings and encouraging click-throughs from search results.

<figure><img src="/files/3h7in8wWkxY1Rgwequer" alt=""><figcaption></figcaption></figure>

#### Logo Management

Upload your company logo and position it on the left, center, or right side of the page. Adjust its size and scaling to fit your design. Make the logo clickable by adding a link to your website—viewers can click it to visit you. You can also hide or remove the logo anytime. Complete customization for perfect branding.

<figure><img src="/files/tJ4GG5VkzEm4qt85IFtm" alt=""><figcaption></figcaption></figure>

#### **Edit Video Player**

This menu lets you control three things about your video player: First, you pick the player size—small, medium, or large—depending on how prominent you want the video on your page. Second, you choose the video orientation: landscape (wide, like a TV) or portrait (tall, like a phone).

Finally, you can upload your company logo as a watermark that stays visible on the video, keeping your branding visible while people watch. Think of it as adjusting a TV remote—size, orientation, and adding your brand stamp to it.

<figure><img src="/files/gkPNyY129cjP7gclVunL" alt=""><figcaption></figcaption></figure>

With Gan.AI’s Landing Page Template Editor, you have full control over every aspect of your page—from header navigation and branding toggles to video player settings, CTA buttons, and social links. Every element is customizable, allowing you to create a polished, professional, and fully branded experience that matches your company identity while optimizing viewer engagement. By mastering these tools, you can quickly build landing pages that are visually consistent, user-friendly, and tailored to drive conversions at scale.


# Exporting Videos

Gan.AI lets you download single or multiple personalized videos easily. Use direct download, bulk export, or CSV-by-email for fast access to all video data.

#### **How to download an Individual Video:**

\
To download a video, first navigate carefully to the specific project you want within the dashboard. After locating it, select the checkbox placed right next to the intended video file. Then, click or activate the download button to begin the file transfer process.&#x20;

This procedure securely preserves all applied customizations and guarantees a complete, production-ready video delivery directly to your local storage device.

<figure><img src="/files/VoQJv5HPi4TGoqOLRR1M" alt=""><figcaption></figcaption></figure>

Alternatively, users may download a single video by accessing the context menu through the three-dot icon adjacent to the video entry. Selecting the download arrow option from this menu initiates immediate transfer of the completed video file to the user's local device storage, preserving all customizations and professional quality.

<figure><img src="/files/WCvCmzCyBp0LV0dcXN0J" alt=""><figcaption></figcaption></figure>

#### **How to download videos in bulk**

The account dashboard offers a convenient way to download multiple videos simultaneously. By clicking on the Export Videos, you get two options

* Download CSV
* Send CSV to Email

<figure><img src="/files/LPFOOqQu0cqoGYELU52H" alt=""><figcaption></figcaption></figure>

#### DOWNLOAD CSV OPTION

**Steps to download CSV**\
\
**Step 1: Access Your Project**

* Log in to your Gan.AI account and click on the Project where you have generated videos.

<figure><img src="/files/Jh2MUtJdXUK2dTIWIETl" alt=""><figcaption></figcaption></figure>

**Step 2: Locate the Export Option**

* In the right sidebar, you'll find the "Export videos" section. This contains all data export options available for your project.

<figure><img src="/files/eCkHMglabRAOMatNe2TE" alt=""><figcaption></figcaption></figure>

**Step 3: Click Download CSV**

* Within the Export videos menu, select the "Download CSV" option. This button initiates the data export process. You may be able to choose a Date range (which videos to include based on creation date). After selecting the date range. You can download your CSV.

<figure><img src="/files/80XJpe3P62hdkbLSq7lM" alt=""><figcaption></figcaption></figure>

**Step 4: File Generation**

* The platform processes your request and generates the CSV file containing all selected data. This typically takes a few seconds to a few minutes, depending on the volume of videos. Once done, it will prompt you to choose the respective folder or storage setting.

<figure><img src="/files/36fkmgLADIxYYL3Bomlf" alt=""><figcaption></figcaption></figure>

**Step 5: Open in Spreadsheet**

* Open the downloaded CSV file in Excel, Google Sheets, or any spreadsheet application. All video data is now organized in columns and rows for easy viewing and analysis.

#### Send CSV to Email

**Step 1: Access Your Project**

* Log in to your Gan.AI account and click on the Project where you have generated videos.

<figure><img src="/files/YOvbdDGmghHgNEAwyZLp" alt=""><figcaption></figcaption></figure>

**Step 2: Locate the Export Option**

* In the right sidebar, you'll find the "Export videos" section. This contains all data export options available for your project.

<figure><img src="/files/YUzPvKRyNmkxFjvYRlSU" alt=""><figcaption></figcaption></figure>

**Step 3: Click send CSV to Email**

* You may be able to choose a Date range (which videos to include based on creation date) after selecting the date range. You will get the CSV in the email registered with Gan.AI.

<figure><img src="/files/WMQbSvcBl9jIzkkh6QMW" alt=""><figcaption></figcaption></figure>

**Step 4: Check your registered Email ID**

* The platform processes your request and generates the CSV file containing all selected data. This typically takes a few seconds to a few minutes, depending on the volume of videos. Once complete, it sends the data to your registered email.

Gan.AI’s Account Dashboard makes downloading videos and related data simple and flexible. Whether you need a single personalized video, multiple files in bulk, or a CSV export for detailed analysis, all options preserve your customizations and professional quality, giving you full control over storing, sharing, and managing your content efficiently.


# Custom Domain Setup

Gan.AI lets you use your own Custom Domain for professional, branded video pages. Add your domain, update DNS records, and verify easily with step-by-step guidance.

#### **Here’s a simple, step-by-step guide to link your Custom Domain with Gan.AI.**

* Log in to your Gan.AI account and click on "Account." Then go to the "My Workspace" section and click on the "**Action Icon**" button.

<figure><img src="/files/kxRnsf36Yumc7BElefxU" alt=""><figcaption></figcaption></figure>

<figure><img src="/files/GRz0alOAuxWCfu5g6K0G" alt=""><figcaption></figcaption></figure>

<figure><img src="/files/8wOT9NJ96q2pCSoYHqIt" alt=""><figcaption></figcaption></figure>

* Once the Action Button is clicked on. You will be directed to the custom domain setting page. You need to click on the “**Add new domain**” button.&#x20;
* Enter your domain address in a ‘**video.yourwebsite.com**’ format. This should be the exact subdomain address where you want to host your videos.

<figure><img src="/files/H9AujsQ1WVYOfcBG0nem" alt=""><figcaption></figcaption></figure>

<figure><img src="/files/Nd5iaWJ7nI0ruAzQzx1l" alt=""><figcaption></figcaption></figure>

* After entering and completing the custom domain information in the required field, please ensure that you carefully click the Save option to store and apply your changes.

<figure><img src="/files/xZuZBBAsHofLu7G01RQC" alt=""><figcaption></figcaption></figure>

#### Tutorial Button

* Links that provide helpful instructional material, detailed learning content, or complete step-by-step setup guidance for properly configuring, managing, and activating custom domains.
* By clicking on these helpful links, you can access the required documentation, explanatory articles, or detailed support pages for further reading and assistance.

<figure><img src="/files/LuGvFwl0dwj6zcdxdkYo" alt=""><figcaption></figcaption></figure>

#### Help Button (?)

* Opens help documentation, FAQs, or support resources specific to custom domain functionality.

<figure><img src="/files/LgC3ni1U57MUf2czzfRl" alt=""><figcaption></figcaption></figure>

<figure><img src="/files/ar5hlTDUbhQBNSdGDtPP" alt=""><figcaption></figcaption></figure>

* You can now also check. How many custom domains can you add?

<figure><img src="/files/wAQLbJmvRL6eMu2uq9tg" alt=""><figcaption></figcaption></figure>

* You are required to set up two separate DNS records inside your DNS control panel. To do this, first sign in to your DNS service provider’s account, locate your domain management section, and then open your Domain List area, where all configuration options are available.

<figure><img src="/files/UNXLdw8tTZ0x08JOnwxA" alt=""><figcaption></figcaption></figure>

* Look for the domain that you added to the Gan.AI platform & click on '**Manage**'

<figure><img src="/files/Faqe89L0Mxv8Rwub3OnM" alt=""><figcaption></figcaption></figure>

* In 'Advanced DNS', click on ‘Add a record’ under the 'Host Records' section to create your first record. Under 'Type', choose the record type as 'CNAME Record'

<figure><img src="/files/8T2YFmN1US8crsTrAD5U" alt=""><figcaption></figcaption></figure>

<figure><img src="/files/lqq5WRUV5reNEPS7fTkM" alt=""><figcaption></figcaption></figure>

* Copy '**Record Name 1**' from the Gan.AI platform & paste it under the 'Host' section

<figure><img src="/files/pTMEI6GihQl0ENXXi8r7" alt=""><figcaption></figcaption></figure>

<figure><img src="/files/KojTFWA1NkGji40eiBkl" alt=""><figcaption></figcaption></figure>

* Copy '**Record Value 1**' from the Gan.AI platform & paste it under the ‘Value’ section & save the details

<figure><img src="/files/3O0TpWKDSQdvBocJBVhh" alt=""><figcaption></figcaption></figure>

<figure><img src="/files/lTKAKrx4OfVt5h8S6Shd" alt=""><figcaption></figcaption></figure>

<figure><img src="/files/eojD06JF5xMghTfXl4qk" alt=""><figcaption></figcaption></figure>

* Add a new record & under 'Type', choose the record type as '**CNAME Record**'

<figure><img src="/files/Ct6ViWU0WcaVU2504PKA" alt=""><figcaption></figcaption></figure>

<figure><img src="/files/6TJOB0TgrzrY4FmNdscy" alt=""><figcaption></figcaption></figure>

* Copy '**Record Name 2**' from the Gan.AI platform & paste it under the 'Host' section

<figure><img src="/files/xrmIipcpNXBkYi7J0HhB" alt=""><figcaption></figcaption></figure>

<figure><img src="/files/7QJkzJpZndSRVckeibaq" alt=""><figcaption></figcaption></figure>

* Copy '**Record Value 2**' from the Gan.AI platform & paste it under the ‘Value’ section & save the details

<figure><img src="/files/UlZm1hZisU7B8OmM5KTe" alt=""><figcaption></figcaption></figure>

<figure><img src="/files/DQWd0SKhM59c9DwCnnyR" alt=""><figcaption></figcaption></figure>

<figure><img src="/files/J9vxcAw1o5gzoJkJTK8X" alt=""><figcaption></figcaption></figure>

* After successfully adding the required DNS records, wait for approximately 2 to 24 hours, then return to the Gan.AI platform to click on the ‘Verify’ button to complete the verification process.\ <br>

**Important Note:** If the verification status continues to display **“Pending”,** do not worry. W**ait a few more hours,** revisit the verification pag&#x65;**,** and press the **‘Verify’** button once again to attempt the process.

<figure><img src="/files/WWXSmDBk8eu60dKJjfRZ" alt=""><figcaption></figcaption></figure>

* Once the domain is verified, you can also set it as the default for  your videos

<figure><img src="/files/FfsSzU7K3Jm2YjKM9oJX" alt=""><figcaption></figcaption></figure>

* You can choose whether to set it as the default for only your upcoming projects or for all the projects.

<figure><img src="/files/yohsI3R75l0e3wewHobs" alt=""><figcaption></figcaption></figure>

Setting up a Custom Domain with Gan.AI ensures your video links look professional, trustworthy, and fully aligned with your brand. Once configured and verified, your custom domain can be used across all your personalized videos and landing pages, giving viewers a seamless, branded experience while reinforcing your company’s identity.


# List of Integrations

Gan.AI offers powerful integrations with leading CRMs, automation tools, and APIs, enabling smooth data import, video personalization, delivery, and tracking.

We currently support over 15 out-of-the-box integrations, as well as custom integrations via API for unique setups.

#### **Supported Integrations (Out-of-the-Box)**

Here’s a list of the most commonly used integrations, grouped by category:

#### **Connectors & Automation**

* Zapier — Connect Studio by Gan.AI with 8,000+ apps, build triggers/actions.
* Make — Use Make (formerly Integromat) to import/export data or trigger video generation.

#### **Marketing**

* HubSpot — Sync contacts, deals, and trigger personalized videos from HubSpot lists.
* Klaviyo — Use video personalization for email campaigns via Klaviyo.[ ](https://help.gan.ai/share-and-embed-gan.ai-videos/list-of-integrations?utm_source=chatgpt.com)

#### **Sales & CRM**

* Keap — Import leads/contacts and export video metrics back to Keap.
* HighLevel — Create workflows in HighLevel that trigger the generation and retrieval of personalized video.&#x20;
* Outreach - Adds personalized video steps into Outreach sequences.
* Follow Up Boss - Ideal for real estate teams—send personalized videos on new inquiries or pipeline updates.
* Apollo - Connects Apollo lead lists to GAN.AI for automated hyper-personalized outbound.
* Salesforce - Sync contact and lead data to generate personalized videos automatically based on record changes.
* Zoho - Pulls lead, contact, and deal information into GAN.AI for personalized video creation.

#### **Spreadsheets & Data Sources**

* Google Sheets — Use Sheets as a data source for variables or export video data back into Sheets.

#### **Communication**

* Mailchimp — Trigger personalized videos and sync metrics into Mailchimp audiences.
* Mailmodo — Integrate Mailmodo for interactive email campaigns that include personalized videos.
* Twilio — Deliver personalized video links via SMS/WhatsApp using Twilio integration.
* Additional channels supported: Social sharing, Slack, custom webhooks, and custom domain delivery.

#### Custom/API Integration

* The Gan.AI API allows custom integrations beyond the pre-built connectors—ideal for enterprises needing unique workflows or systems.

#### How to Get Started with an Integration

Follow these general steps (exact steps vary by integration):

1. In your Gan.AI Studio account, go to Project Settings → Integrations.
2. Select the integration you want to use and turn on the integration toggle.
3. Follow the specific instructions for that integration: authenticate your external account, map variables/data fields, and set triggers or workflows.
4. Run a test to confirm data flows correctly and personalized videos are generated or delivered as expected.
5. Once everything works, enable the workflow in production mode and monitor results.

**Example:** For Make: enable integration → build scenario connecting CRM → Gan.AI API call with variables → test run → save & close.\
**Example:** For Zapier: Turn on integration → create Zap from CRM → Gan.AI action “Generate Video” → map variables → publish.ok

### Best Practices

* Map variables carefully: Ensure your external data source (CRM/Sheet) has columns exactly matching the variable names used in your Gan.AI project (case-sensitive).
* Test with small batches before full rollout to catch mapping or layout issues early.
* Monitor delivery and engagement: After videos are generated and shared, sync engagement metrics back into your CRM for meaningful follow-through.
* Use a custom domain and branded landing pages if tight brand consistency is required.
* Document each integration’s workflow steps within your team so future campaigns can reuse the setup efficiently.

### Troubleshooting Common Integration Issues&#x20;

|                     Issue                    |                         Likely Cause                        |                                              Solution                                              |
| :------------------------------------------: | :---------------------------------------------------------: | :------------------------------------------------------------------------------------------------: |
|        Data not importing into Gan.AI        |      Trigger not configured or data mapping mismatched      |         Check trigger settings in external platform; verify variable names and data fields         |
|          Video copies not generating         |          Integration toggle off, or quotas exceeded         |              Ensure the integration is active; verify your plan allows required volume             |
|      Video URLs not exported back to CRM     |  Export setting not enabled or field/column missing in CRM  | In Gan.AI project settings, turn on “Export video data”; create corresponding custom fields in CRM |
| Variable placeholders showing in final video |      External data missing or variable names mismatched     |            Confirm each row/data entry has values; check variable names for exact match            |
|       Delays or failed webhook triggers      | Network latency, external platform rate limits, invalid URL |    Verify webhook URL, ensure external service isn’t throttling calls, test with smaller batches   |

Gan.AI offers a wide range of ready-to-use integrations as well as custom API options, enabling seamless connection with CRMs, marketing platforms, automation tools, spreadsheets, and communication channels. By leveraging these integrations, you can automate personalized video generation, delivery, and tracking at scale while maintaining full control over data mapping and workflow. Following best practices—careful variable mapping, testing in small batches, and monitoring engagement—ensures smooth operation and maximizes the impact of your personalized video campaigns.


# Available integrations

Explore Gan.AI’s 15+ integrations with CRMs, marketing tools, automation platforms, and APIs to automate data sync and generate personalized videos seamlessly.

### Supported Integrations (Out-of-the-Box)

\
Here’s a list of the most commonly used integrations, grouped by category:

#### &#xD;Connectors & Automation

* Zapier — Connect Studio by Gan.AI with 8,000+ apps, build triggers/actions.
* Make — Use Make (formerly Integromat) to import/export data or trigger video generation.

#### &#xD;Marketing

* HubSpot — Sync contacts, deals, and trigger personalized videos from HubSpot lists.
* Klaviyo — Use video personalization for email campaigns via Klaviyo.

#### Sales & CRM

* Keap — Import leads/contacts and export video metrics back to Keap.
* HighLevel — Create workflows in HighLevel that trigger the generation and retrieval of personalized video.
* Outreach - Adds personalized video steps into Outreach sequences.
* Follow Up Boss - Ideal for real estate teams—send personalized videos on new inquiries or pipeline updates.
* Apollo - Connects Apollo lead lists to GAN.AI for automated hyper-personalized outbound.
* Salesforce - Sync contact and lead data to generate personalized videos automatically based on record changes.
* Zoho - Pulls lead, contact, and deal information into GAN.AI for personalized video creation.

#### Spreadsheets & Data Sources

* Google Sheets — Use Sheets as a data source for variables or export video data back into Sheets.

#### Communication

* Mailchimp — Trigger personalized videos and sync metrics into Mailchimp audiences.
* Mailmodo — Integrate Mailmodo for interactive email campaigns that include personalized videos.
* Twilio — Deliver personalized video links via SMS/WhatsApp using Twilio integration.
* Additional channels supported: Social sharing, Slack, custom webhooks, and custom domain delivery.

#### Custom/API Integration

* The Gan.AI API allows custom integrations beyond the pre-built connectors—ideal for enterprises needing unique workflows or systems.

With these powerful integrations, Gan.AI fits seamlessly into your existing tech stack—whether you manage leads in a CRM, run automated workflows, or send large-scale email and SMS campaigns. By connecting your preferred tools, you can automate video creation, streamline communication, and deliver highly personalized experiences without changing the way you work.


# Zapier

Connect Gan.AI with Zapier to trigger personalized video creation from CRM events and send video results to any app using automated workflows.

#### **How to import data from your CRM/ any other data source through Zapier to create video copies in Gan.AI?**&#xD;

{% embed url="<https://app.supademo.com/demo/clv64xmdf1h7is1g945333qm8?utm_source=link>" %}

1. Log into your Gan.AI account, select the required personalised project
2. Go to Project settings -> Integrations -> Zapier and turn on the integration
3. Log into your Zapier.com account.
4. Click on 'Create Zap'. Name your Zap based on the automation you are looking to create
5. Click on Trigger

* Search for your CRM (eg: Salesforce, Instantly) / data source where you want to import your variable data from
* Choose the event which would trigger the Zap (\*if required)
* Allow Zapier to access data from your CRM/ data source account
* Connect your CRM/ data source account to Zapier
* Under 'Event', choose your event based on the trigger you want to create and provide relevant details
* Click on 'Test trigger' and select a test record
* After that, click on ‘Continue with selected record’ and your trigger is all set

6. Select an 'Action'

* Under action, search for 'Gan.AI (latest)' and select the app
* Under 'Event', select 'Generate Video'
* Click on 'Continue' and connect your Gan.AI account to Zapier by signing in
* Copy the API key from the Gan.AI platform under Project Settings->Integrations->Zapier
* Paste the API key in Zapier and click on 'Continue'
* Choose the relevant Gan.AI project from the dropdown that you want to generate videos for
* For each project variable that appears below, select relevant input variables from your CRM / data source to complete the mapping
* Complete the mapping of the required fields before continuing to test
* Click on 'Continue' and 'Test Step'
* Click on 'Publish' and your Zap is all set

#### &#xD; How to send video copies to Zapier from Gan.AI?

{% embed url="<https://app.supademo.com/demo/clv6e2x231ixms1g9o13nz9ur>" %}

1. Turn on the integration button, next to ‘Export data to Zapier’, in your project settings
2. Log into your Zapier account
3. Click on 'Create Zap'
4. Name your Zap based on the automation you are looking to create
5. Click on 'Trigger'

* Select 'Webhooks by Zapier' as the trigger (\*this is a premium feature)
* Under 'Event', select 'Catch Hook' and click on 'Continue' twice
* You will see a webhook URL appear
* Copy the custom webhook URL that Zapier has generated

6. Paste the webhook URL from Zapier to Gan.AI in the Webhook URL box below and click on 'Verify'
7. Once verification is successful in Gan.AI platform, go back to the Zapier workflow and click on 'Test Trigger'
8. You will see records appear in Zapier. Select any record and click on 'Continue with selected record'
9. Select an 'Action'

* Under Action, select your CRM (eg: Salesforce, Instantly)/ data source/ delivery channel where you want to send videos to
* Select the event which occurs when the Zap runs: updating the lead/contact with Gan.AI video properties, and click on continue
* Connect your CRM/ data source account to Zapier
* Choose the sample lead you want to update (this is required)
* We recommend mapping the four properties :  \
  a. Perma\_link  \
  b. Video\_url  \
  c. Smart\_url  \
  d. Thumbnail\_url
* to the relevant variable in your delivery channel. You can either map them to an existing variable or the custom variables that you've created in your CRM
* Click on 'Continue' and 'Test Step'
* Click on 'Publish' and your Zap is all set
* After that, click on ‘Save & close’ on the Gan.AI platform to save the settings

By pairing Gan.AI with Zapier, you unlock seamless automation across your entire video pipeline. From lead-triggered video creation to instant delivery, Zapier ensures your personalization workflows stay efficient, scalable, and effortlessly integrated with your existing tools.


# Make

Connect Gan.AI with Make to trigger personalized video creation from CRM events and deliver video links to any platform through automated workflows.

#### How to import data from your CRM/ any other data source through Make to create video copies in Gan.AI?

{% embed url="<https://app.supademo.com/demo/cm14eajxa0j8t1205cqjqyjwd>" %}

1. Log in to your Gan.AI account, select the required personalised project
2. Go to Project settings -> Integrations -> Make and turn on the integration
3. Log in to your Make account
4. Click on ‘Create a new scenario’
5. Look for the app you want to connect to your Make account (here we have chosen Hubspot)
6. Now click on ‘Watch CRM objects’
7. Connect your HubSpot account & allow Make to access your contacts
8. Under ‘Object Type to Search’ select ‘Contacts’
9. Under ‘Watch Created/Updated’, select how you want to trigger the data import.
10. Click on ‘OK’ to save
11. In 'Choose where to start', select when you want to start the scenario & click on 'OK'
12. Click on ‘Add another module’ & look for ‘HTTP’
13. Under ‘Actions’, look for ‘Make a request’
14. Now, copy the URL from the Gan.AI platform and paste it under the ‘URL’ input
15. Select ‘Method’ as ‘POST’
16. Click on ‘Add a header’
17. Copy the value of ‘Header name’ from the Gan.AI platform & paste it under ‘Name’ in Make
18. Copy the value of ‘Header value’ from the Gan.AI platform & paste it under ‘Value’ in Make
19. Select the ‘Body type’ as ‘Raw’
20. Select 'Content type' as 'Json'
21. Copy the ‘Request content’ code from the Gan.AI platform & paste under ‘Request content’
22. Click between the empty apostrophes & map the respective variable to its corresponding value

**Note: In case of a different unique identifier (based on your CRM tool), please map it in the ‘Request content’ input**

23. Click on ‘OK’ to save your action
24. Click on ‘Run once’ to verify if the scenario is successful
25. On the Gan.AI platform, click on ‘Save & close’ to save your settings.

#### How to send video copies to Make from Gan.AI?

{% embed url="<https://app.supademo.com/demo/cm14eihnf0jdb1205fzouw4i5>" %}

1. Log in to your Gan.AI account, select the required personalised project
2. Go to Project settings -> Integrations -> Make and turn on the integration
3. Log in to your Make account
4. Click on ‘Create a new scenario’
5. Look for ‘Webhooks’ & select ‘Custom webhooks’
6. Click on ‘Create a webhook’ & then click on ‘Save'
7. Once the webhook URL appears, click on ‘Copy address to clipboard’
8. Go to the Gan.AI platform and paste the URL under the ‘Webhook URL’ input
9. Click on ‘Verify’ to verify the URL & go to Make & check if the status has changed to ‘Successfully determined’
10. Once it’s verified, click on ‘OK’
11. Click on ‘Add another module’ & look for the app you want to send the data to (here we have chosen Hubspot)
12. Connect your HubSpot account (if not connected)
13. Under ‘Contact ID’, choose ‘unique\_id’

**Note: Only map the unique identifier that you’ve used in the import flow. It can be different based on your CRM tool**

14. Under ‘View Method’, choose ‘Compact’
15. Under ‘Properties’, click on ‘Add item’ & select the ‘Key’ (fields in a Hubspot contact) & under ‘Value’ select the value that you want to map to the selected field in ‘Key’ input
16. Repeat this process till you have mapped all the values that you want to send to HubSpot
17. Click on ‘OK’ to save your scenario
18. Click on ‘Run once’ to verify if the scenario is successful
19. On the Gan.AI platform, click on ‘Save & close’ to save your settings

Integrating Make with Gan.AI allows you to automate your entire personalization process from start to finish. After setting up your scenarios, data flows smoothly into Gan.AI, video copies are generated instantly, and results can be sent right back to your CRM. It’s a time-saving, hands-free way to keep your campaigns running effortlessly.


# HubSpot

Connect HubSpot to Gan.AI to map CRM fields, create personalized videos programmatically, and update contacts automatically through workflows.

#### Linking your HubSpot account to Gan.AI

1. Log in to your Gan.AI account
2. Click on the "User Settings" tab on the left navigation bar. Then go to User Settings --> Integrations
3. Select HubSpot from the list below and follow the steps to link your HubSpot account to Gan.AI

#### How to import your HubSpot CRM data to create video copies in Gan.AI?

{% embed url="<https://app.supademo.com/demo/cm1stde6j0voespgcg8xlattc>" %}

1. Log in to the Gan.AI account
2. Select the project for which HubSpot needs to be set up
3. Click on 'Project settings'
4. Go to 'Integrations'
5. Click on 'Hubspot'
6. Go to Hubspot.com and log in to your account
7. Click on ‘Workflows’ in the navigation menu (ask your account admin to enable the workflows feature in your account in case you don’t see this)
8. Click on ‘Create workflow’ in the right and select ‘From scratch’
9. If you have no specific needs, continue with ‘Blank workflow’ and click ‘Next’
10. Set up your contact enrolment trigger (how users are added to this workflow)
11. Click on the ‘+’ icon In the left panel, click on ‘Data Ops’ and select ‘Send a webhook’
12. Set the method to ‘POST’
13. Copy the webhook URL from the Gan.AI platform & paste it in ‘Webhook URL’ on HubSpot
14. Select ‘Authentication type’ as ‘API key’
15. Click on ‘Choose a secret’ and select ‘Add secret’
16. Go to the Gan.AI platform and copy the value corresponding to ‘Name’ under API key
17. Paste the copied value in the ‘Secret name’ input in HubSpot
18. Go to the Gan.AI platform and copy the value corresponding to ‘Value’ under API key
19. Paste the copied value in the ‘Secret value’ input in HubSpot and click on ‘Save’
20. Under ‘Request body’, select ‘Customise request body’
21. Enter properties:

* Go to the Gan.AI platform and copy ‘Key 1’ in ‘Request body’
* Paste the copied value in the ‘Key’ input in HubSpot
* Click on ‘Select a property’ and search for ‘Record ID’ in Hubspot
* Select ‘Record ID’ under ‘Number properties’
* Click on ‘Add a property’
* Now, copy each Gan.AI project variable starting from ‘Key 2’ in the list below and add it to HubSpot as the ‘Key’
* Please note this is case sensitive, so copy the exact Gan.AI variable from below
* Select the relevant HubSpot property to map the copied variable by searching for it in the ‘Available data’ sidebar (For example, for a Gan.AI variable called ‘first name’, select the ‘First Name’ property in HubSpot)
* Click on ‘Add property’ and keep adding individual Gan.AI variables and selecting a HubSpot property for each variable
* Make sure to map all Gan.AI variables from the list to a relevant HubSpot property

22. Test Action:

* Click on ‘Test Action’, and add test/ dummy values against each variable that you added above
* Then, click on ‘Test’ to see if it is successful. If the test is successful, click on 'Save'

23. Click on 'Review and publish'
24. Skip the steps and click on ‘Turn on workflow’
25. Edit the name of the workflow if required
26. Go to the Gan.AI platform and click on ‘Save & close’ to save your changes

#### How to send video copies to HubSpot from Gan.AI?

{% embed url="<https://app.supademo.com/demo/7kGfRVYEXgpibfO0YgeOl>" %}

**Note: We recommend not changing the name or deleting the four properties in the export settings and leaving them as is**

1. The export properties will be automatically created in HubSpot once you save these changes
2. To find these properties in HubSpot, use the internal names mentioned below in HubSpot
3. To add new properties, click on “New property” and select the relevant Gan.AI property from the dropdown
4. The HubSpot name will be automatically created
5. Click ‘Save & Close’ to save your changes

With Gan.AI and HubSpot working together, you can automate your entire personalization process—from importing contact data to sending video results back into your CRM. This integration makes it easier than ever to run targeted campaigns, streamline follow-ups, and maintain clean, accurate data without manual coordination.


# Klaviyo

Integrate Klaviyo with Gan.AI to map contact fields, create personalized videos at scale, and export video URLs directly to Klaviyo properties.

#### How to import data from Klaviyo to generate video copies in Gan.AI?

{% embed url="<https://app.supademo.com/demo/cm1q0p7nz1c6pe4ytmp0aegn3>" %}

1. Select the personalised project you want to integrate with Klayvio
2. Go to Project settings -> Integrations -> Klayvio
3. Turn on the integration button, next to ‘Import data from Klaviyo’ in your project settings
4. Under ‘Klaviyo contact lists’, select the lists from which you want to import your contact details. You can add multiple contact lists to import your data
5. For each Gan.AI variable, select the relevant contact fields from Klaviyo for mapping
6. Once every variable is mapped, click on ‘Save & close’ to save your settings

#### &#xD; How to send video copies to Klaviyo from Gan.AI?

{% embed url="<https://app.supademo.com/demo/cm1q2as0s1c8ee4yteifl8r3k>" %}

1. Select the personalised project you want to integrate with Klayvio
2. Go to Project settings -> Integrations -> Klayvio
3. Turn on the integration button, next to ‘Export data from Klaviyo’ in your project settings
4. Under ‘Property mapping’, select the Gan.AI properties that you want to export to Klaviyo
5. We recommend mapping the following four properties:

* perma\_link
* video\_url
* smart\_url
* thumbnail\_url

6. These properties will automatically be created in Klaviyo under your contact's details, with names corresponding to the Gan.AI properties
7. Once all the needed properties are mapped, click on ‘Save & close’ to save your settings

With Klaviyo connected to Gan.AI, your contact data flows in automatically, and video links flow out just as easily. This integration makes it effortless to run personalized video campaigns, enrich customer profiles, and enhance your email marketing performance with engaging, one-to-one content.


# Zoho

Integrate Zoho CRM with GAN.AI via Zapier to trigger personalized video creation from lead updates and send video URLs back to Zoho automatically.

#### How to Connect Zoho CRM With GAN.AI Using Zapier

**STEP 1 — Create a Zap**

1. Go to Zapier.com
2. Click Create Zap

**STEP 2 — Choose Zoho CRM as the Trigger**

1. Search for Zoho CRM
2. Select a trigger like:

* New Lead
* New Contact
* Updated Lead
* Deal Stage Change

3. Connect your Zoho CRM account
4. Pull a sample record to use for mapping

**STEP 3 — Add GAN.AI as the Action App**

1. Search for GAN.AI
2. Select Generate Personalized Video
3. Choose your GAN.AI personalized project
4. Map Zoho CRM fields to personalization variables:

* Example Mapping

| Zoho CRM Field |   GAN.AI Variable   |
| :------------: | :-----------------: |
|    Lead Name   |       {{name}}      |
|  Company&#xD;  |     {{company}}     |
|   Email&#xD;   |      {{email}}      |
|      Phone     |      {{phone}}      |
|  Custom Field  | {{custom\_message}} |

5. Test the GAN.AI step → It should generate a sample personalized video

**STEP 4 — Turn On Your Zap**

* Your integration is now live.

**Every time a lead updates in Zoho CRM → GAN.AI instantly generates a personalized video.**

#### Send GAN.AI Videos Back Into Zoho CRM Using Zapier

**What This Workflow Does**

After GAN.AI creates a personalized video:

* Zapier updates the matching Zoho CRM Lead/Contact
* Adds the video link to a custom Zoho CRM field

**Before You Start**

**Create a custom field in Zoho CRM:**

* Field Name: Personalized Video Link
* Field Type: URL or Text

**STEP-BY-STEP SETUP**

**STEP 1 — Create a New Zap**

* Go to Zapier → Create Zap

**STEP 2 — Choose GAN.AI as the Trigger**

1. Search GAN.AI
2. Trigger: Video Generated
3. Connect your GAN.AI account
4. Pull a sample video (contains video URL + variables)

**STEP 3 — Add Zoho CRM as the Action App**

1. Search Zoho CRM
2. Select:

* Update Lead (if you are modifying leads)
* or Update Contact

**STEP 4 — Match GAN.AI Output to Zoho Fields**

* To update the RIGHT Zoho record, map:

| GAN.AI Value |             Zoho CRM Field             |
| :----------: | :------------------------------------: |
|     Email    |           Lead Email (Lookup)          |
|   Video URL  | Personalized Video Link (Custom Field) |

**STEP 5 — Complete the Zap**

* Click Turn On Zap
* Done

**Zoho CRM will now automatically receive the personalized video link for every generated video.**

With Zoho CRM and Gan.AI connected through Zapier, your personalization workflow becomes fully automated end-to-end. New leads trigger instant video creation, and completed video links flow right back into Zoho—ensuring your team always has the right content at the right time. This seamless loop reduces manual effort and helps you deliver timely, personalized outreach at scale.


# Outreach

Connect Outreach to Gan.AI to auto-generate personalized videos when prospects are created, updated, or added to sequences, and export video links back to Outreach.

#### Linking your Outreach account to Gan.AI

1. Log in to the Gan.AI account
2. Click on the "User Settings" tab on the left navigation bar. Then go to User Settings --> Integrations
3. Select Outreach from the list below
4. Click on 'Connect to Outreach' and follow the steps to link your Outreach account to Gan.AI

#### &#xD;To generate video copies on Gan.AI while adding or updating a prospect on Outreach, follow the steps below -

{% embed url="<https://app.supademo.com/demo/clw4npylc2690kzemm4awrekp>" %}

1. Log in to the Gan.AI account
2. Select the project for which Outreach needs to be set up
3. Click on 'Project settings'
4. Go to 'Integrations'
5. Click on 'Outreach'
6. Make sure to turn on the Import data settings in the project
7. Select Trigger Events from below for which the videos would be generated. Currently, we support three scenarios for creating new video copies -

* A new prospect is created in the Outreach account
* An existing prospect is updated in the Outreach account
* A prospect is added to a sequence in the Outreach account

8. For each Gan.AI project variable, select relevant input fields from Outreach to complete the mapping
9. Optionally, the tag created in Outreach can also be added to the Trigger Tag field. If Trigger Tag is set, the videos will only be created when a prospect in Outreach is tagged with the Trigger Tag in Gan.AI
10. Click ‘Save & Close’ to save the changes

#### How to send video copies to Outreach from Gan.AI?

{% embed url="<https://app.supademo.com/demo/clw4nxbcw26gikzemacntnxtk>" %}

1. Log in to the Gan.AI account
2. Select the project for which Outreach needs to be set up
3. Click on 'Project settings'
4. Go to 'Integrations'
5. Click on 'Outreach'
6. Make sure that the Import data settings are turned on for the project
7. Turn on the export data settings
8. Map the Gan.AI fields to the custom fields in Outreach. Ensure that the fields selected are empty in a prospect's details. Selecting filled fields will override existing information
9. For each Gan.AI project variable that appears below, select relevant input fields from Outreach to complete the mapping
10. To add new fields, click on “New fields” and select the relevant one from the dropdown, and map it to the relevant custom field in Outreach
11. Additionally, you can delete the Gan properties that you don't want to send to Outreach
12. Click 'Save & Close' to save the changes

Connecting Outreach to Gan.AI allows your personalized video workflows to run automatically in the background. Once set up, new prospects and key updates trigger instant video creation, while completed videos flow directly back into Outreach. It’s an effortless way to enrich your sequences with high-impact, personalized content.


# Apollo

Integrate Gan.AI with Apollo to send personalized video data programmatically by mapping API keys and custom contact fields for seamless delivery.

#### How to connect Gan.AI with your Apollo account?

**Note: These steps can only be performed through an admin account.**

1. Go to Apollo & log in to your account.
2. Go to ‘Settings’.
3. Click on ‘Integrations’ & look for ‘API’.
4. Click on ‘Connect’ Under ‘API Management’, click on ‘API Keys’.
5. Copy the ‘Master Key’ if it has already been created.
6. If there’s no ‘Master Key’, click on ‘Create new key’.
7. Now name your key & set it as the master key.
8. Click on ‘Create API key’.
9. Copy the newly created master key & go to the Gan.AI platform.
10. Paste the API Key and click ‘Connect to Apollo’

#### How to send video copies to Apollo from Gan.AI?

**Note: These steps can only be performed through an admin account.**

1. Log in to your Apollo account. In the left menu, click on ‘Settings’.
2. Under ‘Objects’, click on ‘Contacts’.
3. Select ‘Custom Fields’ & click on ‘New field’.
4. Enter the name of the field that you want to map to Gan.AI fields. For example: ‘video\_url’, ‘smart\_url’, etc.&#x20;
5. Select the ‘Text type’ as ‘Multiline text’.
6. Enter ‘Max text length’ as 48 or more.
7. Click on ‘Save’ to save the custom field.
8. Select the personalised project you want to integrate with Apollo.
9. Go to Project settings -> Integrations -> Apollo.
10. Turn on the integration button, next to ‘Export video copies to Apollo.
11. Now go to the Gan.AI platform to map these custom fields to Gan.AI fields below.
12. We recommend mapping the four properties :

* Perma\_link
* Video\_url
* smart\_url
* thumbnail\_url to the relevant custom field in Apollo.&#x20;

13. To add new fields in Gan.AI, click on ‘New field’ and select the relevant one from the dropdown
14. Once all the necessary fields are mapped, click on ‘Save & close’ to save your settings.

Connecting Apollo with Gan.AI makes it easy to automate video delivery directly into your contacts’ profiles. After the setup, personalized video links update automatically, giving your team fast access to relevant, high-impact content without manual coordination. It’s a simple way to make your outreach more personalized and more efficient.


# Follow Up Boss

Set up Follow Up Boss and Gan.AI to automate personalized video creation, map CRM fields, use trigger tags, and sync generated video links to lead profiles.

#### Linking your Follow Up Boss account to Gan.AI

{% embed url="<https://app.supademo.com/demo/clvxt1sz417adkzem7d2mbdpo>" %}

**The following steps should only be performed by the account admin of the Follow Up Boss account:**

1. Go to <https://www.followupboss.com/> and log in to the account
2. Go to the ‘Admin’ tab at the top. In the Admin tab, scroll down to ‘Integrations’.
3. Within Integrations - select ‘API Keys & Lead Email’
4. Create a new API Key on this page, with a name relevant to Gan.AI Integration, eg, ‘Gan.ai integration key’
5. Copy the newly created API Key (Note - Only the API key created by the account admin can be used to link FUB with Gan.AI)

**Steps in Gan.AI:**

1. Log in to the Gan.AI account
2. Click on the "User Settings" tab on the left navigation bar. Then go to User Settings --> Integrations
3. Select Follow Up Boss from the list
4. Paste the FUB API Key in Gan.AI and click ‘Connect to Follow Up Boss’ <br>

#### How to import data from Follow Up Boss to create video copies in Gan.AI?

{% embed url="<https://app.supademo.com/demo/clw0b2sw41jjtkzemlcm4o1p5>" %}

**To generate video copies on Gan.AI when you add or update a person (lead) on FUB, follow the steps below -**

1. Log in to the Gan.AI account
2. Select the project for which FUB needs to be set up
3. Click on 'Project settings'
4. Go to 'Integrations'
5. Click on 'Follow Up Boss'
6. Select Trigger Events from below for which the videos would be generated. Currently, we support two scenarios for creating new video copies.

* A new person (lead) is created in the FUB account
* An existing person (lead) is updated in the FUB account

7. For each Gan.AI project variable, select relevant input variables from the follow-up boss to complete the mapping
8. Custom fields can also be created on FUB for mapping those to Gan.AI variables
9. Optionally, the tag created in FUB can also be added to the Trigger Tag field. If Trigger Tag is set, the videos will only be created when a prospect in FUB is tagged with the Trigger Tag in Gan.AI
10. Click ‘Save & Close’ to save the changes

**Note: A video will be created for a person only once to avoid duplicate copies of the same video. So, if a video was created for the person when they were added, it won't be generated again if there are updates on the person in FUB**

#### &#xD; How to send video copies to Follow Up Boss from Gan.AI?

{% embed url="<https://app.supademo.com/demo/clw0ccc921k77kzemfjav4ve2>" %}

**Note: We recommend not changing the name/deleting the Gan.AI properties and leaving them as. is**

1. Log in to the Gan.AI account
2. Select the project for which FUB needs to be set up
3. Click on 'Project settings'
4. Go to 'Integrations'
5. Click on 'Follow Up Boss'
6. Turn on the export settings in FUB
7. The Gan.AI fields will be automatically created in FUB as custom fields once you save the changes
8. To add new fields, click on 'New fields' and select the relevant one from the dropdown
9. The FUB custom field will be automatically created
10. You can also create a trigger tag, which will automatically be created in FUB against people (leads) for whom the video generation was successful
11. Click ‘Save & Close’ to save the changes

With Gan.AI and Follow Up Boss connected, personalized videos are generated and synced automatically whenever new leads are added or updated. Custom fields and tags are created for you, making it easy to track each video directly inside FUB. It’s a smooth, hands-off way to add high-impact personalization to your real estate workflows.


# HighLevel

Easily connect Gan.AI to HighLevel to trigger video creation from new leads, map fields, and send video URLs back to HighLevel through automated workflows.

#### How to import your Highlevel CRM data to create video copies in Gan.AI?

#### &#xD;

{% embed url="<https://app.supademo.com/demo/cm1659fl20c6kme0p1e86ho95>" %}

1. Select the personalised project you want to integrate with Highlevel
2. Go to Project settings -> Integrations -> Highlevel
3. Turn on the integration button, next to ‘Import data from Highlevel’, in your project settings
4. Log in to your Highlevel account
5. Go to the sub account you want to connect with Gan.AI In the left panel, click on ‘Automation’
6. Under ‘Workflows’, click on ‘Create workflow’ & select ‘Start from scratch’
7. Click on ‘Add new trigger’ & select ‘Contact created’ & click on ‘Save Trigger’
8. Click on the ‘+’ button & search for ‘Custom Webhook’
9. Under ‘Event’, select ‘CUSTOM’ as the event
10. Under ‘Method’ select ‘POST’ as the event
11. Go to the Gan.AI platform and copy the ‘Webhook URL’ from below & paste it in the ‘URL’ input on Highlevel
12. Select the ‘Authorization’ field in Highlevel as ‘None’
13. Now under ‘Headers’, click on ‘Add an item’ & copy the value of ‘Key 1’ from the Gan.AI platform below & paste it in the ‘Key’ input on Highlevel
14. Copy the corresponding ‘Value 1’ from the Gan.AI platform below & paste it in the ‘Value’ input on Highlevel
15. Now under ‘Content type’, select ‘application/json’ in the dropdown
16. Go to the Gan.AI platform and click on ‘Copy content’ under ‘Body’
17. Now paste the copied content under ‘Raw body’ in Highlevel
18. Now, in the content, click in front of ‘unique\_id’ and type ‘contact.id’
19. In the dropdown menu, select ‘{{contact.id}}’
20. Map the respective project variables to the corresponding fields in Highlevel
21. Once all the variables are mapped, click on ‘Save action’ & save your workflow
22. On the top right corner, turn the switch to ‘Publish’ & click on ‘Save’ to enable the import workflow for your project
23. On the Gan.AI platform, click on ‘Save & close’ to save your settings <br>

#### How to send video copies to Highlevel from Gan.AI?

{% embed url="<https://app.supademo.com/demo/cm1797bwn0x2ime0p25opt9w5>" %}

1. Select the personalised project you want to integrate with Highlevel
2. Go to Project settings -> Integrations -> Highlevel
3. Turn on the integration button, next to ‘Export data to Highlevel’, in your project settings
4. Log in to your Highlevel account
5. Go to the sub account you want to connect with Gan.AI
6. In the left panel, click on ‘Automation’
7. Under ‘Workflows’, click on ‘Create workflow’ & select ‘Start from scratch’
8. Click on ‘Add new trigger’ & select ‘Inbound Webhook’
9. Copy the URL from the Highlevel platform & paste it in the Gan.AI platform under ‘ Webhook URL’
10. Click on ‘Verify’
11. Once the URL is successfully verified, go to the Highlevel platform & click on ‘Mapping reference’
12. Click on the most recent request & check if you’re getting the correct data
13. Once you verify that the data is correct and mapped properly, click on ‘Save trigger’
14. Click on the ‘+’ button & look for ‘Find Contact’ action
15. Under ‘Fields’, click on ‘Add field’ & select ‘Contact ID’

**Note: If you are not able to find the ‘Contact ID’, copy the text from the Gan.AI platform and paste it in the search bar in the dropdown**

16. Now go to ‘Inbound webhook trigger’ -> ‘QueryParams’ -> & select ‘Unique\_id’
17. Click on ‘Save action’
18. Now click on ‘+’ & look for ‘Update contact field’ action
19. Under ‘Fields’, click on ‘Add field’ & select the fields that you want to update for the client & map them with the respective values
20. Once all the fields are mapped, click on ‘Save action’
21. On the top right corner, turn the switch to ‘Publish’ & click on ‘Save’ to enable the export workflow for your project
22. On the Gan.AI platform, click on ‘Save & close’ to save your settings

Connecting HighLevel to Gan.AI creates a fully automated personalization loop—workflows trigger new video copies, and updated links flow straight back into your CRM. It’s a simple, powerful way to enhance your funnels with scalable, personalized videos.


# Keap

Easily link Gan.AI to Keap to import lead data, generate personalized videos, and push video details into Keap automations using mapped custom fields.

### How to connect your Keap account with Gan.AI? <a href="#how-to-connect-your-keap-account-with-gan.ai" id="how-to-connect-your-keap-account-with-gan.ai"></a>

{% embed url="<https://app.supademo.com/demo/cm1oucfvj0xb8e4ytud0fkvqt>" %}

1. Log in to the Gan.AI account&#x20;
2. Click on the "User Settings" tab on the left navigation bar. Then go to User Settings --> Integrations
3. Select Follow Up Boss from the list
4. Log in to your Keap account&#x20;
5. Click on your profile in the bottom left corner & select ‘Settings’&#x20;
6. Scroll down & go to ‘API’ & click on ‘Personal access tokens’&#x20;
7. Click on ‘New token’&#x20;
8. Under ‘Name’, name your API key as ‘gan\_api\_key’&#x20;
9. Click on ‘Generate’ & copy the newly generated API key&#x20;
10. Go to the Gan.AI platform and paste the API key below&#x20;
11. Click on ‘Connect to Keap’ to connect your Gan.AI account with Keap

#### How to import your Keap data to generate video copies in Gan.AI?

{% embed url="<https://app.supademo.com/demo/cm1owjm7y0y73e4ytnod1i42i>" %}

1. Select the personalised project you want to integrate with Keap&#x20;
2. Go to Project settings -> Integrations -> Keap&#x20;
3. Turn on the integration button, next to ‘Import data from Keap’ in your project settings&#x20;
4. Select at least one trigger event from below for which you would like to trigger data import from Keap.
5. Currently, we support two scenarios for creating new video copies-

* A new lead is created in Keap&#x20;
* An existing lead is updated in Keap&#x20;

**You can also select both scenarios**

6. For each Gan.AI variable, select relevant contact fields from Keap to complete the mapping&#x20;
7. Once all the variables are mapped, click on ‘Save & Close’ to save your changes.

#### How to send video copies to Keap from Gan.AI?

1. Select the personalised project you want to integrate with Keap&#x20;
2. Go to Project settings -> Integrations -> Keap&#x20;
3. Turn on the integration button, next to ‘Export video copies to Keap’, in your project settings&#x20;
4. Now log in to your Keap account. In the left menu, select ‘Contacts’ and then under ‘Related shortcuts’, click on ‘Custom fields’&#x20;
5. Now, under ‘Custom contact fields’, click on ‘New custom contact field’&#x20;
6. Name your custom field according to what you want to map to Gan.AI properties&#x20;
7. **Note:** We recommend naming the fields as: &#x20;

* gan\_video\_url &#x20;
* gan\_smart\_url &#x20;
* gan\_permalink &#x20;
* gan\_thumbnail\_url 

These fields will need to be mapped to the corresponding Gan.AI properties. While these are the recommended names, you are free to map other properties according to your needs.&#x20;

8. Once you’ve created all the required custom fields in Keap, go to the Gan.AI platform&#x20;
9. Map the below-mentioned Gan.AI properties to the custom fields created in Keap.&#x20;
10. Note: Ensure that the Gan.AI properties are mapped to the custom fields in Keap to avoid overwriting any existing data
11. To add new fields, click on “New fields” and select the relevant one from the dropdown, and map it to the relevant custom field in Keap&#x20;
12. Additionally, you can delete the Gan properties that you don’t want to send to Keap
13. Click ‘Save & Close’ to save your changes

With your Keap integration fully connected, Gan.AI can now automate both the creation and delivery of personalized videos directly inside your CRM. Every new or updated lead can trigger a custom video, and your mapped fields ensure that each video link is stored exactly where your team needs it. This seamless workflow enhances follow-ups, nurtures contacts more effectively, and keeps your data organized without any manual effort.


# SalesForce

Automate personalized video creation by connecting Salesforce to Gan.AI through Zapier, and send video links back to Salesforce using custom fields.

#### Connect Salesforce → GAN.AI (Generate Personalized Videos)

**STEP 1 — Create a Zap**

1. Open <https://zapier.com>
2. Click Create Zap

**STEP 2 — Choose Salesforce as the Trigger**

1. Search for Salesforce
2. Select a trigger, such as:

* New Lead
* New Contact
* Updated Record
* New Opportunity
* Stage Change

3. Connect your Salesforce account
4. Pull sample data

**STEP 3 — Add GAN.AI as the Action App**

1. Choose GAN.AI
2. Select action: Generate Personalized Video
3. Choose your personalized video project

**STEP 4 — Map Salesforce Fields to GAN.AI Variables**

Example mapping:

| Salesforce Field |   GAN.AI Variable   |
| :--------------: | :-----------------: |
|    First Name    |       {{name}}      |
|      Company     |     {{company}}     |
|       Email      |      {{email}}      |
|   Account Owner  |    {{rep\_name}}    |
|    Lead Status   |      {{status}}     |
|   Custom Field   | {{custom\_message}} |

4. Test the step to confirm GAN.AI is generating correctly
5. Turn the Zap ON

**Result:**

Every time a Salesforce record is created or updated → GAN.AI instantly generates a personalized video.

#### Send GAN.AI Video Copies Back to Salesforce Using Zapier

**PREPARATION**

* Create a custom field in Salesforce:
* Field Name: Personalized Video Link
* Type: URL or Text

**(Add this field to the Lead/Contact layout so reps can see it.)**

**STEP 1 — Create a New Zap**

1. Go to Zapier
2. Click Create Zap

**STEP 2 — Choose GAN.AI as the Trigger**

1. Search GAN.AI
2. Choose Video Generated
3. Connect your GAN.AI account
4. Pull a sample to get:

* Video URL
* Email / variable data

**STEP 3 — Use Salesforce as the Action**

1. Search Salesforce
2. Choose Update Record OR Find & Update Record
3. Select object type:

* Lead
* Contact
* Opportunity
* Account

**STEP 4 — Map GAN.AI Data Back to Salesforce**

| GAN.AI Value |            Salesforce Field            |
| :----------: | :------------------------------------: |
|     Email    |           Lead/Contact Email           |
|   Video URL  | Personalized Video Link (Custom Field) |

**Tip: Use "Find Record by Email" to ensure the correct record is updated.**

**STEP 5 — Turn Your Zap ON**

* Salesforce will now receive video links automatically.

By connecting Gan.AI with Salesforce, you create a seamless automation loop—Salesforce triggers personalized video creation, and Gan.AI delivers the links back into your CRM instantly. This powerful workflow helps your team scale personalization, improve response rates, and enhance every touchpoint with minimal effort.

<br>


# Google Sheets

Connect Google Sheets to Gan.AI through Make to import prospect data, generate personalized videos, and send video results back into Sheets automatically.

#### How to import data from your Google Sheets through Make to create video copies in Gan.AI?

1. Log in to your Gan.AI account, select the required personalised project
2. Go to Project settings -> Integrations -> Make and turn on the integration&#x20;
3. Log in to your Make account and click on 'Create a new scenario'
4. Name your scenario based on the automation you are looking to create
5. Setting up the trigger

* Search for Google Sheets&#x20;
* Choose the event that would trigger the scenario
* Connect your Gmail account to Make
* Under Search method, select 'Search from all'
* For 'Google Sheets', copy the spreadsheet ID from the like (as shown) and paste it in the Make platform

<figure><img src="/files/8RqbwfMXOQ5rhT7Kqrhl" alt=""><figcaption></figcaption></figure>

* Select the sheet that you want to import the data from under the 'Sheet name' dropdown
* Select the range of rows that contains the prospects' data that you want to import
* Click on 'Ok' to save your data

6. Setting up the action

* Click on 'Add another module'
* Select 'HTTP' in the dropdown
* Under action, select 'Make a request'
* Under 'URL',  paste the following link: <https://api.gan.ai/create\\_video/bulk?project\\_id=>
* Copy your 'Project ID' and paste it in the URL input

<figure><img src="/files/dtj7wHqw1wAb9NnZP8xk" alt=""><figcaption></figcaption></figure>

* Under the 'Method' dropdown, select the method as 'POST'
* Click on 'Add a header' and under 'Name', write 'Authorization'
* Under 'Value', write 'Bearer' and after a space, copy the Access token and paste it in the input box
* Set the Body type as Raw
* Set the Content type as JSON
* In the 'Request Content' input box, enter this:\
  `[`\
  `{`\
  `"Variable 1" : ""`\
  `"Variable 2" : ""`\
  `"Variable 3" : ""`\
  `}`\
  `]`

**Here, instead of 'Variable 1', add the names of all the project variables and map them to the corresponding values in your Sheet**

<figure><img src="/files/b9ZJuph2uVJrr9COkTs7" alt=""><figcaption></figcaption></figure>

* Click on 'Run once' to check if the scenario is working
* Once it's successful, click on 'Save'

#### How to export video copies from Gan.AI to your Google Sheets through Make?

1. Log in to your Gan.AI account, select the required personalised project
2. Go to Project settings -> Integrations -> Make and turn on the integration&#x20;
3. Log in to your Make account and click on 'Create a new scenario'
4. Name your scenario based on the automation you are looking to create
5. In the Apps section, search for 'Webhooks' and select 'Custom webhooks'
6. Name your webhook and click on 'Save'
7. Click on 'Copy address to clipboard' and paste it in the Gan.AI platform in the webhook URL input
8. Once it shows "Successfully determined" on the Make platform, click on 'Ok'
9. Click on 'Add another module' and search for Google Sheets
10. Choose the action you want to happen in your Google Sheets
11. Now copy the Spreadsheet ID, and paste it in the Input box
12. Now select the sheet and map the values that you want to send to the columns in the spreadsheet

<figure><img src="/files/LlI4qGOQ2BKghA5zmTO3" alt=""><figcaption></figcaption></figure>

1. Now click on 'Ok' to save these values.
2. In the Gan.AI platform, click on 'Save & close' to save the project's settings.

Integrating Google Sheets with Gan.AI creates a smooth automation loop—your sheet sends data for video creation, and Gan.AI sends the personalized video links right back. It’s fast, scalable, and perfect for managing high-volume personalization without manual work.


# Mailchimp

Integrate Mailchimp with Gan.AI to send personalized video emails using Mandrill API keys and map Gan.AI video links to Mailchimp merge tags.

#### &#xD;How to connect Gan.AI with your Mailchimp account?

1. Log in to your Mailchimp account
2. Click on your profile at the top right corner & go to ‘Profile’
3. Click on ‘Extras’ & select ‘API keys’
4. Under ‘Your API keys’, click on ‘Create a Mandrill API Key’
5. **Note: This is a paid feature**
6. In your Mandril app account, under ‘API keys’, click on ‘New API key’
7. Now enter the API key name as ‘gan\_api’ & click on ‘Create API key’
8. Once your API key appears, click on ‘Copy To Clipboard’
9. Now go to the Gan.AI platform & paste it below under ‘Mailchimp secret key’
10. Enter the email associated with your Mailchimp account in the 'Sender Email' field
11. Enter the name you want to display in the 'Sender Name' field
12. Click on ‘Connect to Mailchimp’ below to connect your Gan.AI account to Mailchimp

#### How to send video copies to Mailchimp from Gan.AI?&#xD;

1. Log in to your Mailchimp account
2. In the left panel, under ‘Content’, navigate to ‘Email templates’
3. Select the template you want to configure with your project
4. Note: Ensure you select templates with merge tags for personalization. If no merge tags have been created, follow these steps (or skip to step 5 if done):

* Edit an existing template or create a new one
* In your template content, click where you want to place the merge tag
* Type ‘\*|’ and enter the name of your merge tag
* Add multiple merge tags as needed throughout your template
* Click ‘Save and exit’ once all tags are added

5. Click the ‘ V’ button on the templates you wish to configure with Gan.AI
6. In the dropdown menu, select ‘Send to Mandrill’
7. Note: This step is required for every email template you configure with a personalized project in Gan.AI.
8. Select the personalised project you want to integrate with Mailchimp
9. Go to Project settings -> Integrations -> Mailchimp
10. Turn on the integration button, next to ‘Export video copies to Mailchimp'
11. Select the email template under ‘Mailchimp email template’
12. Map the Gan.AI properties to merge tags of your Mailchimp email template
13. We recommend mapping the following four properties:

* perma\_link
* video\_url
* smart\_url
* thumbnail\_url

14. Once all the needed properties are mapped, click on ‘Save & close’ to save your settings

With Mailchimp and Gan.AI fully connected, you can now deliver personalized video experiences directly through your email campaigns. Once your templates are mapped and merge tags aligned, Gan.AI automatically sends individualized video links into Mailchimp, allowing every subscriber to receive a highly relevant, customized message. This integration streamlines your workflow, strengthens engagement, and brings true personalization to your email automation—without adding extra manual steps.


# Mailmodo

Connect Gan.AI with Mailmodo to send personalized video emails via webhook-triggered campaigns by mapping Mailmodo personalization fields to Gan.AI properties.

#### How to connect Gan.AI with your Mailmodo account?

1. Log in to your Mailmodo account
2. Click on your profile at the top right corner & go to ‘Profile’&#x20;
3. Click on ‘Extras’ & select ‘API keys’&#x20;
4. Under ‘Your API keys’, click on ‘Create a Mandrill API Key’&#x20;
5. Note: This is a paid feature&#x20;
6. In your Mandril app account, under ‘API keys’, click on ‘New API key’&#x20;
7. Now enter the API key name as ‘gan\_api’ & click on ‘Create API key’&#x20;
8. Once your API key appears, click on ‘Copy To Clipboard’&#x20;
9. Now go to the Gan.AI platform & paste it below under ‘Mailmodo secret key’&#x20;
10. Enter the email associated with your Mailchimp account in the 'Sender Email' field
11. Enter the name you want to display in the 'Sender Name' field&#x20;
12. Click on ‘Connect to Mailchimp’ below to connect your Gan.AI account to Mailmodo

#### How to send video copies to Mailmodo from Gan.AI?

{% embed url="<https://app.supademo.com/demo/cm1q5lmzk1dbme4yts46ire1m>" %}

1. Select the personalised project you want to integrate with Keap&#x20;
2. Go to Project settings -> Integrations -> Keap&#x20;
3. Turn on the integration button, next to ‘Export video copies to Mailmodo’, in your project settings.&#x20;
4. Log in to your Mailmodo account. In the left menu, click on ‘Campaigns’ and select ‘Trigger’&#x20;
5. Click on ‘Create trigger campaign’ & select the email template you want to create the campaign for&#x20;
6. Click on ‘Next’ & under ‘Add Details’, enter relevant details in all the fields
7. Once the fields are filled, click on ‘Next’. Under triggers, select ‘Webhook’ and click on ‘Next’
8. Review your campaign details & click on ‘Enable campaign’
9. Once the Campaign is enabled, click on ‘Show setup steps’ on the campaign’s page
10. Copy the ‘Webhook URL’ & paste it in the Gan.AI platform
11. Go back to your Mailmodo account & click on ‘Summary’ in the campaign page
12. Under ‘Campaign details’, click on ‘View all’ next to the ‘Personalization’ field
13. Copy each personalization, and map it to the corresponding Gan.AI property in the project’s settings in your Gan.AI account
14. Once all the properties are mapped, click on ‘Send test email’ to check if the campaign is working successfully
15. Enter the ‘Receiver’s email’ & dummy values against each property & click on ‘Send’
16. Now check your inbox for the successful verification of email delivery
17. Once the delivery is successful, click on ‘Save & close’ to save your settings

Integrating Gan.AI with Mailmodo creates a smooth automation loop—Gan.AI generates personalized video links, and Mailmodo instantly delivers them through your trigger campaigns. It’s a fast, scalable way to enhance email performance with one-to-one personalization at every touchpoint.


# Twilio

Integrate Gan.AI with Twilio to deliver personalized video links via SMS. Add variables, map URLs, and send automated messages using your Twilio number.

#### How to connect Gan.AI with your Twilio account?

{% embed url="<https://app.supademo.com/demo/cm1sq45cl0uk8spgc9xe49ac4>" %}

1. Log in to your Gan.AI account
2. Click on the 'Integrations' & select 'Twilio'
3. Log in to your Twilio account&#x20;
4. Go to your account dashboard&#x20;
5. Under the ‘Account Info’ section, copy the value of ‘Account SID’ & paste the value in your Gan account
6. Copy the value of ‘Auth token’ from your Twilio account & paste the value in the Gan platform
7. Click on ‘Connect to Twilio’ to connect your Gan account to Twilio.

#### How to send video copies to Twilio from Gan.AI?

{% embed url="<https://app.supademo.com/demo/cm1sqc2kn0ul4spgc14nmdzmx>" %}

1. Select the personalised project you want to integrate with Twilio
2. Go to Project settings -> Integrations -> Twilio
3. Turn on the integration button, next to ‘Export video copies to Twilio'
4. Log in to your Twilio account
5. Go to your account dashboard
6. Under the ‘Account Info’ section, copy the ‘Twilio phone number’ through which you want to send your messages
7. Paste the phone number in the Gan platform under ‘Twilio phone number\*’
8. Under ‘SMS delivery country’, search for the region where the Twilio phone number is enabled to send messages (\*this is an optional step)
9. In the Message input box, write the message you want to send through Twilio
10. Use @ to add variables to your message. You can add the following variables to your message:&#x20;

* Voice Variables&#x20;
* Text Variables
* Project URLs (different links associated with a video copy, for example, permalink, thumbnail\_url, video\_url, etc.)&#x20;

11. We recommend adding these values:&#x20;

* perma\_link
* video\_url
* smart\_url&#x20;
* thumbnail\_url&#x20;

12. Once the messages are added, click on ‘Save & close’ to save your settings<br>

**Note:** You can also enable message scheduling through the Twilio messaging service. This is an optional service.

Connecting Gan.AI with Twilio creates a seamless SMS personalization workflow—Gan.AI generates the video, Twilio delivers it instantly. This integration helps you scale mobile engagement with highly targeted, one-to-one video messages.


# Meta

Connect Meta Lead Ads to Gan.AI via Zapier to auto-create personalized videos for every new lead and send them back through Messenger, Instagram, or WhatsApp.

#### Connect Meta Lead Ads → GAN.AI (Generate Personalized Videos Automatically)

**STEP 1 — Create a Zap**

1. Log in to <https://zapier.com>
2. Click Create Zap

**STEP 2 — Choose Meta (Facebook Lead Ads) as the Trigger**

1. Search Facebook Lead Ads
2. Choose trigger:

* New Lead
* or New Form Entry

3. Sign in with your Meta account
4. Choose the Business Page + Lead Form
5. Pull a sample lead

**STEP 3 — Add GAN.AI as the Action**

1. Search GAN.AI
2. Choose Generate Personalized Video
3. Select your personalized video project

**STEP 4 — Map Meta Lead Fields to GAN.AI Variables**

Example mapping:

|  Meta Lead Ads Field | GAN.AI Variable |
| :------------------: | :-------------: |
|       Full Name      |     {{name}}    |
|         Email        |    {{email}}    |
|     Phone Number     |    {{phone}}    |
| Custom Form Question |   {{interest}}  |

**STEP 5 — Turn ON the Zap**

Your Meta → GAN.AI automation is now live.

**Every Facebook/Instagram lead instantly receives a personalized video (or is queued for one).**

**Send GAN.AI Videos Back to Meta**

1. GAN.AI supports sending video links to Meta via:

* Facebook Messenger
* Instagram Messaging (via Meta API)
* WhatsApp (via Interakt/Twilio)
* Custom Ad follow-up workflows

**You do this using Zapier + Meta apps.**

**STEP 1 — Create a New Zap**

* Click Create Zap in Zapier.

**STEP 2 — Choose GAN.AI as the Trigger**

1. Search GAN.AI
2. Select Video Generated
3. Connect your GAN.AI account
4. Pull a sample-generated video

**STEP 3 — Add Facebook Messenger as the Action**

1. Search Facebook Messenger
2. Choose Send Message
3. Connect your Facebook Page

STEP 4 — Map GAN.AI Output to Messenger Message

Example message:

<figure><img src="/files/93wru9vbe5cuQFvqMD1U" alt=""><figcaption></figcaption></figure>

Map:

| GAN.AI Output | Messenger Field |
| :-----------: | :-------------: |
|      Name     |  Recipient Name |
|   Video URL   |   Message Body  |

**STEP 5 — Turn ON the Zap**

* Your Messenger automation is now active.<br>

GAN.AI can be connected to Meta Lead Ads via Zapier to automatically generate personalized videos for new leads. Set up a Zap with Meta Lead Ads as the trigger (New Lead or Form Entry) and GAN.AI as the action to generate videos, mapping lead fields to your video variables. You can also send generated videos back to leads through Facebook Messenger, Instagram Messaging, or WhatsApp using GAN.AI as the trigger and the messaging platform as the action—creating fully automated, personalized follow-ups.


# Slack

Slack connects to GAN.AI via Zapier to trigger personalized videos or get instant video alerts. Set Slack as trigger or GAN.AI → Slack for real-time notifications.

#### Connect Slack → GAN.AI (Trigger Videos From Slack Events)

While Slack is usually used as the notification destination, you can also trigger video creation from Slack using commands or channel activity.

**Step 1 — Create a Zap**

1. Go to Zapier.com
2. Click Create Zap

**Step 2 — Choose Slack as the Trigger**

1. Search Slack
2. Choose a trigger:

* New Message Posted to Channel
* New Mention
* New Reaction Added

3. Connect your Slack workspace
4. Pull sample data

**Step 3 — Add GAN.AI as the Action**

1. Search GAN.AI
2. Choose Generate Personalized Video
3. Select your video personalization project
4. Map Slack message fields to GAN.AI variables:

|   Slack Field   |   GAN.AI Variable   |
| :-------------: | :-----------------: |
|   Message text  |       {{text}}      |
|   Sender name   |       {{name}}      |
| Custom keywords | {{custom\_message}} |

**Step 4 — Turn On Zap**

* GAN.AI will now generate a personalized video whenever the Slack trigger is activated.

**Send GAN.AI Video Notifications Directly Into Slack (Recommended)**

This is the most common integration.

**What This Workflow Does**

Whenever GAN.AI generates a personalized video:

* Zapier sends a notification to Slack
* Includes video link, viewer name, and metadata

Perfect for:

* Sales teams (see when videos are ready)
* Marketing teams (track launches)
* Support teams (notifications for customer responses)

**Step 1 — Create a Zap**

* Go to Zapier → Click Create Zap

**Step 2 — Choose GAN.AI as the Trigger**

1. Search GAN.AI
2. Select Video Generated
3. Connect your GAN.AI account
4. Pull a sample generated video to load fields like:

* Viewer name
* Email
* Personalization fields
* Video URL

**Step 3 — Add Slack as the Action**

1. Search Slack
2. Choose one of the following actions:
3. Send Channel Message
4. Send Direct Message
5. Send Private Channel Message

**Step 4 — Map GAN.AI Video Data to Slack Message**

Example Slack message:

<figure><img src="/files/WkMr17YekoWQdyIKFo4o" alt=""><figcaption></figcaption></figure>

Map fields:

|    GAN.AI Output    | Slack Message Field |
| :-----------------: | :-----------------: |
|      Video URL      |     Message Body    |
|         Name        |     Message Body    |
|        Email        |     Message Body    |
| Personalized Fields |     Message Body    |

&#x20;**Step 5 — Turn On Zap**

* Your Slack workspace will now receive real-time notifications each time GAN.AI generates a personalized video.

GAN.AI can be integrated with Slack to either trigger personalized video creation from Slack activity or send video notifications directly into Slack channels. Using Zapier, you can set Slack events—like new messages, mentions, or reactions—as triggers to generate videos in GAN.AI, or configure GAN.AI as the trigger to automatically post generated video links, viewer names, and metadata into Slack. This integration keeps sales, marketing, and support teams informed in real time, streamlining workflows and enhancing team collaboration around personalized video campaigns.


# Subscription Plans

Explore Gan.AI subscription plans offering AI avatars, credits, personalization tools, and integrations to help you create and scale high-quality AI videos.

You can choose a plan that matches your video creation requirements and scale as your usage grows.

#### Gan.AI: Main Subscription Plans

Gan.AI offers four main subscription plans designed to fit different user needs, from beginners to enterprise-level marketers. Each plan provides a unique combination of features to help create personalized AI videos efficiently and effectively.

#### Free Plan

* 10 AI videos monthly
* Ideal for trying out Gan.AI’s features
* Basic video creation tools

#### Creator ($24/month)

* More video credits than free plan
* Access to additional tool integrations

#### Growth ($199/month)

* Includes voice cloning capabilities
* API access for advanced integrations
* Best suited for serious marketers

#### Studio Enterprise Plan

* Unlimited access to all features
* Personalized support and dedicated account management
* Custom solutions tailored to business needs

***

#### Additional Offer

Get 20% off when you opt for yearly billing

***

#### How to check pricing plans

* Open your browser and visit Gan.ai. On the top menu, click on “**Pricing**”

<figure><img src="/files/TBY06VtWfu64M2j4Folf" alt=""><figcaption></figcaption></figure>

You’ll see the available plans listed with their features, limits, and monthly/annual pricing. Scroll through the page to compare what each plan includes (e.g., AI avatar generator, personalization credits, API access, branding tools).

**You can choose your subscription both yearly and monthly according to your requirement.**

<figure><img src="/files/TD54VTeRYZ5o4uSjuvDL" alt=""><figcaption></figcaption></figure>

<figure><img src="/files/2l2MjAG4HjFoCPw8fwEn" alt=""><figcaption></figcaption></figure>

***

#### 🎬 Gan.AI's Video Magic: Pick Your Perfect Plan

1. **Studio Free Plan**

The Studio Free plan is perfect for beginners who want to explore Gan.AI at no cost. It includes an HD screen and camera recorder, 10 free avatar videos, 100 generative credits, and 10 credits for personalized video copies. You also get access to stock avatars, a video landing page, a Chrome extension, and AI-generated captions and summaries — making it a great entry point for testing basic features.<br>

2. **Creator Plan – $24/month**

The Creator Plan is designed for individuals and small teams looking to build and scale with a personalized AI avatar. It includes one custom avatar or one personalized project, along with unlimited avatar videos, 6,000 generative credits, and 20 monthly personalization credits. In addition to all features available in the Free Plan, the Creator Plan allows you to create personalized video landing pages and add website video overlays, enabling stronger audience engagement. This plan is ideal for content creators and small businesses that produce consistent, branded video content. Please note that if you have already created a custom avatar and later wish to create a personalized project, the existing custom avatar must be deleted first.<br>

3. **Growth Plan – $199/month (Recommended)**

The Growth plan is designed for scaling video creation and personalization. It includes 5 custom avatar slots, unlimited avatar videos, 60,000 generative credits, and 1000 monthly personalization credits. You also get all Creator features plus 15+ integrations (HubSpot, Salesforce, Zapier, Make), API access, and support for a custom domain. This plan is ideal for marketing teams that want high-volume, automated, and personalized video campaigns.

4. **Studio Enterprise – Custom Pricing**

The Studio Enterprise plan is built for large organizations with advanced or high-volume needs. It offers production-grade videos, custom numbers of avatars, custom personalization credits, and unlimited generative credits. It includes everything in the Growth plan, along with smart AI-generated graphics and a dedicated account manager. Designed for enterprises that require scalability, automation, tailored workflows, and premium support.

***

#### Switch It Up: Upgrade or Downgrade Anytime

Upgrading or downgrading your plan means changing your current subscription to a higher or lower plan based on your needs. Upgrading gives you more features, credits, or avatar capacity. Downgrading reduces your plan level to save cost or match lower usage.

Steps to Upgrade or Downgrade your subscription

Open your browser and visit Gan.ai. On the top menu, click on “**Pricing**”.

<figure><img src="/files/VdXqfjRGkA8JnU18yodr" alt=""><figcaption></figcaption></figure>

After selecting a plan that fits your needs, you will need to create an account. Select your preferred plan and click the "**Get Started**" or "**Start Free**" button.

<figure><img src="/files/PFMI29wIVe2nM9RtziEw" alt=""><figcaption></figcaption></figure>

You'll be directed to the signup page. Kindly enter your credentials and create your account.

<figure><img src="/files/2J3dw9cfIlEYbs6nnIgP" alt=""><figcaption></figcaption></figure>

Once logged in, kindly click on the "**Upgrade plan**" option located in the left sidebar menu.

<figure><img src="/files/9NTkfaZ2v9RJSvBKe7D8" alt=""><figcaption></figcaption></figure>

After you click the "**Upgrade plan**" option from the left sidebar, you'll be redirected to the Plan Selection Page, where you can see all available subscription tiers. You can choose an Annual or Monthly plan.

<figure><img src="/files/GSBKiSAqre0jy53vYnRp" alt=""><figcaption></figcaption></figure>

<figure><img src="/files/FelFrgkZTPI9h6x6ERJO" alt=""><figcaption></figcaption></figure>

It shows both your current plan and the plans to which you can upgrade.

<figure><img src="/files/stYQ6AWyzIfYo8NE30uc" alt=""><figcaption></figcaption></figure>

The “**Seat**” is the number of team members who can access your Gan.AI account. One seat = one person. Add more seats to let team members log in and create videos together. Each additional seat increases your monthly cost. For solo users, keep 1 seat. For teams, add more seats for collaboration.

<figure><img src="/files/Ax6sLiMyCXOD9j46aIpP" alt=""><figcaption></figcaption></figure>

<figure><img src="/files/sLCYmqnBa4t3cMv3bvaI" alt=""><figcaption></figcaption></figure>

After clicking on the **Upgrade** option. You'll be redirected to the Payment/Checkout Page.

<figure><img src="/files/akFTnIMLj3qzR3jfldXb" alt=""><figcaption></figcaption></figure>

You can make payment via 3 options - “**Pay with Link**” , “ Filling your card details” & “ Bank”

<figure><img src="/files/ZRL8z0U7wbdGbtSwBNZw" alt=""><figcaption></figcaption></figure>

After filling in your card credentials, click on Subscribe.

<figure><img src="/files/HgQx3c9gV8ivPb3pYzNV" alt=""><figcaption></figcaption></figure>

Once payment gets approved. You will be notified. Click on continue to use your account.

<figure><img src="/files/SCGxYP7eoFpLShhtQaPa" alt=""><figcaption></figcaption></figure>

Downgrading reduces your plan level to save cost or match lower usage. As per the below image, the user is using the **Creator** plan. If the user wishes to downgrade to the Free plan. He needs to select the Downgrade option.

<figure><img src="/files/NEVNqroH6TE8bLwziVU7" alt=""><figcaption></figcaption></figure>

After clicking on the **Downgrade** Button. You will be redirected to the **cancel subscription page**.

<figure><img src="/files/mF8WhzQeLEe54l47OxLG" alt=""><figcaption></figcaption></figure>

Once the plan is cancelled. You will be able to see the current plan (Downgraded Plan)

<figure><img src="/files/4wV7C8FeMkhLOA4MV0CG" alt=""><figcaption></figcaption></figure>

#### Payment History

Your one-stop record for every subscription, receipt, and refund. Track your spend, download invoices, and stay in control—every payment, always at your fingertips!

The Payment History button is located at the top right corner of the pricing page, easy to spot in a blue box. Just click it to view all your past payments and receipts.

<figure><img src="/files/g0zpth0Uhzv0APyyeL13" alt=""><figcaption></figcaption></figure>

<figure><img src="/files/KWKTxiE2jLfTdXNqmDvb" alt=""><figcaption></figcaption></figure>

Gan.AI offers flexible subscription plans tailored to different user needs, from beginners exploring AI video creation to enterprises running high-volume, personalized campaigns. Plans range from the Free plan with basic features and limited video credits to the Creator and Growth plans with advanced personalization, integrations, and generative credits, up to the Studio Enterprise plan with custom solutions and dedicated support. Users can easily upgrade or downgrade their plans, manage team seats, and track payments and invoices directly from the platform, ensuring their subscription always matches their evolving video creation requirements.


# Manage team users/permissions

Manage workspace access with Gan.AI Subusers - assign roles, control project visibility, set invite permissions, and maintain secure, efficient team workflows.

Gan.AI offers a powerful Subuser Management system that allows organizations to operate at scale by giving controlled access to different team members, departments, and operational units. Subusers are essentially workspace members who can be assigned specific roles - User or Admin - to ensure that every person has the right level of access based on their job responsibilities.

This functionality is especially useful for large teams, agencies, or enterprises that handle multiple video projects simultaneously. It helps maintain workflow structure, restricts sensitive workspace configurations to trusted administrators, and ensures that creators, editors, and operators can focus solely on their project-level tasks without affecting broader workspace settings.

This guide explains how Viewer Permissions and Invite Permissions work for both Users and Admins, and how these settings support secure and efficient workspace management.

***

### What Are Subuser Permissions?

Subuser permissions define what each member of your workspace can see and what actions they can perform, depending on their assigned role - User or Admin.

These permissions help you:

* Protect sensitive projects
* Control access to resources
* Prevent unauthorized workspace growth (unplanned seat billing)
* Maintain operational structure
* Ensure that only the right people manage or oversee workspace-wide activities

***

### Available Roles

Before you begin adding members, it is important to understand the two primary roles available:

#### User

Users are standard team members with limited access. They can:

* View and manage only their own projects and videos, unless workspace permissions allow otherwise
* Participate in project creation and editing
* Can not modify workspace settings
* Can not add or remove members (unless permitted under Invite Permissions)<br>

This role is ideal for creators, editors, interns, contractors, or team members who strictly need to work on assigned content.

***

#### Admin

Admins have elevated privileges and broader visibility across the workspace. They can:

* View all projects and videos (if enabled by settings)
* Manage workspace configurations
* Add, remove, or modify member roles
* Oversee permission structures
* Invite new members by default

This role suits team leads, production managers, and operations personnel responsible for workspace governance.

***

#### Workspace Permission Controls (Viewer + Invite Permissions)

<figure><img src="/files/MgmPD5P7iJn9FJ1XFyks" alt=""><figcaption></figcaption></figure>

Inside the workspace settings, you’ll find two primary permission categories:

#### 1. Viewer Permissions

Viewer permissions determine **what subusers can see inside the workspace**.

You can select one of the following modes:

#### **Option A: “Users can only view their own projects & videos”**

(Recommended for privacy, security, and clean workflows)

Under this mode:

**Users:**

* Can only access content **they created or were assigned**
* Cannot view other members’ projects
* Avoid distractions and maintain a focused working environment

**Admins:**

* Still have access to **all projects and videos**
* Can monitor output, ensure quality checks, and manage workflows

This option is best for:

* Agencies working with multiple clients
* Teams with sensitive projects
* Organizations wanting to maintain strict access boundaries

<figure><img src="/files/bF0clUBBr70BRtU6MMBu" alt=""><figcaption></figcaption></figure>

***

#### **Option B: “Everyone can view all projects & videos”**

Under this mode:

**Users:**

* Can see **all workspace content**, regardless of ownership
* Can reference, collaborate, and learn from other team members’ projects

**Admins:**

* Continue to have complete visibility
* Benefit from a more collaborative and open environment

This option is best for:

* Small teams encouraging cross-collaboration
* Internal operations where transparency is key
* Workflows requiring shared visibility

<figure><img src="/files/JK9RQvYJs4RVGfgJTR5W" alt=""><figcaption></figcaption></figure>

***

#### 2. Invite Permissions

Invite permissions determine **who can add new members** to the workspace.

This is important because adding members can automatically increase seat usage and billing.

You can choose one of the following:

***

#### **Option A: “Only owners & admins can invite new members”**

(Recommended to maintain cost control and security)

Under this setting:

**Users:**

* Cannot invite new members
* Cannot increase seat count (protecting the billing structure)

**Admins:**

* Can invite new members at any time
* Remain responsible for workspace population and access governance

Ideal for:

* Larger teams
* Cost-sensitive organizations
* Workspaces requiring strict onboarding oversight

<figure><img src="/files/FVXC07lQHYelNnULLpxt" alt=""><figcaption></figcaption></figure>

***

#### **Option B: “All members can invite new users”**

Under this setting:

**Users:**

* Can directly invite new people into the workspace
* Instantly expand the team without admin involvement

**Admins:**

* Maintain their standard controls
* Receive visibility in the Members & Roles section

**Note:**\
This may lead to **unexpected billing**, since every new member consumes a seat.\
Best used when:

* Teams grow rapidly
* Collaboration requires fast onboarding
* Everyone is trusted with seat usage

<figure><img src="/files/ReN1CHxV6cJJQ08SrSWb" alt=""><figcaption></figcaption></figure>

***

### Managing Members & Assigning Roles

This section explains how workspace managers can add team members to the account and assign or update their roles (Admin or User). The flow is designed to help you manage access control, project visibility, and workspace-level permissions efficiently.

#### Quick summary

* Locate the left navigation panel and scroll to the bottom until you see “My Workspace.”
* Click the small arrow ( > ) next to it to expand workspace options.
* Goto "**My Workspace**" setting as shown in the demo and open "**Members & Roles**".
* Select **Members & Roles** to manage workspace membership and seats.
* Click **Add members** to open the invite modal, enter email ID, choose the role (User or Admin) from the dropdown, then click **Add member** to send invitations.
* Monitor pending invites under **Invitations sent**; seats shown in the header update based on plan and acceptance.
* To change roles after a member joins, use the **Role** dropdown on their row in the **Members** tab - changes apply instantly.
* To remove someone, open the three-dot menu at the end of their row and select **Remove**; this revokes access and frees their seat (billing depends on your plan).

{% embed url="<https://app.supademo.com/demo/cmispoaar2hl4l8219jzr6q6p?utm_source=link>" %}

***

#### Step-by-step instructions

#### Prerequisites

* You must be an **Owner** or an **Admin** with invite permissions enabled in Workspace Settings. If the **Add members** button is hidden or disabled, check the workspace **Invite permissions** setting first.

1. **Open the Member management page**

* From the left navigation, click **My Workspace** → select **Members & Roles**.
* Verify the header shows available seats (e.g., `3 / 11 Seats used`). This helps avoid accidental seat overrun.

2. **Start an invitation**

* Click the **Add members** button (top-right) to open the **Invite others to your workspace** modal.

3. **Enter email addresses**

* Enter the email address of the person you want to invite.
* Use the email they will use to sign into Gan.AI (Google/Microsoft SSO email) to avoid signup mismatches.

4. **Select the role for each invite**

* Next to each email, open the **Role** dropdown (default: **User**).
* Choose **User** for contributors who will create or edit projects but should not manage workspace settings.
* Choose **Admin** for team leads or managers who need workspace-wide access including member management and settings.
* **Role guidance:** Default to **User** for most people; reserve **Admin** for trusted individuals to reduce accidental config changes and limit security scope.

5. **Send invitations**

* Click **Add member** to send the invite.
* Invited users will receive an email with instructions to accept; the invite remains in **Invitations sent** until accepted.

6. **Monitor invites & seat usage**

* Open the **Invitations sent** tab to view pending invitations, assigned roles and emails.
* Watch the `Seats used` indicator - inviting people may reserve seats depending on your billing rules. Plan invites if adding large groups.

7. **Change roles for active members**

* In the **Members** tab, find the user row and click the **Role** dropdown to switch between **User** and **Admin**.
* The change is applied immediately; the member gains or loses privileges accordingly.

8. **Remove a member**

* In the member’s row, click the three-dot menu and select **Remove**.
* Confirm the removal; access is revoked, and the seat becomes available (billing treatment varies by plan).
* If a user must be re-added later, simply invite them again following steps 2–5.

***

Gan.AI’s Subuser Management framework ensures that every workspace stays organized, secure, and aligned with the team’s operational needs. By assigning the right roles, configuring Viewer and Invite permissions, and managing members thoughtfully, organizations can maintain tight control over access while enabling creators and admins to work efficiently. This structure supports smoother collaboration, reduces risk, and keeps your workspace scalable as your team and projects grow.


# Support

Need help? Connect with Gan.ai’s support team for quick assistance, technical guidance, and personalized solutions.

#### How to Contact Support

1. **Live Chat**

* Use the Live Chat feature that is built directly into the Help & Support center available on the Gan.AI dashboard.
* This option is ideal for addressing quick questions, reporting bugs, or troubleshooting technical issues during normal working hours when immediate assistance is required.

2. **Email Support**

* Drop an email to **<Support@gan.ai>**
* Please include relevant context, such as:

a. Your workspace/project name

b. Video / Project ID, if applicable

c. A detailed description of the issue you’re facing

d. Screenshots, error messages, or logs (if available)

With the above details, we will be able to help in a better and faster way.

3. **Help Center / Documentation**

* Visit the Help & Support Center to browse articles, tutorials, and best-practice guides.
* Use the search bar to find articles on setup, personalization, integrations, and more.

#### Common Support Scenarios

Here are some common issues for which users typically reach out, and how to optimize your support request:

| **Scenario**                            | **Best Practices When Contacting Support**                                                        |
| --------------------------------------- | ------------------------------------------------------------------------------------------------- |
| Account / Login Issues                  | Share the email or method you used to sign up (Google/Microsoft), and a screenshot of any errors. |
| Video Not Generating / Processing Error | Include the Project ID, your plan type, and the exact error message or behavior.                  |
| Personalization Variable Not Working    | Mention the variable name, sample CSV/data being used, and any preview results.                   |
| Integration Bugs (CRM, Zapier, etc.)    | Provide details on your workflow, variable mapping, and any failure points.                       |
| Billing & Subscription                  | Share invoice number, subscription tier, and what action you want (upgrade/downgrade/refund).     |

#### Before Contacting Support — Self-Check Tips

To speed up support and potentially resolve issues faster, try these first:

* **Check our Help Center thoroughly** — many helpful articles already extensively cover the initial setup process, best practices to maximize platform usage, and solutions for common problems faced by users.
* **Search the community forums or internal documentation** available within your workspace, if accessible, to find answers and guidance from other users or administrators.
* **Test using a smaller sample for personalization or integrations** — try using a compact test CSV list to validate that variable mapping is working correctly.
* **Restart your browser or app regularly**, as this simple step often resolves unexpected behavior or caching issues that may disrupt your overall experience.

Gan.AI provides multiple ways to get help quickly and efficiently. You can use the built-in Live Chat for immediate assistance, email <support@gan.ai> with detailed project information for more complex issues, or access the Help & Support Center to browse tutorials, guides, and best practices. Before reaching out, checking the Help Center, testing with a small sample, and restarting your browser can often resolve common issues faster.


# Security and compliance

Learn how Gan.ai protects your data. Explore our security practices and compliance standards for safe, reliable AI solutions.

Key pillars of Gan.AI’s security and compliance program include SOC 2 Type II certification, encrypted data transmission, robust access control, and ongoing security monitoring.

#### Infrastructure & Network Security

1. **Cloud Architecture**

* Gan.AI’s system is hosted on major cloud providers, including **AWS, Azure, Vercel, and Render**, depending on region and service.
* Use of **Virtual Private Clouds (VPCs)** with firewalls restricts internal access to only authorized systems.

2. **Encryption & Transport Security**

* All data in transit is encrypted via **HTTPS/TLS**.
* Sensitive data at rest is protected using strong encryption practices.

3. **Access Controls**

* Strict role-based access ensures only authorized team members can access sensitive systems.
* Continuous monitoring of access controls and system health is maintained via a security monitoring tool (e.g., Sprinto).

4. **Vulnerability Management**

* Gan.AI has documented policies and procedures for managing technical vulnerabilities.
* They maintain an incident response plan to handle security events or breaches.

5. **Disaster Recovery**

* Disaster recovery measures are defined to ensure system resilience in case of major outages or incidents.

***

#### Organizational Security & Governance

* **Staff Training:** Employees receive regular security awareness training to keep up with the latest security practices.
* **Information Security Program:** Continuous review and monitoring of the information security program ensures that Gan.AI stays compliant and up to date with best practices.
* **Data Governance:** There are documented policies around data handling, access, and protection.

***

#### Compliance & Certifications

* **SOC 2 Type II Certification:** Gan.AI holds a SOC 2 Type II certification, which validates that they has effective controls in place around security, availability, confidentiality, and data integrity.
* **Privacy Compliance:**

1. Gan.AI’s Privacy Policy outlines how personal data is collected, used, stored, and shared.
2. They operate in compliance with relevant data protection laws (e.g., for processing personal data).

***

#### AI Ethics & Responsible Use

* Gan.AI has an **AI Ethics policy** emphasizing transparency, consent, and respectful use of synthetic content.
* Key commitments include:

1. Gaining **explicit consent** before using someone’s face, voice, or likeness.
2. Clearly disclose when content is AI-generated (synthetic).
3. Ensuring **data privacy** and minimizing misuse of personal data.

***

#### User Data & Privacy

* Gan.AI collects personal data (e.g., name, email, voice samples, video) to operate its services.
* They process user-uploaded content (audio, video, images) and associated metadata for personalization, but do not use it to establish identity or profile users beyond the service requirement.
* They also collect device data, usage data, and browser data to improve service, with respect for user privacy and applicable data protection laws.
* Security measures include both technical and organizational controls to protect personal data against unauthorized access or breaches.

***

#### Incident Response & Breach Handling

* In the event of a data breach, Gan.AI follows its Incident Response Plan to quickly contain and mitigate risks.
* They have documented procedures to notify affected users and regulators as needed, in compliance with laws and contractual obligations.
* Users are encouraged to report suspected security issues via support channels.

***

#### User Responsibilities & Best Practices

To help maintain security and compliance, users of Gan.AI should:

* Use strong, unique passwords and enable two-factor authentication (if available).
* Protect access credentials — do not share your login details.
* Review and sanitize any personal or sensitive data before uploading (especially voice or video samples).
* Stay informed of Gan.AI’s policy updates (security, privacy, terms of service).
* Report any suspicious activity or security concern via Gan.AI’s support channels.

In summary, Gan.AI combines advanced technical safeguards, strict organizational policies, and robust compliance measures to ensure the highest levels of security, privacy, and responsible AI use. By following best practices and remaining vigilant with personal data, users can confidently leverage the platform to create personalized videos while knowing their information is protected and handled ethically.


# FAQs

Find quick answers to common questions about Gan.ai’s features, pricing, and technical support in our FAQs.

<details>

<summary>What languages does Gan.AI support?</summary>

Gan.AI currently supports:

* English in all accents (American, British, and more)
* Hindi

We plan on adding more languages: stay tuned for **Spanish** and others!

</details>

<details>

<summary>Does Gan.AI have API?</summary>

Gan.AI has an API for specific use cases, product workflows, and more.&#x20;

</details>

<details>

<summary>How to avoid spam?</summary>

Properly set up your domain and warm it up before sending personalized videos.

</details>

<details>

<summary>What exactly is a “variable” in personalized videos?</summary>

A variable is a placeholder (like <mark style="color:$success;">@FirstName</mark><mark style="color:$primary;">,</mark> <mark style="color:$success;">@Company</mark>) used in your video script or landing page. During generation, Gan.AI replaces these placeholders with actual values from your data source.

</details>

<details>

<summary>What kind of personalization can I apply in my videos?</summary>

You can personalize:

* Spoken words (via Voice AI / lip-sync)
* Text elements (names, locations, company names)
* Visuals/backgrounds (dynamic backgrounds per viewer)
* Thumbnails with personalized text or images

</details>

<details>

<summary>How does Gan.AI create personalized video copies?</summary>

To create personalized video copies, you either record a new base video or upload an existing one into the Gan.AI platform. After setting or defining your personalization variables, Gan.AI’s advanced artificial intelligence system, combining both voice cloning and precise lip-sync technology, automatically generates numerous customized versions of that same video. Each version is accurately tailored and uniquely delivered to a different intended recipient

</details>

<details>

<summary>Is Gan.AI secure?</summary>

Yes — Gan.AI uses a secure cloud architecture on platforms like AWS, Azure, Vercel, and Render with role-based access control, encryption for data at rest and in transit, and continuous monitoring.

</details>

<details>

<summary>What certifications or compliance standards does Gan.AI meet?</summary>

Gan.AI has achieved SOC 2 Type II certification, demonstrating a firm commitment to essential aspects such as security, availability, confidentiality, and data integrity within its operations and platform. This compliance reassures users about the protection of their data.

</details>

<details>

<summary>How does Gan.AI handle user data (e.g., voice, video)?</summary>

User-provided data (video, audio, images) is stored and processed securely. Gan.AI applies encryption and has policies to safeguard data access.

</details>

<details>

<summary>How does Gan.AI approach ethical AI use?</summary>

Gan.AI’s AI Ethics policy outlines its commitment to transparency, consent, and responsible usage. Key tenets include:

* Getting explicit consent before using someone’s likeness
* Disclosing when content is AI-generated
* Protecting user data and ensuring user privacy

</details>

<details>

<summary>What use cases is Gan.AI best suited for?</summary>

Gan.AI works well for:

* Sales outreach via personalized video
* Customer onboarding or support videos
* Training and internal communication
* Marketing campaigns with personalized video landing pages Gan.AI.

</details>

<details>

<summary>Can I embed the generated video on my own website?</summary>

Yes, Gan.AI gives you options to share video via link, embed code, or landing page — making it easy to host on your own site.

</details>

We hope these FAQs help you quickly find the answers you need. If you ever have additional questions or need clarification, our support team and documentation are always available to guide you. Gan.AI is committed to ensuring a smooth, seamless experience at every step.